• Ciao Guest - You’ve landed at the ultimate Guzzi site. NEW FORUM REGISTRATIONS REQUIRE EMAIL ACTIVATION - CHECK YOUR SPAM FOLDER - Use the CONTACT above if you need help. New to the forum? For all new members, we require ONE post in the Introductions section at the bottom, in order to post in most of the other sections. ALWAYS TRY A SEARCH BEFORE STARTING A NEW TOPIC - Most questions you may have, have likely been already answered. DON'T BE A DRIVE-BY POSTER: As a common courtesy, check back in and reply within 24 hours, or your post will be deleted. Note there's decades of heavily experienced Guzzi professionals on this site, all whom happily give endless amounts of their VALUABLE time for free; BE COURTEOUS AND RESPECTFUL!
  • There is ZERO tolerance on personal attacks and ANY HYPERLINKS to PRODUCT(S) or other competing website(s), including personal pages, social media or other Forums. This ALSO INCLUDES ECU DIAGnostic software, questions and mapping. We work very hard to offer commercially supported products and to keep info relevant here. First offense is a note, second is a warning, third time will get you banned from the site. We don't have the time to chase repeat (and ignorant) offenders. This is NOT a social media platform; It's an ad-free, privately funded website, in small help with user donations. Be sure to see the GTM STORE link above; ALL product purchases help support the site, or you can upgrade your Forum profile or DONATE via the link above.
  • Be sure to see the GTM STORE link also above for our 700+ product inventory, including OEM parts and many of our 100% Made-in-SoCal-USA GTM products and engine kits. In SoCal? Click the SERVICE tab above for the best in service, tires, tuning and installation of our products or custom work, and don't miss our GT MotoCycles® (not) art on the BUILDS tab above. WE'RE HERE ONLINE ONLY - NO PHONE CALLS MADE OR RECEIVED - DO NOT EMAIL AND ASK QUESTIONS OR ASK TO CALL YOU.
  • Like the new V100, GuzziTech is full throttle into the future! We're now running on an all-new server and we've updated our Forum software. The visual differences are obvious, but hopefully you'll notice the super-fast speed. If you notice any glitches or have any issues, please post on the Site Support section at the bottom. If you haven't yet, please upgrade your account which is covered in the Site Support section or via the DONATE tab above, which gives you full site access including the DOWNLOADS section. We really appreciate every $ and your support to keep this site ad-free. Create an account, sign in, upgrade your account, and enjoy. See you on the road in 2024.

2013 V7 Racer exhaust popping noise

Welcome New Rider ksa!

Questions are fine and good. Good answers are better.

The Spark Plug Cap (SPC) threads into the High Tension Lead (HTL - sometimes called the High Tension Cable HTC)) wire core using a brass screw with a conventional clockwise thread. As the wire ages, or if the previous owner pulled on the HTL by the wire instead of the SPC, then the insulation around the wires core may relax allowing the copper core wire to move away from the caps brass screw. This loss of connection translates to your misfires and running issues.

The good news is, its easy to fix!

This is an example of a typical Spark Plug Cap just like yours.
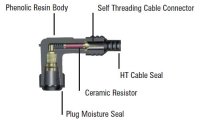

SPC

  • Remove spark plug cap and attached wire from the spark plug. PULL GENTLY AND SMOOTHLY ON THE THE CAP BODY, NOT THE WIRE!!! You can use a zip tip to assist you if necessary.
  • Remove your electrical tape.
  • With the cap free in hand, hold the High Tension Lead (HTL) (yes, the HTL is the wire) and gently rotate the CAP ASSEMBLY CLOCKWISE. The cap may turn about a half turn on the wire and **should become snug and resist turning.** If the cap SPINS ON THE WIRE IT NEEDS REPAIRED!
  • REPAIR THE WIRE: If the cap spins with no resistance to rotation, unscrew it by rotating the CAP counter clockwise while holding the wire. Using a pair of sharp side wire cutting pliers (dikes), cleanly cut off 1/4" (6 mm) from the HTL.
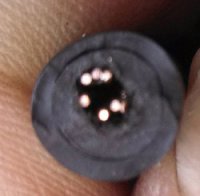
  • Using small pick (a toothpick will work fine here), fan out the copper wire strands into a 360° pattern. Do not bend them repeatedly!

  • Fan
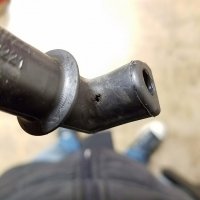
  • While you have the SPC's off, examine them closely and carefully for any breaks in the insulation, as this will be a point where the spark will leave the wire & SPC and jump to the body of the engine instead of the spark plug. This is an example of what to look for.
  • 8V PlugCap Hole
  • Push the SPC smoothly and firmly onto the HTL (wire) and turn it clockwise until its snug. (You are turning the self threading connector into the wire - yes, it's just a little screw)
  • Watch this video from 36 seconds to 1:45 seconds and you will understand.

  • Firmly Seat the SPC onto the plug.
  • Proceed to next SPC, check and repair if necessary.

That should get you back to a better place and cost you nothing. However, if you find a damaged SPC, and you decide not to use the Moto Guzzi OEM factory part, then you will need to replace the SPC on both cylinders as it is very important that they must be identical types with the same electrical characteristics.

Good Luck! Let us know how it goes.
 
Last edited:
T
Welcome New Rider ksa!

Questions are fine and good. Good answers are better.

The Spark Plug Cap (SPC) threads into the High Tension Lead (HTL - sometimes called the High Tension Cable HTC)) wire core using a brass screw with a conventional clockwise thread. As the wire ages, or if the previous owner pulled on the HTL by the wire instead of the SPC, then the insulation around the wires core may relax allowing the copper core wire to move away from the caps brass screw. This loss of connection translates to your misfires and running issues.

The good news is, its easy to fix!

This is an example of a typical Spark Plug Cap just like yours.


View attachment 12318

  • Remove spark plug cap and attached wire from the spark plug. PULL GENTLY AND SMOOTHLY ON THE THE CAP BODY, NOT THE WIRE!!! You can use a zip tip to assist you if necessary.
  • Remove your electrical tape.
  • With the cap free in hand, hold the High Tension Lead (HTL) (yes, the HTL is the wire) and gently rotate the CAP ASSEMBLY CLOCKWISE. The cap may turn about a half turn on the wire and **should become snug and resist turning.** If the cap SPINS ON THE WIRE IT NEEDS REPAIRED!
  • REPAIR THE WIRE: If the cap spins with no resistance to rotation, unscrew it by rotating the CAP counter clockwise while holding the wire. Using a pair of sharp side wire cutting pliers (dikes), cleanly cut off 1/4" (6 mm) from the HTL.
  • Using small pick (a toothpick will work fine here), fan out the copper wire strands into a 360° pattern. Do not bend them repeatedly!

  • View attachment 12319
  • While you have the SPC's off, examine them closely and carefully for any breaks in the insulation, as this will be a point where the spark will leave the wire & SPC and jump to the body of the engine instead of the spark plug. This is an example of what to look for.
  • View attachment 12320
  • Push the SPC smoothly and firmly onto the HTL (wire) and turn it clockwise until its snug. (You are turning the self threading connector into the wire - yes, it's just a little screw)
  • Watch this video from 36 seconds to 1:45 seconds and you will understand.

  • Firmly Seat the SPC onto the plug.
  • Proceed to next SPC, check and repair if necessary.

That should get you back to a better place and cost you nothing. However, if you find a damaged SPC, anbd you decide not to use the Moto Guzzi OEM factory part, then you will need to replace the SPC on both cylinders as it is very important that they must be identical types with the same electrical characteristics.

Good Luck! Let us know how it goes.


Thank you so much for taking the time for the detailed explanation. Makes a lot more sense to a noob like me. Much appreciated.
 
T


Thank you so much for taking the time for the detailed explanation. Makes a lot more sense to a noob like me. Much appreciated.

You are most welcome!

I hate that term "noob" as it is insulting, derogatory and rude. Don't describe yourself as such. You are a new Guzziisti, a new Moto Guzzi rider, and EVERYBODY here was once one as well.

You more than likely do not need new caps. Follow my instructions, and check and repair what you have got. You only need new caps if the existing ones are damaged. Then in that case, follow the previously given excellent advice from Wahoo650.

"You need the XD05F plug cap (from amazon as well) and they fit perfectly. Same spark plugs though. The "B" is for plugs 14mm and larger. The "D" is for 10mm & 12mm plugs. The plugs used here are 10mm."
 
I am a little confused about if it is XB05F or XD05F spark plug boot? If either/or, I was going to place an order for two of these;

https://fortnine.ca/en/ngk-spark-resistor-cover-xb05f
Call NGK. its been explained here twice. XD05F is correct. The pl
You are most welcome!

I hate that term "noob" as it is insulting, derogatory and rude. Don't describe yourself as such. You are a new Guzziisti, a new Moto Guzzi rider, and EVERYBODY here was once one as well.

You more than likely do not need new caps. Follow my instructions, and check and repair what you have got. You only need new caps if the existing ones are damaged. Then in that case, follow the previously given excellent advice from Wahoo650.

"You need the XD05F plug cap (from amazon as well) and they fit perfectly. Same spark plugs though. The "B" is for plugs 14mm and larger. The "D" is for 10mm & 12mm plugs. The plugs used here are 10mm."

https://www.ngk.com/product.aspx?zpid=20072
 
  • Like
Reactions: ksa
You are most welcome!

I hate that term "noob" as it is insulting, derogatory and rude. Don't describe yourself as such. You are a new Guzziisti, a new Moto Guzzi rider, and EVERYBODY here was once one as well.

You more than likely do not need new caps. Follow my instructions, and check and repair what you have got. You only need new caps if the existing ones are damaged. Then in that case, follow the previously given excellent advice from Wahoo650.

"You need the XD05F plug cap (from amazon as well) and they fit perfectly. Same spark plugs though. The "B" is for plugs 14mm and larger. The "D" is for 10mm & 12mm plugs. The plugs used here are 10mm."


Thank you once again. You certainly have a refreshing attitude which is atypical on forums these days. I think I will do what you said. Shall remove the electrical tape and screw the HTC into the boot as it's meant to instead of just being pushed into it. The boot seemed fine to me when I first checked it but there was some grease like material on it. Not sure if it was some leakage from inside or just left by the previous owner when working on it. I had the entire boot wrapped in electrical tape as well upon the directions of the previous owner. It doesn't really bother me if it's wrapped in tape or not as long as it works. But the HTC definitely needs to be screwed in as I had no idea.

From what you said, it appears that when I try to screw it into the boot and it doesn't tighten up, that is also an indication that I need a new boot, so I will be cognizant of that as well.
 
... The boot seemed fine to me when I first checked it but there was some grease like material on it. Not sure if it was some leakage from inside or just left by the previous owner when working on it...

...From what you said, it appears that when I try to screw it into the boot and it doesn't tighten up, that is also an indication that I need a new boot, so I will be cognizant of that as well.

Somebody slatherd vaseline or such on the SPC to try and make it easier to pull the SPC/HTC off of the spark plug easier. This is a mistake. It can caused shorts to the engine block. Clean that stuff off with some paper towels, Q-tips and windex or 409 or whatever kitchen counter cleaner you have around the house. The SPC/HTC should be clean and dry. Never try to remove the SPC/HTC from the spark plug when the engine is hot. Only when it is cool to the touch. Also wipe off the spark plug where the SPC/HTC connects, to the best of your ability.

Now, as to the boot, if you screw it on and it doesn't tighten up in a few rotations, the wire is stretched and needs to have 1/4 to 1/2 inch cut off just like I said in my directions. Then, if after pressing the boot onto the HTC while turning it clockwise it still won't tighten up, then yes, you woukd need a new boot.

Let me know what you do and what happens please.

Also, never mess with the SPC/HTC while the bike is running!"
 
Thanks for the additional tips, I will update the thread when I have had a chance to do it.
 
SWEET Video & explanations!

This might explain why my bike is pulsing sometimes @ idle as well.

I like pictures and too many words sometimes confuse me...English isn't my first language :p

Time to put this onto my "to upgrade list" among other things...:p
 
Back
Top