• Ciao Guest - You’ve landed at the ultimate Guzzi site. NEW FORUM REGISTRATIONS REQUIRE EMAIL ACTIVATION - CHECK YOUR SPAM FOLDER - Use the CONTACT above if you need help. New to the forum? For all new members, we require ONE post in the Introductions section at the bottom, in order to post in most of the other sections. ALWAYS TRY A SEARCH BEFORE STARTING A NEW TOPIC - Most questions you may have, have likely been already answered. DON'T BE A DRIVE-BY POSTER: As a common courtesy, check back in and reply within 24 hours, or your post will be deleted. Note there's decades of heavily experienced Guzzi professionals on this site, all whom happily give endless amounts of their VALUABLE time for free; BE COURTEOUS AND RESPECTFUL!
  • There is ZERO tolerance on personal attacks and ANY HYPERLINKS to PRODUCT(S) or other competing website(s), including personal pages, social media or other Forums. This ALSO INCLUDES ECU DIAGnostic software, questions and mapping. We work very hard to offer commercially supported products and to keep info relevant here. First offense is a note, second is a warning, third time will get you banned from the site. We don't have the time to chase repeat (and ignorant) offenders. This is NOT a social media platform; It's an ad-free, privately funded website, in small help with user donations. Be sure to see the GTM STORE link above; ALL product purchases help support the site, or you can upgrade your Forum profile or DONATE via the link above.
  • Be sure to see the GTM STORE link also above for our 700+ product inventory, including OEM parts and many of our 100% Made-in-SoCal-USA GTM products and engine kits. In SoCal? Click the SERVICE tab above for the best in service, tires, tuning and installation of our products or custom work, and don't miss our GT MotoCycles® (not) art on the BUILDS tab above. WE'RE HERE ONLINE ONLY - NO PHONE CALLS MADE OR RECEIVED - DO NOT EMAIL AND ASK QUESTIONS OR ASK TO CALL YOU.
  • Like the new V100, GuzziTech is full throttle into the future! We're now running on an all-new server and we've updated our Forum software. The visual differences are obvious, but hopefully you'll notice the super-fast speed. If you notice any glitches or have any issues, please post on the Site Support section at the bottom. If you haven't yet, please upgrade your account which is covered in the Site Support section or via the DONATE tab above, which gives you full site access including the DOWNLOADS section. We really appreciate every $ and your support to keep this site ad-free. Create an account, sign in, upgrade your account, and enjoy. See you on the road in 2024.

A few questions about pulling CARC swingarm

ohiorider

Cruisin' Guzzisti
Joined
Apr 8, 2011
Messages
174
Location
Hudson, OH
Specialswingarmremovaltoolrev1_zps57ef60aa.jpg

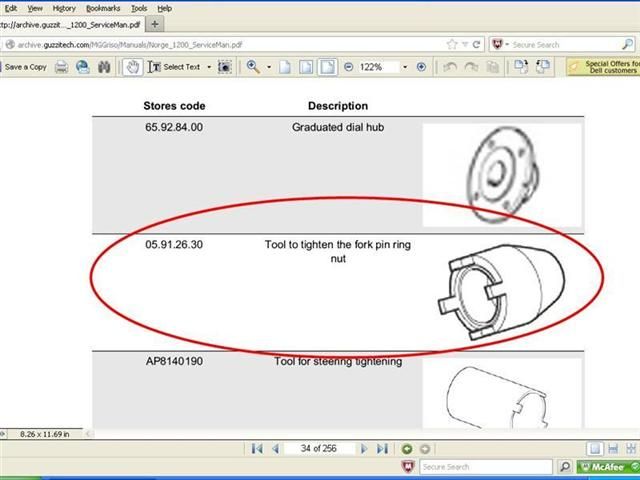
Is this special Guzzi tool required, or is there an 'off the shelf' tool that works just as well?

GuzziCARCSwingArm_zps4842ba7f.jpg

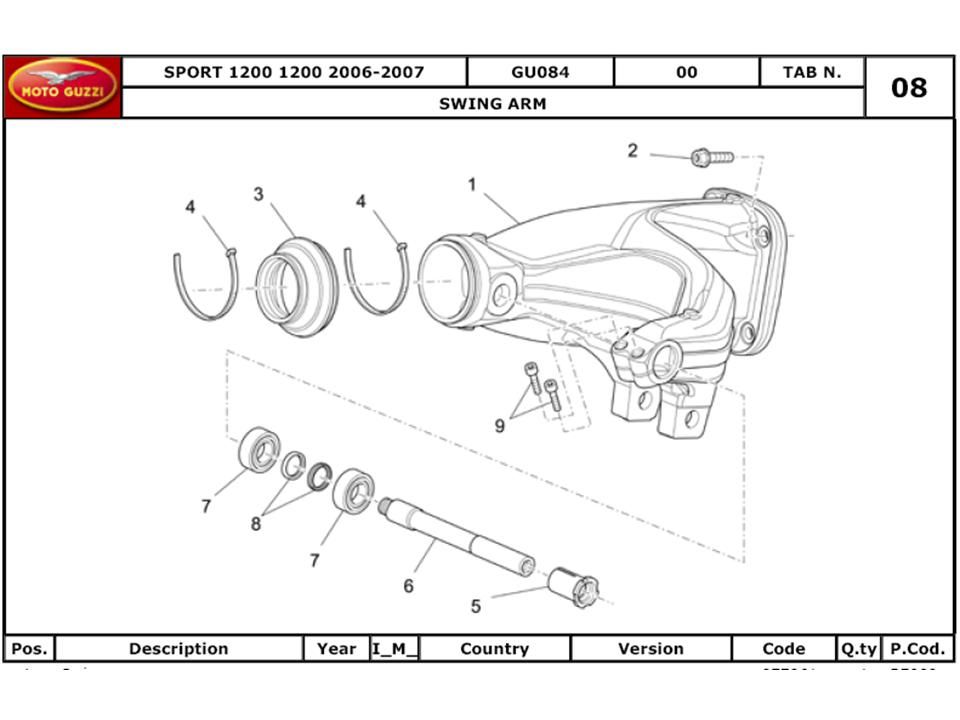
a) Is it necessary to preload (overtorque) the bearings when replacing the pivot shaft (fork pin)?
b) Final Torque on #5?

GuzziConnectingRodRearShock_zpscf96c5f0.jpg

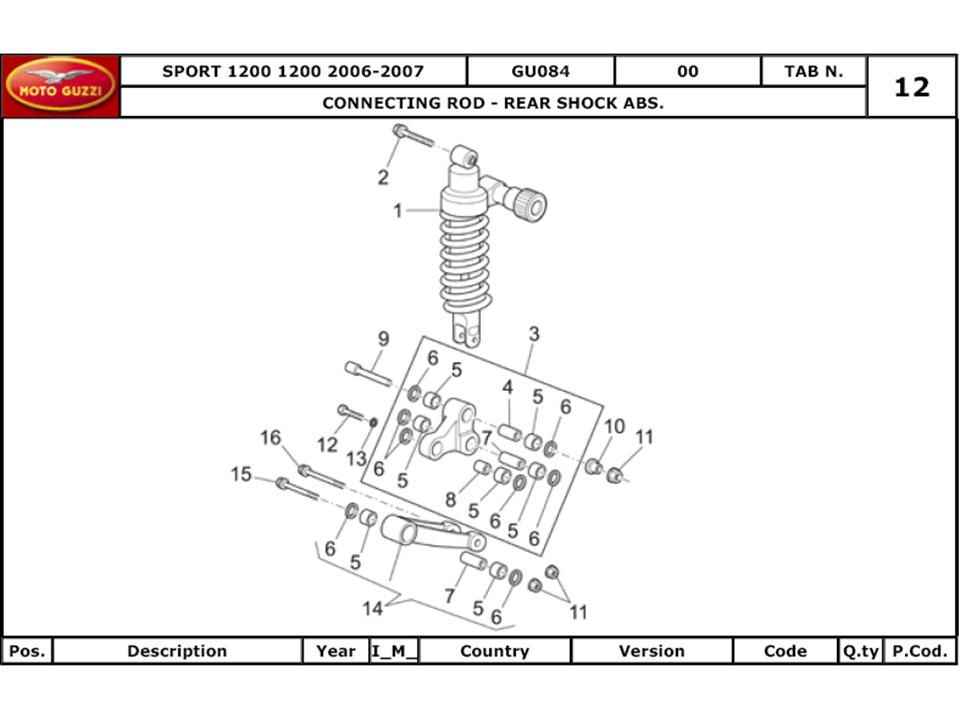
a) There's over half a dozen needle bearings used in the shock absorber connecting rod. Are these as dry as the main pivot bearings are reputed to be? Or are these factory packed and sealed?
b) Are the needles caged in place? Or is there a chance of the needles falling out?
 
Todd sells one on this web site, works fine.

The bearing can not be preloaded before the axle (#6) is in place, the castle nut (#5) is used to adjust the bearing play.

I didn't use a torque wrench on the swing arm bearings. Snugged, snugged a little more then backed off a tiny bit, check for lateral play and ease of vertical motion.

The amount of grease in the shock linkage seems to vary. Forum members have found little to almost none.

Needle bearing are not cages. Yes, these little buggers can get lost. Luckily, I found one on my lap before I got up off the floor. I now use a big monochrome towel to work on. Just be careful.

I also greased the drive shaft spline with Wurth spline grease. And inspect your u-joints. According to my local dealer, gasket sealer is required between the CARC and the swing arm. They recommended 3 Bond.

Look for a thread on this subject in this forum, think there are two.
 
+1 on everything already said...the special tool makes the job much easier. As for the sealer, I'm questioning why it's there except for keeping water out of the cavity. You want to make sure whatever sealer you use won't make such a tight bond that you can't get it apart next time.

The drive shaft (Cardan joint) is held to the output shaft by an internal clip...that's a clip inside the part that stays with the shaft. The clip mates up with a groove on the tranny output shaft. As you pull the swingarm away from the frame the shaft wants to stay attached to the tranny so it comes away from the rear drive spline. That's why you need to split the CARC from the swingarm, so you can mate it all up prior to putting it back on the output shaft.

You will be glad you did this job once you see how little lube was on all these bearings.

Peter Y.
 
Yeah - I didn't use anything on mine. Guess I'll do it next time I'm in there. My buddy's Stelvio is in my garage waiting for the same lube job and I can see the sealant that oozed out that was applied at the factory.

Make sure you read the other threads. Don't take off the peg side plates like I did - bike nearly fell over :S :pinch:
 
You don't need the tool, an adjustable C spanner will do or you can tap it round with a pin and hammer. If the carc is off and the suspension linkage is all disconnected you can feel if you've got it too tight by the up and down movement, or lack of it,in the swinger.
 
iainw said:
You don't need the tool, an adjustable C spanner will do or you can tap it round with a pin and hammer. If the carc is off and the suspension linkage is all disconnected you can feel if you've got it too tight by the up and down movement, or lack of it,in the swinger.

I have no doubt you and some others here can, but I just ordered one from Todd.

With the right tool, I am capable of muddling through with only a few curses :S ; using the wrong one results in the equivalent of a war crime. :woohoo:

Bill
 
Rafael said:
Todd sells one on this web site, works fine.

****

The amount of grease in the shock linkage seems to vary. Forum members have found little to almost none.

****

I also greased the drive shaft spline with Wurth spline grease. And inspect your u-joints.

****

Look for a thread on this subject in this forum, think there are two.

Color me confused ... tho that is my usual shade. :whistle:

First I cannot find two threads on this subject, but did find this, which is, perhaps, one of those: https://www.guzzitech.com/forum/topic.html?f=196&t=3845&hilit=lube+carc

My basic concern is that I have lost the bubble on what it is that needs to be checked and (probably) lubed, as the factory can't seem to find grease on assembly.

I have the exhaust can and rear wheel off of my Griso in anticipation of installing a replacement shock. While that far, might as well get to what can be gotten to and grease whatever it is that needs it.

That is where I get confused.

Are we talking about shock linkage? If so, not sure why I have to disassemble CARC.

Or is it way more complicated as it seems is so and is the rear drive splines? Front, too?

I am, fwiw, 800+ miles away from my Griso this moment, but will be prepared next weekend to start (and hopefully finish!) whatever needs to be done. I just don't know what that is.

Apologies for my cranial density, especially if all of this laid out in detail here and I have simply missed it. I plead an uncommon cold in defense. :blush:

Thanks.

Bill
 
Bill,

You want to lube both the shock linkage AND the swing arm bearings. To get the swing arm bearings requires removal of the swing arm. You remove the CARC so you don't have to handle as much weight and the assembly is easier with the CARC off. Don't forget about that retaining clip at the upper u-joint on the transmission output shaft.
 
Bill,

I went through this with my Griso. Actually much easier than it looks. I have the C spanner tool (I just made one). You're welcome to borrow it. Once you loosen the pinch bolts, it unscrews very easily. Let me know if you want me to send the tool out. Reach me at my big boy email: jonathan at jklopman dot com.

On pulling the drive shaft- the spring clip mentioned tends to keep the shaft in the trans (a good thing). You have to give it a sharp rap with a soft mallet to get it to pop free. Popping it back in place after it's greased is easier.

The whole assembly is relatively simple and well designed. I found it a satisfying job.
 
boatdetective said:
Bill,

I went through this with my Griso. Actually much easier than it looks. I have the C spanner tool (I just made one). You're welcome to borrow it. Once you loosen the pinch bolts, it unscrews very easily. Let me know if you want me to send the tool out. Reach me at my big boy email: jonathan at jklopman dot com.

On pulling the drive shaft- the spring clip mentioned tends to keep the shaft in the trans (a good thing). You have to give it a sharp rap with a soft mallet to get it to pop free. Popping it back in place after it's greased is easier.

The whole assembly is relatively simple and well designed. I found it a satisfying job.

Thanks to you, Peter, John, and all. Tool is inbound from Todd. Time is my problem now. I am an untalented plodder, with tendencies toward disastrous missteps even in simple tasks. So, I'll likely budget a weekend next month to do it. Taxes, unfortunately, come first. In the meantime,I really appreciate the offers and counsel ahead of the actual work.

I am somewhat tempted to wait for shock replacement and this 'til after my return to Virginia, as I have the lift and other garage creature comforts there, but the can and wheel are already off and I do have the time, beer, and ... erm ... no spousal-unit intervention out here on the tundra. ;)

Bill
 
Hi Bill,

It really is a very straight foward job, just start at the back wheel and take everything off until you find the bearings. Then put it back together again, there are no fiddly little bitty things, it's all man size chunks. The only thing that needs special care is the bearing tension, set that before you connect the suspension linkage and carc.

I started this with a bit of anticipation and on pulling the rear wheel off discovered that the carc main seal was leaking, I ended up replacing the main bearing and seal in it and surprised myself on how easy it is with all the advice and info posted on here. Just to clean and grease the bearings is a simple job.

Crack on!
:)

Iain.
 
Bill Hagan said:
Got in the tool, Todd.

A very nice piece of metal work.

Now ... to see about flying in one of the guys who has done this. :whistle:

Bill

Volunteer here! :whistle: Resume: Completed 3 of these with my Buddy. Wish I could jump on my bike and drive out there...

No, Really Bill, YOU CAN DOO IIT.

On the Stelvio, the only one of the 3 that had the CARC sealed to the Swingarm required a bit of excretion. You can use a milk crate lower the swing arm onto when removing the axle. Also when turning out the axle, make sure the castle nut (bearing adjusted) turns along with it. On our first attempt, it jammed on to the axle - but no biggy.
 
I feel your trepidation Bill. I think I need to do this to my bikes also, like you I have minimal confidence in my being able to complete this. I hate starting a project then having to haul the pieces parts down to Jimmy at Ned's. :lol: Once you do your's perhaps I'll be able to bribe you with spiritous liguids to show me how to do it. I may be putting a new rear tire on the Norge this summer, which would be a good time to do this. What say you?? :whistle: :cheer:
 
Hey guys, this really is an easy job....really, really, really! The interesting parts are posted online with photos. Someone mentioned using a milk crate to support the CARC, I just used a 1/4" nylon rope...anything to keep it from flopping around while you unbolt it. With all that said I had a similar fear of getting too deep into something new. After I got everything apart I was asking myself why I was so worried about such a simple task.
 
pyoungbl said:
Hey guys, this really is an easy job....really, really, really! The interesting parts are posted online with photos. Someone mentioned using a milk crate to support the CARC, I just used a 1/4" nylon rope...anything to keep it from flopping around while you unbolt it. With all that said I had a similar fear of getting too deep into something new. After I got everything apart I was asking myself why I was so worried about such a simple task.

It's approxamently 900 miles from Portsmouth VA to my place; I should know, I drove it several times while stationed at Little Creek. Figure either one day Iron Butt run, or two day easy ride to my place. What day should I/we expect you, and what is your favorite liquid?? :lol:
 
Only 900 miles? Well, after Bike Week my schedule opens up a bit. You will probably have the job done by then, it's only a couple hours worth of work.

Peter Y.
 
pyoungbl said:
Only 900 miles? Well, after Bike Week my schedule opens up a bit. You will probably have the job done by then, it's only a couple hours worth of work.

Peter Y.

Thanks to all for encouragement.

Matt (ST2) and I will likely do this on his Norge first. He has a lift, too. Mine's in Virginia and my knees and other parts scream when I have to get up and down on the garage floor in this apartment building. The garage is heated, but I am usually on the ground, with some part I just seated, when BANG, the timed lights go out and it's darker than the proverbial witch's mammary. I've tried waving an arm, tossing things, all sorts of tricks, but I lie defeated every time. OK, yes, I digressed.

"When" is a bit of an issue. I get "regular" weekends off; Matt's "weekend" is on Mon & Tues. OTOH, we are both have sinusitis so bad, we could probably call in sick with clear consciences!

We'll let all know how this turns out. Really do appreciate the "no big deal" nudges.

Bill
 
Back
Top