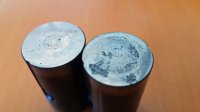
Thank you Scott, I will try that technique first. Looks easy. Thanks also for the ceramic coatings link.
Navigation
Install the app
How to install the app on iOS
Follow along with the video below to see how to install our site as a web app on your home screen.
Note: This feature may not be available in some browsers.
More options
-
Ciao Guest - You’ve landed at the ultimate Guzzi site. NEW FORUM REGISTRATIONS REQUIRE EMAIL ACTIVATION - CHECK YOUR SPAM FOLDER - Use the CONTACT above if you need help. New to the forum? For all new members, we require ONE post in the Introductions section at the bottom, in order to post in most of the other sections. ALWAYS TRY A SEARCH BEFORE STARTING A NEW TOPIC - Most questions you may have, have likely been already answered. DON'T BE A DRIVE-BY POSTER: As a common courtesy, check back in and reply within 24 hours, or your post will be deleted. Note there's decades of heavily experienced Guzzi professionals on this site, all whom happily give endless amounts of their VALUABLE time for free; BE COURTEOUS AND RESPECTFUL!
-
There is ZERO tolerance on personal attacks and ANY HYPERLINKS to PRODUCT(S) or other competing website(s), including personal pages, social media or other Forums. This ALSO INCLUDES ECU DIAGnostic software, questions and mapping. We work very hard to offer commercially supported products and to keep info relevant here. First offense is a note, second is a warning, third time will get you banned from the site. We don't have the time to chase repeat (and ignorant) offenders. This is NOT a social media platform; It's an ad-free, privately funded website, in small help with user donations. Be sure to see the GTM STORE link above; ALL product purchases help support the site, or you can upgrade your Forum profile or DONATE via the link above.
-
Be sure to see the GTM STORE link also above for our 700+ product inventory, including OEM parts and many of our 100% Made-in-SoCal-USA GTM products and engine kits. In SoCal? Click the SERVICE tab above for the best in service, tires, tuning and installation of our products or custom work, and don't miss our GT MotoCycles® (not) art on the BUILDS tab above. WE'RE HERE ONLINE ONLY - NO PHONE CALLS MADE OR RECEIVED - DO NOT EMAIL AND ASK QUESTIONS OR ASK TO CALL YOU.
-
Like the new V100, GuzziTech is full throttle into the future! We're now running on an all-new server and we've updated our Forum software. The visual differences are obvious, but hopefully you'll notice the super-fast speed. If you notice any glitches or have any issues, please post on the Site Support section at the bottom. If you haven't yet, please upgrade your account which is covered in the Site Support section or via the DONATE tab above, which gives you full site access including the DOWNLOADS section. We really appreciate every $ and your support to keep this site ad-free. Create an account, sign in, upgrade your account, and enjoy. See you on the road in 2024.
You are using an out of date browser. It may not display this or other websites correctly.
You should upgrade or use an alternative browser.
You should upgrade or use an alternative browser.
Breva 1100 Restoration Project
- Thread starter NPS
- Start date
Thank you Scott, I will try that technique first. Looks easy. Thanks also for the ceramic coatings link.
You are very welcome. It will work, I promise you and the ceramic coating will completely protect your exhaust from that type of corrosion damage ever again. Good Luck Sir! Please let us know how it goes.
For the cam followers, it does happen, but I've never seen pitting like that. I have seen wear though. They should be replaced. How are the lobes on the cam? For the valve guides, I do recommend having K-line inserts installed. Replacing guides can expand the place in the head and cause problems down the road. These guys are even in the UK http://cylinderheadshop.com/k-line-guide-liners/
John, you astound me by you knowledge and connections. I will call the cylinderheadsop next week.
I'm worrying about the cam I and did realise I have to check. Next stage of delving in to this project.
I knew when I started this could go to very long lengths to make the 10 year old Breva a new motorcycle. I'm not wanting to go any further with the engine. Do you think I need to look at mains and big end shells. I didn't think I would have any nasty surprises on the valve train but I did. I have examined big end shells before on a car, many years ago. My feeling is they should be OK. Just a feeling as I have followed oil and filter changes and I rarely stress the engine. I really don't want to go there.
Scott. I tried your method. I think there are 8 bolts on the rear wheel. 5 released and I stripped 3 hex bots. Partial success in my case. Sorry if I didn't hit hard enough but I gave it a try after seeing you excellent video.
I'm worrying about the cam I and did realize I have to check. Next stage of delving in to this project.
I knew when I started this could go to very long lengths to make the 10 year old Breva a new motorcycle. I'm not wanting to go any further with the engine. Do you think I need to look at mains and big end shells. I didn't think I would have any nasty surprises on the valve train but I did. I have examined big end shells before on a car, many years ago. My feeling is they should be OK. Just a feeling as I have followed oil and filter changes and I rarely stress the engine. I really don't want to go there.
How many miles are on the bike? Considering what the followers look like, It would be a good idea to inspect at least the connecting rod shells and the crank journal. Do you have plastigauge to check the connecting rod to crank clearance? Much easier than using a micrometer.
Um. I thought that was the next step. 28k miles. I know about plastigauge but not used it. I will research and buy some.How many miles are on the bike? Considering what the followers look like, It would be a good idea to inspect at least the connecting rod shells and the crank journal. Do you have plastigauge to check the connecting rod to crank clearance? Much easier than using a micrometer.
Plasitgauge is really easy to use. Remove the connecting rod cap, place a short section of the plastigauge across the cap. A little oil will help to hold it in position. Install cap and tighten. Do not rotate engine and remove cap. Use the scale that came with the plastigauge to read the measured gap. You should be in the 0.002 inch range. If the journal looks good and measures to spec, you may just need standard size shells at most.
I'm willing a realise it needs to be done. Shells cost £16 each and big end bolts £32 each. This is expensive.
I will correct that. Bolts are 16 each also.
On a good point a gasket set is available at £180. But the separate gaskets cost about half that.
Had missed this thread, and just read it ll.
Daunting project -- to me, at least -- but will follow and learn.
My brother had a B11. IMO, it is one of the best all-arround motorcycles of any brand.
Best,
Bill
Daunting project -- to me, at least -- but will follow and learn.
My brother had a B11. IMO, it is one of the best all-arround motorcycles of any brand.
Best,
Bill
Scott. I tried your method. I think there are 8 bolts on the rear wheel. 5 released and I stripped 3 hex bots. Partial success in my case. Sorry if I didn't hit hard enough but I gave it a try after seeing you excellent video.
Whoops! I'm glad you got the 5. On the other 3, did you do this "...If it doesn't, rap it again 3-5 times and I guarantee, it will let go easily."?
The idea being here that If the bolt doesn't turn, continue to rap it until it loostens up. Sometimes, I've had to rap them 15-20 times, it all depends on the stupidity of the bastard who soaked the bolt in Locktite or even worse, used Red Locktite! Most people are afraid to hit the drift HARD, which is what has to be done.
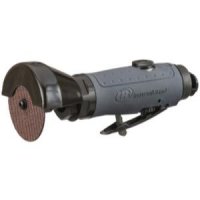
So now, get your drift, and whack them harder some more. Take a hand held air grinder with a cutting wheel (or even a Dremel tool with a cutting wheel will work but you'll have to make multiple side by side cuts) and cut a straight groove in the head, so you can insert a flat-blade screw screwdriver bit. You can then use a impact driver with a flat-head blade on it to loosen the bolts. If you don't have these tools, any garage will, they are common mechanic tools and they will probably help you for next to nothing. Good Luck!
Attachments
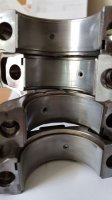
I have the con rods and pistons out. Here is a picture of the big end shells.
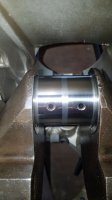
The crank journal
The camshaft shows damage from the tappet problem.
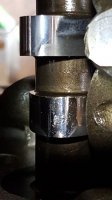
So a new camshaft then!
I have a question about the RH piston. I was undoing the bolts and it released and fell out before I could prevent it. I'm not 100% on the orientation. I note that the LH piston has the oil delivery channel entry on the upper most side. I presume this is the same for the RH side.

The crank journal

The camshaft shows damage from the tappet problem.

So a new camshaft then!
I have a question about the RH piston. I was undoing the bolts and it released and fell out before I could prevent it. I'm not 100% on the orientation. I note that the LH piston has the oil delivery channel entry on the upper most side. I presume this is the same for the RH side.
Shells and journal look good. If clearance is good I'd install with the existing shells. I can't answer your question of piston orientation. I usually mark with an arrow pointing to the front for piston orientation with a felt tip marker on the top of the piston. Something to remember for the future.
Thanks John a lesson learnt the hard way. If I had bothered to look at the pistons I realise the larger cut out for the inlet valve indicates the way they should go. Interestingly that puts the oil hole on the same side as the crank rotates but opposite sides in relation to the ground. But when the crank is rotating so fast I guess gravity does not matter that much.
Do you have any recommendations about sourcing a camshaft. The stock item 05053331 costs about £560 over here. I dont like to try a second hand one but if it is good then it would help my budget.
Edit: After further research I can get a new one for about £300. Still looking for an almost new used camshaft for the lower cost.
Last edited:
I think I will replace the shells anyway as one set has the extremity polished and might be a little worn. I have got this far so might as well do a complete job. Judging by the shells being largely OK, do you think I should check the main journals? If you say I should then I might as well have the crankcase powder coated by a professional. If not I will 2-pack epoxy it by hand application.
I think I will replace the shells anyway as one set has the extremity polished and might be a little worn. I have got this far so might as well do a complete job. Judging by the shells being largely OK, do you think I should check the main journals? If you say I should then I might as well have the crankcase powder coated by a professional. If not I will 2-pack epoxy it by hand application.
You are so close to having a bare block go ahead and pull the crankshaft. The mains are probably good and can just be put back in with a new gasket at the rear. As to a replacement cam shaft, you could check with a breaker to see if any crashed Brevas have been in and you could score a good used that way. A quick web search using the phrase "used moto guzzi parts" listed several breakers. This one included http://www.rebootguzzispares.com/about-us.php
"You are so close to having a bare block go ahead and pull the crankshaft." Thank you John, I had hoped you would say that.
I love doing this, I am almost there with the engine and why not? Yes I would like to get the whole Breva reborn. I don't know what it is but I have a real excitement at each stage the further I go. I know it is a long and difficult job. This is just the engine and will cost £600 or so.
I think I said I have had 25 motorcycles but if not you know now now. Many in my 20s (I'm 57 now). This is the only one I kept for more than three years. The Breva is 10 years in July (12 years old) and has done four winters commuting most days there was not ice on the ground. Plenty of salt and why it is externally damaged. It deserves a refit.
The realities of planning a restoration are starting to dawn on me. There are many stages to this if to be done in a year which was my starting target. I had my plans in my head initially. I started with a list off the parts manual of each section and added each part I would replace or refurbish with a search online for the cost. Currently Im at £2900 or there about before this engine complication. £3500 is more like. Project management is the next skill to employ as the different stages require a part removal, assessment and dealing with. This is either replacement with new if necessary (but costly) or cleaning and refurbishment. The complexity starts to fan out in all directions as I consider the other areas. The engine is the big thing and a foundation with the new powder coated frame.
Last edited:

