Thank you Oz for pointing that one out. Two earths now moved to bell housing bolt above.NPS, consider moving your main earth from the stud the starter cover mounts onto. The bolt just above it that holds the flywheel housing is a good point - you will need to enlarge the holes in the lugs though, so care is needed. Works out better for earthing and charging. The original point is fragile and does not provide the best earth...
Keep the story coming - me likey!
Navigation
Install the app
How to install the app on iOS
Follow along with the video below to see how to install our site as a web app on your home screen.
Note: This feature may not be available in some browsers.
More options
-
Ciao Guest - You’ve landed at the ultimate Guzzi site. NEW FORUM REGISTRATIONS REQUIRE EMAIL ACTIVATION - CHECK YOUR SPAM FOLDER - Use the CONTACT above if you need help. New to the forum? For all new members, we require ONE post in the Introductions section at the bottom, in order to post in most of the other sections. ALWAYS TRY A SEARCH BEFORE STARTING A NEW TOPIC - Most questions you may have, have likely been already answered. DON'T BE A DRIVE-BY POSTER: As a common courtesy, check back in and reply within 24 hours, or your post will be deleted. Note there's decades of heavily experienced Guzzi professionals on this site, all whom happily give endless amounts of their VALUABLE time for free; BE COURTEOUS AND RESPECTFUL!
-
There is ZERO tolerance on personal attacks and ANY HYPERLINKS to PRODUCT(S) or other competing website(s), including personal pages, social media or other Forums. This ALSO INCLUDES ECU DIAGnostic software, questions and mapping. We work very hard to offer commercially supported products and to keep info relevant here. First offense is a note, second is a warning, third time will get you banned from the site. We don't have the time to chase repeat (and ignorant) offenders. This is NOT a social media platform; It's an ad-free, privately funded website, in small help with user donations. Be sure to see the GTM STORE link above; ALL product purchases help support the site, or you can upgrade your Forum profile or DONATE via the link above.
-
Be sure to see the GTM STORE link also above for our 700+ product inventory, including OEM parts and many of our 100% Made-in-SoCal-USA GTM products and engine kits. In SoCal? Click the SERVICE tab above for the best in service, tires, tuning and installation of our products or custom work, and don't miss our GT MotoCycles® (not) art on the BUILDS tab above. WE'RE HERE ONLINE ONLY - NO PHONE CALLS MADE OR RECEIVED - DO NOT EMAIL AND ASK QUESTIONS OR ASK TO CALL YOU.
-
Like the new V100, GuzziTech is full throttle into the future! We're now running on an all-new server and we've updated our Forum software. The visual differences are obvious, but hopefully you'll notice the super-fast speed. If you notice any glitches or have any issues, please post on the Site Support section at the bottom. If you haven't yet, please upgrade your account which is covered in the Site Support section or via the DONATE tab above, which gives you full site access including the DOWNLOADS section. We really appreciate every $ and your support to keep this site ad-free. Create an account, sign in, upgrade your account, and enjoy. See you on the road in 2024.
You are using an out of date browser. It may not display this or other websites correctly.
You should upgrade or use an alternative browser.
You should upgrade or use an alternative browser.
Breva 1100 Restoration Project
- Thread starter NPS
- Start date
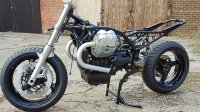
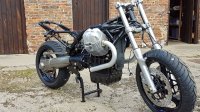
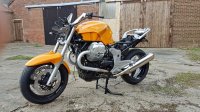
Reached my target of two wheels on the ground and pictures below.
The header pipes have a ceramic coat. The surface was badly pitted so rather replacing with new pipes I thought I would try this.
The tank, front mudguard, side panels and rear panels are all in a local spray shop for base and top coat of RAL2000 (orange).
I'm waiting for the tank decals in black to arrive.
I'm going to slow down a bit now and restore the various plastic items.
I also have the brake calipers to refurbish and paint. I already have the piston and seals and some gold paint and I have done the initial clean so these wont be too difficult. I have replacement flexi-hoses in stainless with clear covering.
The seat is likely to be a Corbin in black leather with orange stitching to match the paintwork. Not ordered yet as still pondering the high cost.


When you install the front fender, be sure to use an anti seize compound on the screws that go into the slider. They are stainless and can gall the slider material and lock into the slider. I've had to have a machinist remove a screw that broke trying to remove it. BTW, it wasn't cross threaded.
Thank you John. That was the case when I took it apart. I had to drill and tap one of the holes.When you install the front fender, be sure to use an anti seize compound on the screws that go into the slider. They are stainless and can gall the slider material and lock into the slider. I've had to have a machinist remove a screw that broke trying to remove it. BTW, it wasn't cross threaded.
I have been testing the rear suspension and there is some slack. All new bearings except the main swing arm tapper rollers that are ok anyway. On the main stand I can grab the rear wheel and pulling up I can feel a slight amount of free play. Hard to say how much exactly without someone to measure it for me. I'm thinking it is the clearance between the needle roller bearings and the bearing shaft inner, this amplified through the four pivot points.
A valuable piece if info for anyone doing this is to note the position of the bleed pipe on the clutch slave cylinder. It faces rearward and if too far in that direction rubs on the rear shock. the angle on mine is about 19:30 on a 24hr clock when sat on the bike. It is hard to get to after installing parts so getting this right first time saves revisiting.
A note on the placing the wiring loom. It seems to all revolve around the position of the ECU. Two plugs into this. The shortest one controls the positioning of the loom down the RH main tube(sat on the bike). The rest follows. Not done the relay and battery area so cant say here yet.
Assembling the front forks on my bike was a nightmare. The lower ptfe coated plain bearing does not easily fit inside the upper plain bearing of the slider. Forcing them through each other can damage the surface as I found out.
One fork bearings did pass through each other and the other didn't, with resulting damage.
To reassemble this one I ordered a new upper and lower plain shell. I drifted it home after the stanchion was in place down the lower slider. Lesson learnt. I'm not sure if the stanchion is easily separated from the slider normally. I did have to replace the stanchions as they were damaged from pitting on the upper exposed area.
Sport1200
Tuned and Synch'ed
I'm not quite sure what you mean here- if Guzzi forks are like the many others I have assembled, the lower bush does NOT have to pass through the upper to assemble. The upper bush is placed onto the leg from the top (lower bush installed already) and inserted into the lower leg. Maybe I'm reading your post wrong?Assembling the front forks on my bike was a nightmare. The lower ptfe coated plain bearing does not easily fit inside the upper plain bearing of the slider. Forcing them through each other can damage the surface as I found out.
One fork bearings did pass through each other and the other didn't, with resulting damage.
To reassemble this one I ordered a new upper and lower plain shell. I drifted it home after the stanchion was in place down the lower slider. Lesson learnt. I'm not sure if the stanchion is easily separated from the slider normally. I did have to replace the stanchions as they were damaged from pitting on the upper exposed area.
I'm not quite sure what you mean here- if Guzzi forks are like the many others I have assembled, the lower bush does NOT have to pass through the upper to assemble. The upper bush is placed onto the leg from the top (lower bush installed already) and inserted into the lower leg. Maybe I'm reading your post wrong?
He may not have compressed the bush on the fork tube to have it pass through the bush in the slider. If it isn't compressed and oiled it will damage at least one bush.
Sport1200
Tuned and Synch'ed
Sounds weird to me. Not like Japanese forks. Off to the manual I go.
Sport1200
Tuned and Synch'ed
Just checked the manual. Weird. Italians....
Just checked the manual. Weird. Italians....
Something I learned a ling time ago, it it doesn't go together easily, you are doing something wrong.
The problem was taking the fork apart to replace the stanchion tube. The lower smaller, would not go through the top bush. Presumably something was in the way that would not allow the smaller bush to compress.
An update on the seat. My budget does not allow for spending £550 on a corbin seat so I am visiting a seat restorer next week to discus the remaking of the stock seat with improved comfort. If anyone has any tips on seat comfort I would appreciate them. Early on when I got the Breva 10 years ago I removed the standard foam and replaced it with my own modified construction which included a bicycle inner tube to control height and hardness. Not seeking to do that again but I will asking for a more comfortable seat based on my bottom dimensions and weight. I'm sure an experienced seat restorer will be able to do something for me from experience and calculation rather than my guess work approach.
Sport1200
Tuned and Synch'ed
If you can find a standard Sport 1200 seat (apparently standard on 2V optional later) they have a gel seat. Pretty comfy. Done over 1000km on mine in the last week and going to do 400km on mine tomorrow. 
An update on the seat. My budget does not allow for spending £550 on a corbin seat so I am visiting a seat restorer next week to discus the remaking of the stock seat with improved comfort. If anyone has any tips on seat comfort I would appreciate them. Early on when I got the Breva 10 years ago I removed the standard foam and replaced it with my own modified construction which included a bicycle inner tube to control height and hardness. Not seeking to do that again but I will asking for a more comfortable seat based on my bottom dimensions and weight. I'm sure an experienced seat restorer will be able to do something for me from experience and calculation rather than my guess work approach.
Best to use a high density closed cell foam. Have the seat maker contour for your shape and make a new cover. The original as you found out is too soft. With the closed cell foam the seat feels the same all day and you don't end up on the seat pan.
Sahweet!!! Love the orange and the coated headers.
Interesting color. You will have a pumpkin bike!!

