• Ciao Guest - You’ve landed at the ultimate Guzzi site. NEW FORUM REGISTRATIONS REQUIRE EMAIL ACTIVATION - CHECK YOUR SPAM FOLDER - Use the CONTACT above if you need help. New to the forum? For all new members, we require ONE post in the Introductions section at the bottom, in order to post in most of the other sections. ALWAYS TRY A SEARCH BEFORE STARTING A NEW TOPIC - Most questions you may have, have likely been already answered. DON'T BE A DRIVE-BY POSTER: As a common courtesy, check back in and reply within 24 hours, or your post will be deleted. Note there's decades of heavily experienced Guzzi professionals on this site, all whom happily give endless amounts of their VALUABLE time for free; BE COURTEOUS AND RESPECTFUL!
  • There is ZERO tolerance on personal attacks and ANY HYPERLINKS to PRODUCT(S) or other competing website(s), including personal pages, social media or other Forums. This ALSO INCLUDES ECU DIAGnostic software, questions and mapping. We work very hard to offer commercially supported products and to keep info relevant here. First offense is a note, second is a warning, third time will get you banned from the site. We don't have the time to chase repeat (and ignorant) offenders. This is NOT a social media platform; It's an ad-free, privately funded website, in small help with user donations. Be sure to see the GTM STORE link above; ALL product purchases help support the site, or you can upgrade your Forum profile or DONATE via the link above.
  • Be sure to see the GTM STORE link also above for our 700+ product inventory, including OEM parts and many of our 100% Made-in-SoCal-USA GTM products and engine kits. In SoCal? Click the SERVICE tab above for the best in service, tires, tuning and installation of our products or custom work, and don't miss our GT MotoCycles® (not) art on the BUILDS tab above. WE'RE HERE ONLINE ONLY - NO PHONE CALLS MADE OR RECEIVED - DO NOT EMAIL AND ASK QUESTIONS OR ASK TO CALL YOU.
  • Like the new V100, GuzziTech is full throttle into the future! We're now running on an all-new server and we've updated our Forum software. The visual differences are obvious, but hopefully you'll notice the super-fast speed. If you notice any glitches or have any issues, please post on the Site Support section at the bottom. If you haven't yet, please upgrade your account which is covered in the Site Support section or via the DONATE tab above, which gives you full site access including the DOWNLOADS section. We really appreciate every $ and your support to keep this site ad-free. Create an account, sign in, upgrade your account, and enjoy. See you on the road in 2024.

Charging System Failure-Boise Break Down

WindwardWarrior

Tuned and Synch'ed
GT Famiglia
Joined
Sep 25, 2011
Messages
94
Location
Kelowna
Good day everyone!

All is well today I hope! I am 3/4 of the way through my spring ride and have broke down in Burley Idaho, and had the 08 Norge Flat Decked to Boise (friends home).

The trip so far has been fabulous with stops in Washington, Idaho, Nevada, Arizona, Texas, New Mexico, Colorado, Utah and Wyoming!

The Norge was running fine until yesterday when it started to falter on I 84 at Burley. I was stopping there to take a picture (a friends last name too).

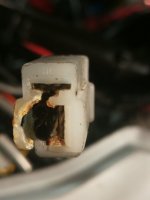
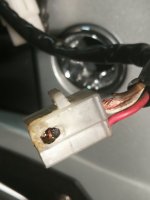
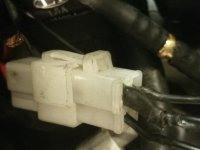
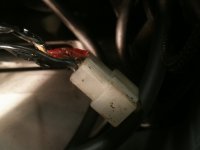
When I hit the off ramp the bike stalled and wouldn't restart. I carry a small jumper kit and restarted it but it would not run without excessive throttle. I did the primary checks of fuses, cleaned the terminals etc. and then I got a new battery. I got the bike to an auto parts place and tested the charging system. It identified a failed regulator/rectifier.

The voltage across the battery is 11.4 or less at 2000 RPM.

I replaced the alternator assembly last year because the voltage was at 12.4 across the battery. Of course it's an offshore brand (supplied by my dealer in BC).

I am curious as to the cause of the failure, and if the regulator on the Store (OEM Guzzi Voltage Regulator – 06+) will work?

Thanks for checking out the post and I hope I haven't reposted something that is already there? I did a search but didn't find anything quite like this!

Cheers

Mark
 
I replied directly to Mark on this, but if anyone reading this needs one, the Denso alternator uses an integrated/onboard VR, which I'll try to put online here soon. They can be found online for as little as $35.
 
Hi Todd and everyone!

In Boise, I replaced the VR with one from Euro Moto Electrics. After that there were still charging system issues. I left the bike in Boise and had it shipped back to the US/Canada Border.

Well, I have the Norge back home now! It was an adventure in logistics getting it from Boise to the US/Canada border, and absolutely seamless getting it across the border!

After another failure on the past Saturday mornings tour, I decided to perform a voltage drop test and discovered no real significant drain (.002 Amps). I cleaned everything I could remove, scraped as much as I could and read some good posts on ignition switch issues.

The situation as it is now if I start the bike 3 times I may encounter either of these charging situations:
  1. Start bike and it is charging at 13.6 Volts across the battery with 12.7 reading on Dash :)
  2. Start bike and it is charging at 11.5 Volts across the battery with 11 Volts on Dash :(
  3. Start bike and after 30 seconds of running the Service Light illuminates and the charge may be 15.5 Volts across battery :((
When the bike failed Saturday:
  1. The idle was extremely high (2200 RPM)
  2. The odometer wasn't logging KM ridden
  3. The ABS Warning Lamp started to flash
  4. The Service Light came on with the Red Triangle at which time I was pulled over and shutting it down
I am curious as to whether the ignition switch is at fault?

I will look forward to your insights!

Cheers
 
In my opinion, you should have replaced the entire alternator and not have gone into it to use the VR from Euro Moto Electrics. I have contacted someone who is more familiar with the Norge charging system than I am and hopefully he will respond soon.
 
Thanks John! I appreciate the insight.

I had replaced the alternator as a complete unit last spring so I was hopeful that it was functional and the VR would get me back on the road.

I'll look forward to your friends thoughs.
Cheers
 
I once had an issue with an EV Touring not charging. After checking the diode board and the alternator with my multimeter, I discovered a bad join in the cable between the two. The join was located up behind the steering head, and it was covered in heat shrink. Took apart, cleaned the connectors, back together with heat shrink and vola no more problems.

Dunno whether the Norge has a similar join, but it might be worth a look.
 
Let me preface this with I am more familiar with the 8V model electrics than the 2008 model but a wiring diagram is a wiring diagram.

The voltages you were reading are typical of a charge/no charge situation. The craziness of the dash and RPM is consistent with low voltage so I don't believe it is an issue. I don't think you are in between states. It is charge or no charge. Assuming the alternator and VR are good (assumption for now) I would start with the basics. This seems to be a bad or failing connection somewhere in the charging circuit. Hope you have a voltmeter handy as it will help in the process.

1. When you have no charging (ie. 11 V while running) are your lights, horn, Hazards working. The exciter wire to the alternator comes from the ignition switch but it also feeds the 3 fuses by the green arrow below which feed other electrical on the bike. If if was your switch, none of these would work when you lose charge.

2. I would think that if it was the VR, you would have burned it up by now but again, let's assume that is working fine. That leaves the wires from the alternator. The Green Red wire runs from the alternator to the multi connector and then through a 40 amp fuse to the battery. I would start there and verify that the red green wire is good all the way to the battery. Check the connection at the alternator and make sure there is no corrosion and that the crimp is good on the wire and ring terminal. A quick pull on the wire at the terminal will tell you quickly but pull it off the alternator and strip back the heat shrink if you have to. If that is good put it back and then test the resistance from the alternator to the battery. It should be pretty much zero. Test the continuity also between these two points and wiggle the wires all the way from the alternator to the battery to see if there is a weak connection somewhere.

3. Check the continuity of the green black wire from the alternator exciter (other wire on the alternator, clipped to the front of it) back to the positive on the battery with the key on. Again give it a good wiggle and see if it loses continuity back to the battery. There is a splice somewhere between this wire and the fuses but the main for this comes from the ignition switch. Not sure where this splice is but either way, you should have good continuity back to the battery positive post. Measure the resistance also just to be sure

4. Take that multi connector apart. There was someone on another thread that reported those connections to be corroded and the wires charred from the heat of added resistance. All though they did not lose charge, then did lose some voltage from the added corrosion resistance. Make sure you have solid continuity on both side of the connector and all the wires are tight.

If all those wires check out to be ok along with the resistance to the battery then that really only leaves the VR or alternator but I am betting that you will find a wiring issue so start with the simple first.


Upload 2017 6 28 11 14 17
 
Last edited:
One last thought, what is the VR that you purchased. I have never replaced the VR before on this style of alternator but I do know from the manual that the VR is integrated into the alternator. I believe it can be replaced but not 100% sure. Did you just bolt it on to the alternator??

Just want to eliminate the actual type and size of the VR as an issue. I am still betting on corrosion of some sort in the wiring but never hurts to ask.
 
Hi Canuck 1969! Thank you for such a detailed response! Are you the friend John referenced previously?
I'm questioning the recommendation of my dealer last year where the alternator was replaced as the symptoms are the same now. Possibly the condition was masked by the new alternator?
I'm traveling for work today but I will definitely follow your recommendations when I get back home tomorrow!
Yes the Voltage Regulator is a bolt on piece attached with 4 screws to the back of the alternator.

Thanks again and have a great night!
 
I have had this problem recently - it turned out to be a dirty fuse contact on one of the 2 fuses next to the battery (item 24 I think) - one runs the bike, the other recharged the battery. Putting 2 and 2 together would tell you that you would get this problem. Not saying it is your problem, but worth a check...
 
Hi Canuck 1969! Thank you for such a detailed response! Are you the friend John referenced previously?
I'm questioning the recommendation of my dealer last year where the alternator was replaced as the symptoms are the same now. Possibly the condition was masked by the new alternator?
I'm traveling for work today but I will definitely follow your recommendations when I get back home tomorrow!
Yes the Voltage Regulator is a bolt on piece attached with 4 screws to the back of the alternator.

Thanks again and have a great night!

One in the same. John asked me to jump in to see if I could shed some light on the problem.

I too questioned why they replaced the alternator. Failure of this type of alternator with the integral VR is rare but can happen. I suspect that when it was changed they may have just accidentally temporarily fixed the original problem. Not hard to investigate but most techs will just replace the first thing they suspect as the issue and look no further. No charging…must be the alternator. If the bike starts and charges while in the shop problem solved.

I would start with that main power wire on the alternator. Pull back that boot on the terminal ring and inspect the connection. If that is good trace that wire all the way back to the battery through the multi connector and fuse holder. With the on/off charge you are getting I would suspect a failing loose connection from corrosion. In the ring terminal boot is the most likely spot as the boot can loosely hold the wires together.

Do the testing of the circuits I mentioned in the previous posts and report back. Worse case scenario if it all checks out is to yank the alternator and bring it to a automotive electrics shop to test. It is basically a car alternator. I think Canadian Tire will even do it but not 100%. I don't think it will get to that but that would be the next step. 9 times out of 10 on these bikes it is the simplest and most times cheapest cause. The components are tough. What connects them not so much. The cost comes in the time to find it.

Good luck and report back. You will get a huge sense of accomplishment when you find out what it is.
 
IMG 20170629 191226 IMG 20170629 191303 IMG 20170629 191343 IMG 20170629 191402 Hi Canuck1969!
So, at this point, there was no continuity from the Red/Green wire to the battery. After some deep searching, this is what I found!
 

Attachments

  • IMG_20170629_191226.jpg
    IMG_20170629_191226.jpg
    36.2 KB · Views: 3
  • IMG_20170629_191303.jpg
    IMG_20170629_191303.jpg
    43.6 KB · Views: 4
  • IMG_20170629_191343.jpg
    IMG_20170629_191343.jpg
    78.8 KB · Views: 4
  • IMG_20170629_191402.jpg
    IMG_20170629_191402.jpg
    65.5 KB · Views: 3
Crap…not the first and won't be the last.

Well good news is you found the problem. Bad news is you have a bit of work ahead of you. Won't be hard but will take some time to rewire that mess. You may have enough good wire left to crimp on new connectors but may just be easier to run new wire. Just make sure the wire gauge is correct. If you have any questions on wiring or connectors let me know. Check that wire from end to end to make sure there are no other surprises.

I would also send those pics to your dealer and have them spend some quality time with their techs. Should have never left the shops like that. Luckily you didn't end up with a Roman candle for a bike.

Good luck and let me know if there is anything I can do.
 
Thanks guys! I appreciate the kindness and the great advice. In my memory, I taped up a bare spot on that wire a few years ago. I'll upload some images of my fix. I can repair the pulled out wire (solder connection) and splice in some new connections with soldered joints!

Have a great night!
 
Thanks guys! I appreciate the kindness and the great advice. In my memory, I taped up a bare spot on that wire a few years ago. I'll upload some images of my fix. I can repair the pulled out wire (solder connection) and splice in some new connections with soldered joints!

Have a great night!

Sounds like you have the knowhow to fix it. My only advise is I prefer a "good" crimped connection over a soldered connection. Soldered joins can fail over time in areas of high vibration.

If it were my bike I would remove that connector and just crimp in some insulated bullet connectors for each wire. Can still be taken apart if needed but provides a strong joint. Remenber that wire can carry upwards of 40 amps so a good solid connection is needed. I would say that is why the existing one failed. Those spade connectors can loosen up over time. I would then shrink wrap right over the entire connection for each wire and then cover the wires with a pvc split loom tie wrapping both ends of the loom with the split facing down to drain any possible water.

I have several crimped terminals on my bike and have never had one fail. Just make sure the crimp is good and strong and you trim back enough wire. You don't want to be crimping insulation on the main crimp. I always back it up with a second crimp a little further back toward the wire insulation on the actual insulation. That one stops water from entering the main crimp.

Good luck and let us know once she is fired back up and working properly.
 
Happy 4th of July everyone! Canada Day was great with extreme heat and great fireworks in the Okanagan!
So, I completed the wiring harness repair and still have the same situation.
  1. Start bike, charging at 13.6V-bike is purring like it should at 1200 RPM at idle. Voltage across battery fluctuating with RPM up and down.
  2. Start bike, charging at 11.5 V-no change in voltage across battery with increased RPM. Bike appears to have a slight miss?
  3. Start bike, charging at >15.5 V-engine RPM higher on start (1400 RPM)
So , I decided to unwrap the main wiring harness and follow Carl Addison's (Moto Guzzi's) wiring diagram. As we already established, there are 3 wires leading out of the alternator with the Green Red wire now having continuity to the battery after repairing the burnt connector with butt connectors as Canuck 1969 suggested!

The other 2 black wires (plugged into the alternator) aren't specifically identified on the wiring diagram? The diagram shows a single green/black wire. The 2 black wires from the alternator junction with 2 black wires that are coming from the Headlamps (Low and High Beam Connectors) and then these 4 wires are connected with a single black wire which feeds into the Low Beam Relay. There is continuity between the plug and wires and from the headlamp to the relay.

Additional tests today on the resistance of the various wires leading to the dash.
Grey Connector
1-Continuity to battery +
11-Continuity to battery +
17-Continuity to -
19-Continuity to -
20-Continuity to -

Black Connector
21-Continuity to battery positive
22-Continuity to battery positive

So, after this work, I am now extremely familiar with the wiring of my motorcycle, but still completely in the dark as to what is happening with the charging system. When I test rode the bike (in the 13.6 V phase), it performed as always. I had to start the bike 2 times to get it to be in this state of operation.

Thanks in advance everyone!
 
My opinion for what it is worth is since the wiring is now correct, the only suspect part is the VR you put on is not completely compatible with the output of the alternator. My suggestion is to have it checked at an automotive electrical shop and perhaps have a VR installed that matches the output capability.
 
Back
Top