• Ciao Guest - You’ve landed at the ultimate Guzzi site. NEW FORUM REGISTRATIONS REQUIRE EMAIL ACTIVATION - CHECK YOUR SPAM FOLDER - Use the CONTACT above if you need help. New to the forum? For all new members, we require ONE post in the Introductions section at the bottom, in order to post in most of the other sections. ALWAYS TRY A SEARCH BEFORE STARTING A NEW TOPIC - Most questions you may have, have likely been already answered. DON'T BE A DRIVE-BY POSTER: As a common courtesy, check back in and reply within 24 hours, or your post will be deleted. Note there's decades of heavily experienced Guzzi professionals on this site, all whom happily give endless amounts of their VALUABLE time for free; BE COURTEOUS AND RESPECTFUL!
  • There is ZERO tolerance on personal attacks and ANY HYPERLINKS to PRODUCT(S) or other competing website(s), including personal pages, social media or other Forums. This ALSO INCLUDES ECU DIAGnostic software, questions and mapping. We work very hard to offer commercially supported products and to keep info relevant here. First offense is a note, second is a warning, third time will get you banned from the site. We don't have the time to chase repeat (and ignorant) offenders. This is NOT a social media platform; It's an ad-free, privately funded website, in small help with user donations. Be sure to see the GTM STORE link above; ALL product purchases help support the site, or you can upgrade your Forum profile or DONATE via the link above.
  • Be sure to see the GTM STORE link also above for our 700+ product inventory, including OEM parts and many of our 100% Made-in-SoCal-USA GTM products and engine kits. In SoCal? Click the SERVICE tab above for the best in service, tires, tuning and installation of our products or custom work, and don't miss our GT MotoCycles® (not) art on the BUILDS tab above. WE'RE HERE ONLINE ONLY - NO PHONE CALLS MADE OR RECEIVED - DO NOT EMAIL AND ASK QUESTIONS OR ASK TO CALL YOU.
  • Like the new V100, GuzziTech is full throttle into the future! We're now running on an all-new server and we've updated our Forum software. The visual differences are obvious, but hopefully you'll notice the super-fast speed. If you notice any glitches or have any issues, please post on the Site Support section at the bottom. If you haven't yet, please upgrade your account which is covered in the Site Support section or via the DONATE tab above, which gives you full site access including the DOWNLOADS section. We really appreciate every $ and your support to keep this site ad-free. Create an account, sign in, upgrade your account, and enjoy. See you on the road in 2024.

GPS installation info.

Garrett Fulton

Just got it firing!
Joined
Sep 14, 2014
Messages
15
Location
North Carolina, USa
http://www.servicemotoguzzi.com/pub.../Norge 1200 IE MY06 Navigator Support KIT.pdf

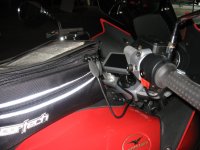
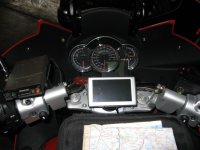
The link above was posted on a thread here from May, 2009 and is supposedly a .pdf file concerning installing a GPS on the Norge. I don't have the username or password for that website. Was wondering if anyone knows how to register and get access there, or is it strictly for dealerships only? I'd like to install a GPS on my new Norge. Thanks for any time and help.
 
I have attached a PDF file that I think may be what that article refers to.
Let me know.
Nick
 

Attachments

  • GPS hookup for Norge.pdf
    1.8 MB · Views: 105
I actually downloaded that file years ago (2007) and did not need a password.
Access level may have changed since.
Good luck!
 
I actually downloaded that file years ago (2007) and did not need a password.
Access level may have changed since.
Good luck!
Nick,

Thought I'd hop on the info as well, but the file won't open.

Thanks!

Lee
 
Basically there is a connector fixed to the rear end of the headstock, under the front of the tank. You have to undo the tank fixings and pull it back a couple of inches so that you can see where the connector is taped or tiewrapped to the frame gusset.
 
Basically there is a connector fixed to the rear end of the headstock, under the front of the tank. You have to undo the tank fixings and pull it back a couple of inches so that you can see where the connector is taped or tiewrapped to the frame gusset.

Yeah, I just read through that .pdf file, but it must be for the earlier Norge. The dash panel for the mounting base shown for the GPS is not similar to my 2012 Norge panel. I'm sure Tom Tom or Garmin make something that would fit my machine, and I'll just have to research the thing. Thanks to all for the help. But I really wish I could get access to that Moto Guzzi site where the file was and if anyone has any advice in ref. to that, I'd like to hear it.
 
Thanks all, I'll try pulling it down on my netbook instead of tablet. I'm actually looking to mount my Nexus 7 as a do all device, just want a power source....ram mounts (they have a huge selection for almost everything) on the way.

Happy Holidays!

Lee
 
Last edited:
On my 2007 Norge I added a fuse box for powerlet outlets and GPS. I then purchased a spare upper triple clamp cover (the plastic cover I think the 2012 has it.) I did not have a motorcycle GPS back then and used a regular Garmin car GPS. I used the mount that you could slip the curved arm into or slide it out of and attached that to the plastic cover with their permanent adhesive pad. The curve in the mount was not enough to work but a few moments with a heat gun and I bent it to what I needed. Unfortunately these are the best pictures I have of the setup. I was just looking at the photo and no, the cord going into the tank bag was not the power for the GPS. Danged if I know what it was right now.
 

Attachments

  • 2009-08-07 Helibars 003.JPG
    2009-08-07 Helibars 003.JPG
    149 KB · Views: 49
  • 2009-08-07 Helibars 004.JPG
    2009-08-07 Helibars 004.JPG
    115 KB · Views: 46
On my 2007 Norge I added a fuse box for powerlet outlets and GPS. I then purchased a spare upper triple clamp cover (the plastic cover I think the 2012 has it.) I did not have a motorcycle GPS back then and used a regular Garmin car GPS. I used the mount that you could slip the curved arm into or slide it out of and attached that to the plastic cover with their permanent adhesive pad. The curve in the mount was not enough to work but a few moments with a heat gun and I bent it to what I needed. Unfortunately these are the best pictures I have of the setup. I was just looking at the photo and no, the cord going into the tank bag was not the power for the GPS. Danged if I know what it was right now.

I've got a new car Tom Tom and have that adhesive pad that came with it. Have you found that the adhesive is strong enough not to shake loose when you're riding? That's a clean looking installation Abbie.
 
The Garmin mount came with 2 adhesive pads. One was for temporary installation where you were supposed to be able to remove it. The permanent pad I think could be removed with heat but fortunately I never had to try. The warning on it was only use it if you had no intention of removing it. It never came loose on me and I rode in heat, rain and cold on all types of roads except gravel. Seriously, it never gave me any reason to worry about it coming loose. I know it was on for quite a while but I just checked my maintenance records on that bike and I did not enter when I installed it. I would guess I used it for 15,000 to 20,000 miles.
Check the mount carefully before install. I had to bend it so I could see the GPS. The fact I could slide the mount off with the base glued on was a real convenience for removing the GPS when parking at the restaurant or hotel.

15-20,000 miles. Good enough for me. Thanks for the time and the advice.
 
Speaking of later ones. I now have a 2012 Norge. It is pre-wired for my TomTom GPS but judging by the length of the wire I am guessing a lower mount by the steering stem. This is where I would prefer it and where I had it on my 2007 Norge. So far now I have wasted over an hour and one RAM stem mount trying to get it to work but no luck. Since it is pre-wired I figured Guzzi would have an optional mount but I can't find one. I am open for ideas as it is turning into a massive waste of time and money currently for me.
 
So, after much time and mental contemplation I came up with a way. I am not 100% happy with it. If the little plug with the Guzzi eagle on it was't $40 I would buy one and drill it out to cover the hole. I think I have a better way now thought of but I'll wait till I get my suspension parts from Todd. Then when I have the front fender off I'll be able to reach up in and tighten it correctly. I just used the impact this time. I also have to find one of those top acorn nuts with the washer built onto it that is new looking as opposed to the one I found in my parts box. I just slipped the tank on for reference.
Still open for better, cleaner ideas. IMG 0134 IMG 0135 IMG 0136
 
So, after much time and mental contemplation I came up with a way. I am not 100% happy with it. If the little plug with the Guzzi eagle on it was't $40 I would buy one and drill it out to cover the hole. I think I have a better way now thought of but I'll wait till I get my suspension parts from Todd. Then when I have the front fender off I'll be able to reach up in and tighten it correctly. I just used the impact this time. I also have to find one of those top acorn nuts with the washer built onto it that is new looking as opposed to the one I found in my parts box. I just slipped the tank on for reference.
Still open for better, cleaner ideas.View attachment 9969 View attachment 9970 View attachment 9971


I just mounted a TomTom Rider on my brother's new Norge. I used the threaded hole with fastener for cable restrainer visible in the black plastic just north of your mount in your first photo.

Had to go to ACE Hardware for a longer 6M SS, but it works just fine with the same short-arm RAM set-up you used.

Bill

P.S. That was the third Norge (and fourth Guzzi) GPS install I have done. For some reason, the dedicated GPS cable was stowed in such a way that I had to almost remove the tank to find the expletive-deleted wiring. Much more difficult than earlier ones. I even doubted for a bit if this Norge had one. :swear:
 
I thought about that but I had 2 doubts. One was using the smaller 6mm bolt with the 10mm hole in the mount. The other was that the top surface of the retainer is slightly lower than the top surface of the clamp. Did you use a spacer or just rotate it and keep the entire mount on the cable clamp.
I already had the tank off so the cable wasn't a problem but they do tuck that thing in there quite tight.
 
Back
Top