• Ciao Guest - You’ve landed at the ultimate Guzzi site. NEW FORUM REGISTRATIONS REQUIRE EMAIL ACTIVATION - CHECK YOUR SPAM FOLDER - Use the CONTACT above if you need help. New to the forum? For all new members, we require ONE post in the Introductions section at the bottom, in order to post in most of the other sections. ALWAYS TRY A SEARCH BEFORE STARTING A NEW TOPIC - Most questions you may have, have likely been already answered. DON'T BE A DRIVE-BY POSTER: As a common courtesy, check back in and reply within 24 hours, or your post will be deleted. Note there's decades of heavily experienced Guzzi professionals on this site, all whom happily give endless amounts of their VALUABLE time for free; BE COURTEOUS AND RESPECTFUL!
  • There is ZERO tolerance on personal attacks and ANY HYPERLINKS to PRODUCT(S) or other competing website(s), including personal pages, social media or other Forums. This ALSO INCLUDES ECU DIAGnostic software, questions and mapping. We work very hard to offer commercially supported products and to keep info relevant here. First offense is a note, second is a warning, third time will get you banned from the site. We don't have the time to chase repeat (and ignorant) offenders. This is NOT a social media platform; It's an ad-free, privately funded website, in small help with user donations. Be sure to see the GTM STORE link above; ALL product purchases help support the site, or you can upgrade your Forum profile or DONATE via the link above.
  • Be sure to see the GTM STORE link also above for our 700+ product inventory, including OEM parts and many of our 100% Made-in-SoCal-USA GTM products and engine kits. In SoCal? Click the SERVICE tab above for the best in service, tires, tuning and installation of our products or custom work, and don't miss our GT MotoCycles® (not) art on the BUILDS tab above. WE'RE HERE ONLINE ONLY - NO PHONE CALLS MADE OR RECEIVED - DO NOT EMAIL AND ASK QUESTIONS OR ASK TO CALL YOU.
  • Like the new V100, GuzziTech is full throttle into the future! We're now running on an all-new server and we've updated our Forum software. The visual differences are obvious, but hopefully you'll notice the super-fast speed. If you notice any glitches or have any issues, please post on the Site Support section at the bottom. If you haven't yet, please upgrade your account which is covered in the Site Support section or via the DONATE tab above, which gives you full site access including the DOWNLOADS section. We really appreciate every $ and your support to keep this site ad-free. Create an account, sign in, upgrade your account, and enjoy. See you on the road in 2024.

Project "0 Tolerance" - Griso Tenni Cafe Scrambler!

PetarZil

Tuned and Synch'ed
Joined
Nov 9, 2016
Messages
32
Location
Macedonia
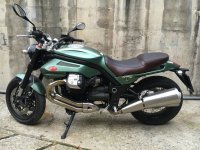
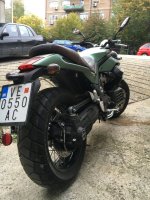
I have mentioned in the inteoduction section, i own a 2011 Griso Tenni LE! Mostly used for weekend, short rides and around town. I have decided to add some personal touch to my beast, and highlight the beauty!

For begining, i'll post my bike from every angle, along with the project checkpoints and goals.

I'll provide you information and details of the current process, and i'll make a proffesional final photoshoot when the masterpiece is completed!
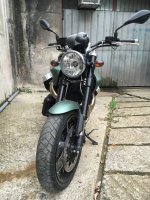
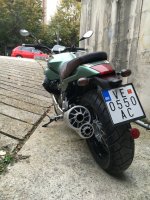
Image Image Image Image
 
Last edited:
Phase 1!

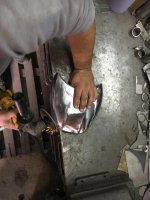
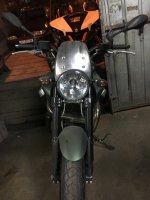
1. Custom headlight fairing! Making a cafe racer fairing out of stainless steel, with custom brackets at two points fixation. Design is inspiration by Rizoma's fairing made for BMW RnineT, but i am modifying the angle, lenght and coverage area.

Work in progress - 90% done
Requires the final polish touch, and painted tenni green at proffesional paintshop, along with adding custom stripes


Image
 
Phase 1!

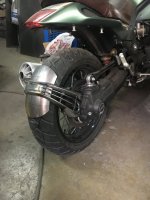
Custom licence plate holder and fender - i personally dislike the current aftermarket offer for licence plate relocation, due to their poor design and non functional. Design is inspired by the OEM oil coolant grill, with pyramid style grill lines, so i can keep the lines from beging till the end od the bike. The small fender beneath is added to provide maximum mud and water protection, it is also diacreet and will be hidden under the plate.

Current peogress 75%
Required the final touch polishing, smoothening of the fender ends, clean the welding leftovers and prepare it for electrostatic painting at high temp.


Image
 
Phase 1!

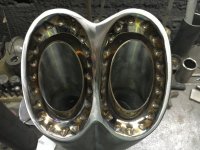
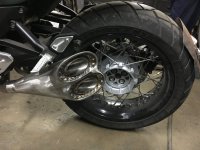
Custom muffler - many of you would disagree with me, but i am more into appearance than performance. All aftermarket exhaust solutions gives even more sportier and agressive look, at the cost of loosing the vintage style. I have desided to design a custom muffler to highlight what i wanted to: Short in lenght so i can open up the view on those beautifull spokes, wide angle cut so i can give 3D view on the exhaust, detailed with custom made triangle holes same as the chromed chassis circles, one part covered with drilled protection part for the scramler look. As for the inner part, it will be 1 in 2 pipes, with drilled inner parts, and using the highest quallity steel whool from Jaguar XJ 5.0 muffler, along with fiberglass cover and acoustic foam. I have used the inner model of the italian exhaust car brand TUBI exhaust to maximum silence the sound.

I have arranged custom mapping after the whole project is done so i can get the max out of it!

Progress - 50% done

Pictures yet to come
 
Last edited:
Phase 1!

Exhaust pipes wrap - i have read plenty of comments about the plus&minus, but i have deaided to do it aimply for aesthetical reasons. The supplier gave me advice of using the thinnest lava wrap in titanium color only for the looks.

Progress 0%
 
Phase 1!

Bar end mirrors - ordered Oberon mirrors online in anodized black color, but if i dislike the look i can easily resell them to a friend and go for another bar end retro style. I am ready to sacrifice the rear view :)

Progress 0%
 
Phase 1!

Tires - To keep up with the style in general, i have decided to buy tires that will match the whole bike. Therefor, i have a dillema that some of you might help me!

Option 1 - Pirelli MT 60 RS or Metzeler Tourance

Option 2 - Racing Rain tires of any brand

Feel free to give me a suggestion

Progress 0%
 
Phase 1!

Headlight grill - feel free to suggest a design or send a picture of mounted one. I still havent decide if i actually going to do it, or just wrap with yellow and add some detail.
 
Last edited:
Phase 1!

Turn indicators - i am planing to keep the OEM turn indicators along with the OEM led light for the plate, but install them on a custom plate under the tail. If i dialike the look, i might change all turn signals for aomething more custom
 
Phase 1!

Seat -
i will keep the brown color for sure, but i will rework the seat's deaign and passenger height. I'm thinking of diamond design on the top, and some solid on the sides with the Guzzi logo, or Moto Guzzi letters or just Griso.
 
Phase 1!

Custom muffler - many of you would disagree with me, but i am more into appearance than performance.

****

Howdy, welcome, and best wishes from the top of Virginia.

Yours was a beautiful machine stock, but I appreciate your mods, too.

I also understand your "appearance over performance" comment and, yes, as you supposed some might, disagree (a bit), as I think both are important. That said, IMO, the latter should trump the former most of the time.

I skimmed your posts and perhaps I missed it, but trust -- unless you have confirmed this has already been done by the PO -- that you have completed the critical fix of replacing the flat tappets with roller ones. If not, you'll eventually have a beautiful objet d'art that won't run. :cry:

Bill
 
Warm greetings to the top of Virginia :)

@Bill Hagan first of all thanks for the time devoted to read my whole post!

Its my fault i forgot to mention in the introduction that i'm leisure type of driver, and have done only 5,000kms in 3 years.

My griso is 2011, with A5 engine, though it comes with last generation flat tappets. My griso was used as demostration vehicle by the official piaggio dealer in my country for 2 years, mostly sitting in the showroom, or driven by the manager. I bought it used with 800kms, 2 oil changes and filters replaced due to 12 month period, and also rollerised tappets in their own service, since they are first to know about the global recall.

The stock tenni is a piece of art indeed! But even Mona Lisa in a poor frame will look bad :) that is the reason i decided to add some personalisation, and started with some details that impressed me when looking into other bikes.

As for the perception on the mufflers, i totally agree with you. Some will prefer the performnce, others the look, and thats the reason i'm making mine a good balance, but if i have to choose between, i'll always pick the beauty over the performance.

Anyway, i'm trying to put my personallity into my griso! I can't change my life for a bike, but i can modify the bike to suit my lifestyle.

Best regards
 
Last edited:
I have mentioned in the inteoduction section, i own a 2011 Griso Tenni LE! Mostly used for weekend, short rides and around town. I have decided to add some personal touch to my beast, and highlight the beauty!

For begining, i'll post my bike from every angle, along with the project checkpoints and goals.

I'll provide you information and details of the current process, and i'll make a proffesional final photoshoot when the masterpiece is completed!
Peter,

Thank you for this thread showing the work you are doing on Your Griso. I may have missed it in your first post, but was wondering if you are doing all of the custom fabrication yourself? If so, all the better. Having worked as a machine designed for many years I appreciate the skills and techniques that talented fabricators use.

I do have some questions for you though. Why have you chosen to make your headlight fairing out of a stainless steel when it will be painted? It seems to me that aluminum sheet or even a low carbon sheet would be more ductile and therefore easier to work.

I am enjoying your progress.

Good day to you too, @roadventure !

I haven't mentioned anywhere, i'm Marketing Manager in the Pharmaceutical industry, therefor nothing connected to manufacturing, welding and fabricating. But, i do posses high desire to learn and practice in this field. My Griso is in a local garage where the person is a good friend of mine, and their work is pure industrial, but we both engaged in my project, me as designer and assistance with drawing and executing the plans, maps, schemes, calculations, modeling etc. he is doing the final cuts and the welding. We both do the cleaning and the polishing. I might be able to do all by myself, but i am afraid the final look will be more amateur, and i don't want my bike to suffer of my own unexperience errors and mistakes.

As for the fairing, the Inox is material that we have all the machinery, and is less sensitive than alluminium. First calculation is the weight, which is 130grams heavier. Measured the pre working plate with same dimensions from alluminium and inox. In order to make it more stable, and rebalance those 130grams, i have made the brackets to fix in 2 positions. Second things was the sharpness. No matter how much i push the edges, the 2mm alluminium plate is sharp as knife, as for the inox, you can play with it.
As for the other options, fiberglass or carb, it would be easier indeed, but i haven't done anything with it, and my friend is metal guy. Even if we would decide to do it, we had to make a model first, and that model would be metal. So, i allready have the metal version, i can easy manufacture it in fiberglass now. But, if i haven't positioned the angle for wind rotation, i can fix it with inox in half an hour, and if it was carb or fiber, it would reuire a complete rework.

Hope you got me on this :)
 
Final touch before painting, but ...

I have decided to drill two more holes in between the existing one for the brackets. Not only for better stability, but also for the simetry with the three sockets with the forks.

And don't judge the turn indicators, they'r not fixed ;)

Image
 
Yes, I understand completely.

Now for a question about your muffler. Is it fabricated from tube, or cast. It is difficult to tell from the photo you showed. Either way, nice design. The dimpling at the end cap is a nice detail.

I've devided muffler design in outer and inner part. All technical photos are in the GoPro and i am posting only the ones from my phone.

1. Inner - 4 mini pipes , 3 are 62mm diameter custom drilled with 3mm holes, welded in Y design. Last is the connector pipe welded to the muffler ending so i can easily connect to the open pipe, exact fit mannualy edited. Used highest quallity fiber, steel wool from a Jaguar muffler, and sprayed the edges with acoustic foam. I think this was the maximum i could silence the open pipe with such short muffler lenght.

2. Outer part - made of tube, 2mm inox. The end caps were 2 sepparate caps, and welded togather after positioning. The artistic wholes are the same model as the ones we have in the chrome circle in the chassis.

The exhaust is not finished, it requires the final touch, fixing custom brackets, heat shield with holes for the scrambler look, and final inspection.

I have made a test install, but i can't upload a video, send me your mail on inbox if you want to hear it.

Best regards
 
Last edited:
Back
Top