• Ciao Guest - You’ve landed at the ultimate Guzzi site. NEW FORUM REGISTRATIONS REQUIRE EMAIL ACTIVATION - CHECK YOUR SPAM FOLDER - Use the CONTACT above if you need help. New to the forum? For all new members, we require ONE post in the Introductions section at the bottom, in order to post in most of the other sections. ALWAYS TRY A SEARCH BEFORE STARTING A NEW TOPIC - Most questions you may have, have likely been already answered. DON'T BE A DRIVE-BY POSTER: As a common courtesy, check back in and reply within 24 hours, or your post will be deleted. Note there's decades of heavily experienced Guzzi professionals on this site, all whom happily give endless amounts of their VALUABLE time for free; BE COURTEOUS AND RESPECTFUL!
  • There is ZERO tolerance on personal attacks and ANY HYPERLINKS to PRODUCT(S) or other competing website(s), including personal pages, social media or other Forums. This ALSO INCLUDES ECU DIAGnostic software, questions and mapping. We work very hard to offer commercially supported products and to keep info relevant here. First offense is a note, second is a warning, third time will get you banned from the site. We don't have the time to chase repeat (and ignorant) offenders. This is NOT a social media platform; It's an ad-free, privately funded website, in small help with user donations. Be sure to see the GTM STORE link above; ALL product purchases help support the site, or you can upgrade your Forum profile or DONATE via the link above.
  • Be sure to see the GTM STORE link also above for our 700+ product inventory, including OEM parts and many of our 100% Made-in-SoCal-USA GTM products and engine kits. In SoCal? Click the SERVICE tab above for the best in service, tires, tuning and installation of our products or custom work, and don't miss our GT MotoCycles® (not) art on the BUILDS tab above. WE'RE HERE ONLINE ONLY - NO PHONE CALLS MADE OR RECEIVED - DO NOT EMAIL AND ASK QUESTIONS OR ASK TO CALL YOU.
  • Like the new V100, GuzziTech is full throttle into the future! We're now running on an all-new server and we've updated our Forum software. The visual differences are obvious, but hopefully you'll notice the super-fast speed. If you notice any glitches or have any issues, please post on the Site Support section at the bottom. If you haven't yet, please upgrade your account which is covered in the Site Support section or via the DONATE tab above, which gives you full site access including the DOWNLOADS section. We really appreciate every $ and your support to keep this site ad-free. Create an account, sign in, upgrade your account, and enjoy. See you on the road in 2024.

XMSN output oil seal stuck

Nathan Stanley

Just got it firing!
Joined
May 10, 2020
Messages
19
Location
Las Vegas
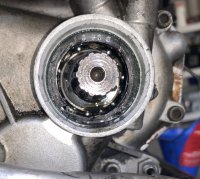
This is my last, and longest lasting oil leak to correct before the bike goes back together to ride. The PO used a non-standard seal in this spot. It is metallic, thin, and didn’t actually seal at all against the speedo drive. There isn’t any seal material, it’s just a flat washer-like piece, although it is imprinted with numbers like a seal would be. The trouble is, a liquid compound was used to affix it in place to the rear cover, and has a blue hue. I’m guessing blue thread-lock. I wanted to complete this job without crabbing the frame and completely removing the xmsn. I drilled some holes in the seal in attempts to get some purchase on it, but it is in there pretty solidly. Any recommendations that require less work than complete disassembly?
Thanks!

Upload 2020 7 18 10 17 41
 
It looks like you have removed the speedometer drive collar, if you haven't do so but don't drop the little steel ball that locks the collar to the output shaft. It is in the longest groove on the output shaft. Then see if you can get a cotter pin puller behind the seal and carefully work it out. I've done it a couple times, but didn't have to fight the blue stuff. Perhaps heating the area first with an electric heat gun will help by softening the sealant and expanding the case in that area.
 
Thank you, John. Yep, retaining nut, speedo drive, and drive ball are removed.
I don’t have a heat gun, but I suppose I could try carefully and slowly with a bbq lighter. I could always use an offset plier; better pick one of those up. That will probably give the best bite on the material.
 
Thank you, John. Yep, retaining nut, speedo drive, and drive ball are removed.
I don’t have a heat gun, but I suppose I could try carefully and slowly with a bbq lighter. I could always use an offset plier; better pick one of those up. That will probably give the best bite on the material.

If you have a harbor freight or similar nearby you can pick one up relatively cheap. You will find it comes in handy for many uses. I don't recommend using an open flame as gearbox oil will burn.

harborfreight.com/1500-watt-dual-temperature-heat-gun-56434.html
 
Ok, you got me here.

Offset pliers? What are you talking about? Do you mean pliers with a bent tip?

I’m confused because I’ve never heard or seen that term.

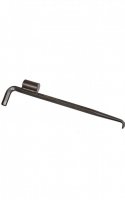
When I cannot fit a standard “anchor shaped” seal puller, this little bugger gets the job done! Hook it, hold the bent end keeping your hand safely below the round metal striker, then and tap the round striker with a small hammer. Done!

Mayhew Pro 37019 Seal Puller


C0798CBE A4EB 4076 8624 75D68D31DED5
 
Last edited:
Yes, bent tip needle nose or long nose pliers. After a short trip to the search engine, I realize that they don’t have a common nomenclature. It seems to change depending on manufacturer.
Either way, they worked. I think most seal tools would get the job done, aside from the anchor type, but I wasn’t making any progress because of the thread lock that was used to glue it in place. The heat gun softened it enough to release.
That tool you posted looks pretty nifty! I’m not sure it would have worked in the space I was confined to.
 
Back
Top