• Ciao Guest - You’ve landed at the ultimate Guzzi site. NEW FORUM REGISTRATIONS REQUIRE EMAIL ACTIVATION - CHECK YOUR SPAM FOLDER - Use the CONTACT above if you need help. New to the forum? For all new members, we require ONE post in the Introductions section at the bottom, in order to post in most of the other sections. ALWAYS TRY A SEARCH BEFORE STARTING A NEW TOPIC - Most questions you may have, have likely been already answered. DON'T BE A DRIVE-BY POSTER: As a common courtesy, check back in and reply within 24 hours, or your post will be deleted. Note there's decades of heavily experienced Guzzi professionals on this site, all whom happily give endless amounts of their VALUABLE time for free; BE COURTEOUS AND RESPECTFUL!
  • There is ZERO tolerance on personal attacks and ANY HYPERLINKS to PRODUCT(S) or other competing website(s), including personal pages, social media or other Forums. This ALSO INCLUDES ECU DIAGnostic software, questions and mapping. We work very hard to offer commercially supported products and to keep info relevant here. First offense is a note, second is a warning, third time will get you banned from the site. We don't have the time to chase repeat (and ignorant) offenders. This is NOT a social media platform; It's an ad-free, privately funded website, in small help with user donations. Be sure to see the GTM STORE link above; ALL product purchases help support the site, or you can upgrade your Forum profile or DONATE via the link above.
  • Be sure to see the GTM STORE link also above for our 700+ product inventory, including OEM parts and many of our 100% Made-in-SoCal-USA GTM products and engine kits. In SoCal? Click the SERVICE tab above for the best in service, tires, tuning and installation of our products or custom work, and don't miss our GT MotoCycles® (not) art on the BUILDS tab above. WE'RE HERE ONLINE ONLY - NO PHONE CALLS MADE OR RECEIVED - DO NOT EMAIL AND ASK QUESTIONS OR ASK TO CALL YOU.
  • Like the new V100, GuzziTech is full throttle into the future! We're now running on an all-new server and we've updated our Forum software. The visual differences are obvious, but hopefully you'll notice the super-fast speed. If you notice any glitches or have any issues, please post on the Site Support section at the bottom. If you haven't yet, please upgrade your account which is covered in the Site Support section or via the DONATE tab above, which gives you full site access including the DOWNLOADS section. We really appreciate every $ and your support to keep this site ad-free. Create an account, sign in, upgrade your account, and enjoy. See you on the road in 2024.

V50 II alternator rotor wont come out

kevin vernon

Just got it firing!
Joined
Nov 26, 2021
Messages
6
Location
Wales
Hi There All

I'm trying to remove the alternator rotor on my V50 II in order to get at the ignition pickups behind,

The retaining screw unscrews easily and is now clearly free of the thread in the crank, however it will not pull through body of the rotor.

Anyone else experience this problem? Any suggestions on how to proceed?
 
Moto Guzzi had a hardened pin spacer that went in then the bolt would pop it off. I bought a BMW tool that has that machined on it so you just run it in, all 1 piece. Even with these tools they can be difficult. Warming it up w/heatgun and a rubber mallet some helps but you must be careful or the windings will break.
You can find these tools easily on the web w/a search.
 
Once you tighten the screw down, either the hardened pin and stock screw, or one piece BMW tool, a shock from a brass hammer on the head of the screw should pop it off. It is a tapered fit which locks to itself.
 
I have the tool from GutsiBits. My problem is that having unthreaded the stock screw from the crank it will not pull through the rotor. I've even tried encouraging it with a slide hammer attached to a mole grip. Nothing to show for that apart from a nasty pinch blister!
 
I thought there were two 'threaded sections' to unscrew the bolt out. First is the section in end of crank & second is a section in the back of the rotor (the Gutsibits special tool only threads into the rear section of the rotor and then pushes the end of the crank so pops rotor off...so you need to unscrew the bolt twice !
 
Using screw pressure alone will not get the rotor off and may cause damage if you crank it down too tight. As stated it is a taper fit so apply tension, then shock from a hammer is the best way to get the rotor to come off.
 
His problem is that the stock screw won't come out of the rotor, presume because it's out the crank but not out the rotor threads (he hasn't put the extractor screw in yet!)
 
I have the tool from GutsiBits. My problem is that having unthreaded the stock screw from the crank it will not pull through the rotor. I've even tried encouraging it with a slide hammer attached to a mole grip. Nothing to show for that apart from a nasty pinch blister!


You also have to unscrew it from the rotor. There are threads in the rotor as well as the crankshaft. You may have damaged things using that slide hammer.
 
That make sense. I did imagine that to be the case and tried to pick up a thread in the rotor without success. It was then I took advice from the local bike shop. Clearly should have asked here first.

So on the assumption that I've been a dick and messed up the threads on the back of the rotor (or just possible they'd previously been messed up given the unwilling to pick up) does anyone have any advice on how to dig my self or get dug out of this hole
 
Last edited:
That make sense. I did imagine that to be the case and tried to pick up a thread in the rotor without success. It was then I took advice from the local bike shop. Clearly should have asked here first.

So on the assumption that I've been a dick and messed up the threads on the back of the rotor (or just possible they'd previously been messed up given the unwilling to pick up) does anyone have any advice on how to dig my self or get dug out of this hole


At this point I'd say the rotor and screw have to be sacrificed. Thread the screw back in partially to the crank. As far as you can without the screw bottoming on the rotor. Then an external puller on the rotor. You just have to break the bond of the tapered fit.
 
I do not think you have mickey’d up the threads but even if you have, they can easily be chased back with the proper tap.

The trick is to break the compression fitment between the tapered shaft and the rotor.

Can you remove the bolt, place two or three good washers on the bolt and thread it into the rotor without reaching the threads in the crankshaft?

If so, then you can then use a grab head on a slide hammer to safely transmit pull to the screw and hence the rotor.

Another trick is to find out the size and pitch of the screw, and then find one long enough to bottom out in the crankshaft with 2-5 cm of additional length.

You can measure depth with a straw or bamboo meat skewer of wire coat hanger.

Find the depth where the threads bottom out. Use a grinding wheel to knock off the threads on the section that will go into the crankshaft but leve the threads intact where they will be inside of the rotor. When the screw bottoms out in the crankshaft, a few turns more will apply outward force on the threads in the rotor and cause it to pop off the shaft. Using a hair dryer to heat up the rotor will often times help.

Post some pics of where you are. This will help out a lot!

84C3E4C0 3223 4C68 8297 2A1D9F87BD3F
 
Last edited:
Scott, he said he can't get the screw out.

I just re-read his original post and I guess I misread it. My bad.

For the life of me, I’ve never seen a retaining bolt on any BMW airhead rotor or any metric cruiser for the matter, that refused to come out.

How much force did you use on your slide hammer? I am sure you probably have a 1kg hammer or maybe 2kg?

Please tell me you didn’t use a 5kg or 10 kg slide hammer for a V50 rotor?

Also, I guess I’m not fully understanding what is happening when you back out the bolt.

Your bolt should look like this one I believe.

B16AE870 E644 433F A0FB 6171224934E3

If this is the case, then the threads at the end of the bolt have to turn through the rotor which is threaded its entire length.

What type of end is on that bolt? Allen head or actual hex head?

Does it just STOP turning and then the crankshaft starts rotating from continuing to turn the bolt backwards?

If so, put the bike in 1st gear and have somebody apply the rear brake or zip tie it down, to stop the crank from being rotated while turning out the bolt.

If you have mickey’d the threads, a reverse-forward back-and-forth rotation of the bolt to try and brute force “chase” the threads may work in easing it out.

This is where not knowing what type of head is on your particular bolt, is thwarting me.

If it is a hex head, then a box wrench is handy as it is easy to control back and forth movement easily and quickly. However if it is an internal allen hex cut, then you have to either use an allen key wrench or a allen head socket bit.

Either way, you need to hold outward tension on the bolt while turning it out, to make the threads catch from the bolt, through the cut threads in the rotor.

If you used your slide hammer and banged that bolt up against the inside of the rotor threads without it actually being threaded into the rotor, then yes, you may have mauled up the threads.

John may be correct in saying that you may end up sacrificing the rotor and bolt.

The part you definitely do not want to screw up, is the crankshaft and its internal threads. Then you will have a real bonafide complete mess on your hands!

Again though, some good pictures will do wonders here for everyone in trying to help sort you out.

EDITED:

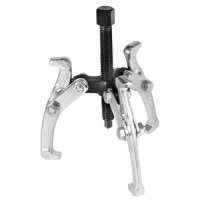
Can you use a simple 3 jaw puller to gently pull the rotor from behind while applying force to the crankshaft?

E0FAEC46 7E66 4DF4 9FE8 3FB6894F2E48
 
Last edited:
Did you have any luck with the puller, Kevin? I also tried an improvised slide-hammer technique on my V50ii alternator before resorting to the proper tool. It's odd how difficult these are to get off, yet so easy when you apply a little force with the right tool and it pops off just as easily as the cap from your favorite cold beverage.

I wonder if yours was "over torqued" at some point or maybe the bike was ridden without the cover and it allowed some water in resulting in a rusted unit? I think the torque spec on these is something like 3 ft-lbs...

If it were me, I'd force the bolt through the alternator even if it means a cross-thread. It can be sufficiently repaired with the proper tap, as Scott mentioned. Hit it with some penetrating oil while you're at it. Best of luck!
 
This is the type of forum post I really loath.

People come with a problem, begging for help.

Detailed help is offered by multiple people, and not even so much as the courtesy of a “Thanks” or even a reply in 2 months.

That’s the very definition of “drive-by poster”.

It’s very rude in my estimation and it makes me personally, very frustrated.
 
Did you have any luck with the puller, Kevin? I also tried an improvised slide-hammer technique on my V50ii alternator before resorting to the proper tool. It's odd how difficult these are to get off, yet so easy when you apply a little force with the right tool and it pops off just as easily as the cap from your favorite cold beverage.

I wonder if yours was "over torqued" at some point or maybe the bike was ridden without the cover and it allowed some water in resulting in a rusted unit? I think the torque spec on these is something like 3 ft-lbs...

If it were me, I'd force the bolt through the alternator even if it means a cross-thread. It can be sufficiently repaired with the proper tap, as Scott mentioned. Hit it with some penetrating oil while you're at it. Best of luck!
Hi There

We did eventually pull the bolt through the rotor, turned out to be slightly bent which was possibly why it wouldn't pick up the thread in the rotor. After that the rotor came off easily enough with the extractor which didn't even need re-tapping. I still remain puzzled how it managed to thread into the crank given the degree of bend,
 
This is the type of forum post I really loath.

People come with a problem, begging for help.

Detailed help is offered by multiple people, and not even so much as the courtesy of a “Thanks” or even a reply in 2 months.

That’s the very definition of “drive-by poster”.

It’s very rude in my estimation and it makes me personally, very frustrated.

With all due respect Scott I did reply to the early responders. I must admit that I missed you last post, possibly because it started with an apology for not having read my posts properly, I suspect I only read the summary on the notification rather than visiting the forum to read the whole message.
 
With all due respect Scott I did reply to the early responders. I must admit that I missed you last post, possibly because it started with an apology for not having read my posts properly, I suspect I only read the summary on the notification rather than visiting the forum to read the whiole message.

With “all due respect” Sir, asking for assistance and then not even bothering to fully read the replies, is considered extremely rude.

From the beginning, I understood precisely what you wrote but I just demurred to John as it was easier and allowed the conversation to proceed. I posted detailed questions, photos and explanations of how to overcome your predicament.

Furthermore, after again carefully re-reading your posts, the words “Thank you” never appeared to anyone, at any time after you begged for help to “dig you out of your hole” as you put it.

You might want to reconsider your forum etiquette instead of doubling-down on your previous behavior.
 
Last edited:
This is the type of forum post I really loath.

People come with a problem, begging for help.

Detailed help is offered by multiple people, and not even so much as the courtesy of a “Thanks” or even a reply in 2 months.

That’s the very definition of “drive-by poster”.

It’s very rude in my estimation and it makes me personally, very frustrated.
I disagree with your assessment here, Scott. There was back-and-forth on the post from the beginning, and the issue/attack plan was laid out pretty clearly after just two days. Didn't really see a need for a lot of follow-up after that, but I know problem tasks, such as this one, can age for weeks (or months) before being dealt with on the shop floor...
 
Back
Top