• Ciao Guest - You’ve landed at the ultimate Guzzi site. NEW FORUM REGISTRATIONS REQUIRE EMAIL ACTIVATION - CHECK YOUR SPAM FOLDER - Use the CONTACT above if you need help. New to the forum? For all new members, we require ONE post in the Introductions section at the bottom, in order to post in most of the other sections. ALWAYS TRY A SEARCH BEFORE STARTING A NEW TOPIC - Most questions you may have, have likely been already answered. DON'T BE A DRIVE-BY POSTER: As a common courtesy, check back in and reply within 24 hours, or your post will be deleted. Note there's decades of heavily experienced Guzzi professionals on this site, all whom happily give endless amounts of their VALUABLE time for free; BE COURTEOUS AND RESPECTFUL!
  • There is ZERO tolerance on personal attacks and ANY HYPERLINKS to PRODUCT(S) or other competing website(s), including personal pages, social media or other Forums. This ALSO INCLUDES ECU DIAGnostic software, questions and mapping. We work very hard to offer commercially supported products and to keep info relevant here. First offense is a note, second is a warning, third time will get you banned from the site. We don't have the time to chase repeat (and ignorant) offenders. This is NOT a social media platform; It's an ad-free, privately funded website, in small help with user donations. Be sure to see the GTM STORE link above; ALL product purchases help support the site, or you can upgrade your Forum profile or DONATE via the link above.
  • Be sure to see the GTM STORE link also above for our 700+ product inventory, including OEM parts and many of our 100% Made-in-SoCal-USA GTM products and engine kits. In SoCal? Click the SERVICE tab above for the best in service, tires, tuning and installation of our products or custom work, and don't miss our GT MotoCycles® (not) art on the BUILDS tab above. WE'RE HERE ONLINE ONLY - NO PHONE CALLS MADE OR RECEIVED - DO NOT EMAIL AND ASK QUESTIONS OR ASK TO CALL YOU.
  • Like the new V100, GuzziTech is full throttle into the future! We're now running on an all-new server and we've updated our Forum software. The visual differences are obvious, but hopefully you'll notice the super-fast speed. If you notice any glitches or have any issues, please post on the Site Support section at the bottom. If you haven't yet, please upgrade your account which is covered in the Site Support section or via the DONATE tab above, which gives you full site access including the DOWNLOADS section. We really appreciate every $ and your support to keep this site ad-free. Create an account, sign in, upgrade your account, and enjoy. See you on the road in 2024.

tank removal

Roblatt

High Miler
Joined
Nov 18, 2008
Messages
603
Location
Nar Nar Goon, Victoria, Australia
I've read MikeC's instructions from a while ago, I've tried BrianUK's trick of disconnecting the fuel pump and trying to start it to reduce hose pressure, and no luck.

Now that the Breva's aren't so new any more, I figure someone(s) would have perfected the technique of removing that blasted fuel line with ease.

Jiggle, twist, turn, push, pull, RP7. All I've done is worn a layer of skin off my delicate fingers.

2006 B11.

Any suggestions?

thanks

Robert
 
Oh YES!

just entered to post a best-ever trick and I see your post.

This saturday, knowing I'll have to remove tank to replace the valve-cover gasket, I re-read all the posts about the bloody connector for the fuel-line-to-tank linkage. So, I thought I'm well equipped, knowing I have to push, pull and hold all in the same time. My fingertips on both my hands do hurt till now... It did not work. at all. the freaking grey unit did nothing at all...

BUT, after using a strong projector lighting into the connection module, and trying to understand how the heck are the mechanics there are designed I came to a simple idea, which proves awesome.

all you need to remove the tank from 1200 sport (my case):

0. ride tank as ampty as you wish. I removed it while very full, was ok, but for sure would be easier if 15 kg lighter :)
1. release 4 bolts on the plastic linkage in the fork area, to disconnect tank from the front plastic molding.
2. remove seat
3. remove right underseat plastic cover (1 bolt)
4. start motor
5. disconnect the plug going to fuel pump, let the motor die out of fuel.
6. release rear tank bolt
7. disconnect 2 fuel overflow lines from the triangle-connector
8. lift the back of the tank (in my case around 15 cm clearance in the rear bolt area)
9. put something to keep tank lifted. perfectly - something with pins entering the holes intended for the bolt, to ensure this insert can not be pushed away, and the tank will not smash your hands.
10. get strong light source
11. go to the left side of the bike
12. take some long thin and strong object with you (in my case a hex-head stick some 15 cm long and 1mm thick, smallest I had, did it well, but the longer the better)
13. look at the connector assembly from the left side, along the horizontal part of the RED plastic pipe exiting the tank, after it turns 90 degree to become horizontal
14. on this red plastic pipe you will see a ring, being a part of this pipe, which serves as a locking point for the 4 grey teeth, being actually a part of the bloody grey round something.
15. now you need to just lightly touch every of this four teeth with your long thin stick, and they easily click away on their own. the pressure amount is minimal, as high as if you had to move a book laying on the table, or maybe 0,2-0,3 kg
16. you will see the teeth move a little away from locked position around the red ring. do not try to move them too much away to provide perfect clearance from red stuff, to not break teeth. it is really enough to gently touch 'em.
17. grab the fuel line with your right hand from above the tank and pull directly on it gently (any black surface, the closer to the connector - the better). do not pull on grey thing.
18. you will fill it is sliding away from red nose and after 3-4 cm travei it is free and puking sonme 20 ml of fuel on your airbox :)
19. do not forget to remove snorkel from airbox while your tank is off :)

having this experience with releasing teeth, it will take me some 15 minutes to remove the tank now.

by the way, in case of 1200 sport, the front plastic covers attached to the tank (matt black with chrome inserts) really disturb by lack of clearance while removing the tank. simple help here, which I'll use always, is placing some rubber strap around the tank, from top over it, with some hacks on the ends, which can be connected to the frontest-possible ends of this plastic covers, resulting in the spanning them to the sides. they are really flexible ones detached from front moulding, and if they are spread by this rubber some 10-15 cm apart - tank removal and placement back will be just as simple as it has to be.

good luck!
Alex
 
Personally, I find persistence and a few choice curses helps. A key learning for me was that it doesn't "click" loose - you don't know the line is released until it just comes apart!

Good luck!
 
Alex,

that's a great description. I'll give it a go and report back.
I've pointed a torch and have seen the teeth you describe, but I wasn't game to touch them.
Now I will.

Bobra,

cursing didn't help. And I did use ALL of them.
I will keep in mind that there is no click for release though.

thanks guys,

Robert
 
Kuzya said:
<snip>

This saturday, knowing I'll have to remove tank to replace the valve-cover gasket

<snip>

1. release 4 bolts on the plastic linkage in the fork area, to disconnect tank from the front plastic molding.

<snip>

3. remove right underseat plastic cover (1 bolt)

<snip>

Alex

I can see Kathi reading your post to me step-by-step next to me I (try to) remove the tank! :lol:

Seriously, thanks.

But, I post to say that, unless the S12 is significantly than the Norge in the tank area -- always a possibility, and I sure don't know -- I only use the three steps, above, to change out valve-cover gaskets, with the only addition to be to prop the tank up a an inch or so with a small block of wood, tho even that is not necessary. Can imagine circumstances, e.g., when one finds the gasket adhering to the head surface as if applied with superglue, requiring much delicate scraping and many of the curses you mention. But, most of the time, do not need to do that on my Norge, anyway.

Thanks again for the detailed description. A friend here broke the connector off his tank, and I do not wish to repeat that or his anguish.

Bill
 
Wow, I just took the tank off my 07 B1100 last week to change the air filter and the fuel line came off with a gentle pull and went back on as easily. Was this too easy, I hope I didn't inadvertently do something stupid! I have ridden it several times since and not noticed anything out of the ordinary.
 
MarkB said:
Wow, I just took the tank off my 07 B1100 last week to change the air filter and the fuel line came off with a gentle pull and went back on as easily. Was this too easy, I hope I didn't inadvertently do something stupid! I have ridden it several times since and not noticed anything out of the ordinary.

No one here likes you, Mark. :p

I have yet to do it unassisted. :woohoo:
 
Bill Hagan said:
Kuzya said:
<snip>

This saturday, knowing I'll have to remove tank to replace the valve-cover gasket

<snip>

1. release 4 bolts on the plastic linkage in the fork area, to disconnect tank from the front plastic molding.

<snip>

3. remove right underseat plastic cover (1 bolt)

<snip>

Alex

I can see Kathi reading your post to me step-by-step next to me I (try to) remove the tank! :lol:

Seriously, thanks.

But, I post to say that, unless the S12 is significantly than the Norge in the tank area -- always a possibility, and I sure don't know -- I only use the three steps, above, to change out valve-cover gaskets, with the only addition to be to prop the tank up a an inch or so with a small block of wood, tho even that is not necessary. Can imagine circumstances, e.g., when one finds the gasket adhering to the head surface as if applied with superglue, requiring much delicate scraping and many of the curses you mention. But, most of the time, do not need to do that on my Norge, anyway.

Thanks again for the detailed description. A friend here broke the connector off his tank, and I do not wish to repeat that or his anguish.

Bill

S1200 2V has unfortunately slightly different valve-cover and a deeper reaching-around fairing piece attached to the tank compared to a 2V Norge
look here
share-8B14_4BDAFA8A.html


the black plastic cover for the spark-wire is bolted with 2 tiny nuts on it's inner side and the clearance of the lifted tank does not let there. it is even good, cause my valve-cover gasket was sticking in pieces to the cylinder head and cover, so it would be difficult to remove the rests with a tank on :)

next time I'll first try the clickless push-push-pull approach, but, honestly, when the fuel line was dismounted, I surely looked into the connector to better understand the physics, and strange as it is, I see no effect from the gray part moving any direction, which may cause the teeth to spread.. it has a small (0,5 mm) free play and comes to stop by hard plastic pieces...
I'm wondering what do mechanics @ workshops do to detach the line? such a huge topic, but no profi-opinion from authorized dealers seen so far.
 
Bill Hagan said:
MarkB said:
Wow, I just took the tank off my 07 B1100 last week to change the air filter and the fuel line came off with a gentle pull and went back on as easily. Was this too easy, I hope I didn't inadvertently do something stupid! I have ridden it several times since and not noticed anything out of the ordinary.

No one here likes you, Mark. :p

I have yet to do it unassisted. :woohoo:


I guess I won't be coming to Little Five Points anytime soon :(
 
guys, if you try the described method with unlocking teeth, please let know if it works fine for you, I'm not sure it is not something that worked only on my bike, and it is better to have more results posted for other people looking for ideas on the matter (before we find out it is compatible only to my bike in a form that someone will break his connector trying).
thanks!
Alex
 
Alex,

I owe you several beers.

I used the smallest allen key I had, tickled the teeth, as you said, "just touching" them. There was no click or anything to tell me it was done, the fuel hose just slid off.

Sir, you are a godsend!

Robert

edit: I have a bit of fuel in my tank, so I just used duct tape around the elbow and it doesn't leak. Oh, and Alex, you're right about the wings, it's a good idea to spread them with elastic cord before tank removal.
 
Roblatt said:
Alex,

I owe you several beers.

I used the smallest allen key I had, tickled the teeth, as you said, "just touching" them. There was no click or anything to tell me it was done, the fuel hose just slid off.

Sir, you are a godsend!

Robert

edit: I have a bit of fuel in my tank, so I just used duct tape around the elbow and it doesn't leak. Oh, and Alex, you're right about the wings, it's a good idea to spread them with elastic cord before tank removal.

:D glad it works not only for me!
getting more and more reasons to travel to your continent, friends are calling, now you with the beer :) by the way, in case any of you, Guzzista, plan to visit Ukraine - will be glad to welcome you here in person, beer included. I'm kinda MG ambassador here, with the first and only 1200Sport countrywide ;)
 
Bill Hagan said:
MarkB said:
<snip>

I guess I won't be coming to Little Five Points anytime soon :(

OK, OK, I'll buy you a beer at the Vortex for having fun at your expense. :silly:

Hope to see you tomorrow night.

Bill


Thanks Bill, but I have thick skin.......I don't think I can make it today, as I am leaving early tomorrow morning on a trip(motorcycle)! I will try and make it next month, as I think the only place I am going to see another Guzzi is at a meeting!

Mark
 
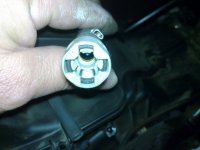
For those yet to remove the fuel line, here is a pick of the grey connector that was difficult to remove until Alex's little trick.
It's the white clips on the inside that you need to tickle.
 

Attachments

  • fuel connector.jpg
    fuel connector.jpg
    45.6 KB · Views: 1,577
Roblatt said:
For those yet to remove the fuel line, here is a pick of the grey connector that was difficult to remove until Alex's little trick.
It's the white clips on the inside that you need to tickle.

exactly, thanks for the picture! I always forget to make pics while something is dismounted, being too disappointed if it does not work, or too happy if it finally works :)
 
Kuzya said:
Roblatt said:
For those yet to remove the fuel line, here is a pick of the grey connector that was difficult to remove until Alex's little trick.
It's the white clips on the inside that you need to tickle.

exactly, thanks for the picture! I always forget to make pics while something is dismounted, being too disappointed if it does not work, or too happy if it finally works :)


Alex,

pictures for me is second nature. I use them to ensure everything goes back where it belongs when re-assembling. I used to have a habit of having bits left over and the pictures help.

I once took a gearbox out of my car and had several bolts and 2 brackets left over (weight saving performance enhancement!), so now pictures are a must for me.
 
I used a jewelers screwdriver to release two of the clips and the fitting came apart with no problem.
 
Alex,
Thank You, Thank You, Thank You.
I have a VII and getting the fuel line off is usually no problem.
The Norge is a real problem until I tried your idea. Worked great and unassisted.
Had to lift the tank fairly high to access the lugs but when I did it came off like a dream.
Free Beer in Australia when you arrive and catch up with me.
Happy New Year, Allan
 
A small squirt of WD40 also allows the teeth to slide as intended. Probably when the connector is taken off and put back on, a small amount of fuel is spilt on these teeth preventing them from sliding as intended, hence the WD40!
 
Back
Top