I MIGHT be getting some new to me (pre owned, but new) Agostini's from a fellow I met thru the Net several months ago. He never got to place them on his bike as he was rear ended. In any event, what's entailed in installing them?
Navigation
Install the app
How to install the app on iOS
Follow along with the video below to see how to install our site as a web app on your home screen.
Note: This feature may not be available in some browsers.
More options
-
Ciao Guest - You’ve landed at the ultimate Guzzi site. NEW FORUM REGISTRATIONS REQUIRE EMAIL ACTIVATION - CHECK YOUR SPAM FOLDER - Use the CONTACT above if you need help. New to the forum? For all new members, we require ONE post in the Introductions section at the bottom, in order to post in most of the other sections. ALWAYS TRY A SEARCH BEFORE STARTING A NEW TOPIC - Most questions you may have, have likely been already answered. DON'T BE A DRIVE-BY POSTER: As a common courtesy, check back in and reply within 24 hours, or your post will be deleted. Note there's decades of heavily experienced Guzzi professionals on this site, all whom happily give endless amounts of their VALUABLE time for free; BE COURTEOUS AND RESPECTFUL!
-
There is ZERO tolerance on personal attacks and ANY HYPERLINKS to PRODUCT(S) or other competing website(s), including personal pages, social media or other Forums. This ALSO INCLUDES ECU DIAGnostic software, questions and mapping. We work very hard to offer commercially supported products and to keep info relevant here. First offense is a note, second is a warning, third time will get you banned from the site. We don't have the time to chase repeat (and ignorant) offenders. This is NOT a social media platform; It's an ad-free, privately funded website, in small help with user donations. Be sure to see the GTM STORE link above; ALL product purchases help support the site, or you can upgrade your Forum profile or DONATE via the link above.
-
Be sure to see the GTM STORE link also above for our 700+ product inventory, including OEM parts and many of our 100% Made-in-SoCal-USA GTM products and engine kits. In SoCal? Click the SERVICE tab above for the best in service, tires, tuning and installation of our products or custom work, and don't miss our GT MotoCycles® (not) art on the BUILDS tab above. WE'RE HERE ONLINE ONLY - NO PHONE CALLS MADE OR RECEIVED - DO NOT EMAIL AND ASK QUESTIONS OR ASK TO CALL YOU.
-
Like the new V100, GuzziTech is full throttle into the future! We're now running on an all-new server and we've updated our Forum software. The visual differences are obvious, but hopefully you'll notice the super-fast speed. If you notice any glitches or have any issues, please post on the Site Support section at the bottom. If you haven't yet, please upgrade your account which is covered in the Site Support section or via the DONATE tab above, which gives you full site access including the DOWNLOADS section. We really appreciate every $ and your support to keep this site ad-free. Create an account, sign in, upgrade your account, and enjoy. See you on the road in 2024.
You are using an out of date browser. It may not display this or other websites correctly.
You should upgrade or use an alternative browser.
You should upgrade or use an alternative browser.
Installation tips for slip on's
- Thread starter Yarvis
- Start date
lschultz
Tuned and Synch'ed
I would imagine just unbolt the original mufflers and install the new ones. When you get the clamps loose turn the mufflers right or left they might be stuck to the exhaust pipe. You should not need any sealant on the exhaust pipe when you put the new mufflers back on. They might leak a little exhaust where the muffler slides on the exhaust pipe but as carbon builds up it should seal. Or put some kind of high temp silicone around the exhaust pipe before you slide the muffler on to ensure a good seal.
Remove the heat shields. Loosen the clamp to the headers. Remove both bracket bolts, one under the folding passenger pegs. The mufflers are forced on at the factory pretty far, so it usually takes some lube and a block of wood (against the round muffler body) and a small mallet to remove (and an extra set of hands helps, but not mandatory). Do not bother trying to seal the mufflers, just slide them on and tighten.
Remove the heat shields. Loosen the clamp to the headers. Remove both bracket bolts, one under the folding passenger pegs. The mufflers are forced on at the factory pretty far, so it usually takes some lube and a block of wood (against the round can) and a small mallet to remove (and an extra set of hands helps). Do not bother trying to seal the mufflers, just slide them on and tighten.
Thanks Todd! I was hoping you would give me some tips! What about the saddlebags, do they need to be removed?
I haven't done a Tourer yet, but I would say not needed, no.Thanks Todd! I was hoping you would give me some tips! What about the saddlebags, do they need to be removed?
mikeaedmonds
Tuned and Synch'ed
I have installed agostinis on my tourer and did not have to remove the bags. I did have a heck of a time lining up the mounting brackets for the can. As well the heat shields do not fit the cans very well.
If your pipes are out of round, like mine, get a 2 1/8" (check the right size for your bike) muffler clamp ($2) and put it on ahead of where your muffle is supposed to end up. Tighten the clamp to round the pipe then slip on the muffler on the pipe easily and remove the clamp. Piece of cake -- although I like pie more.
If your pipes are out of round, like mine, get a 2 1/8" (check the right size for your bike) muffler clamp ($2) and put it on ahead of where your muffle is supposed to end up. Tighten the clamp to round the pipe then slip on the muffler on the pipe easily and remove the clamp. Piece of cake -- although I like pie more.
Great tip, thank you!
I have installed agostinis on my tourer and did not have to remove the bags. I did have a heck of a time lining up the mounting brackets for the can. As well the heat shields do not fit the cans very well.
Mike
Relocate the lower screw on the heat shield, remove the lower screw, re-position the shield and drill new location point
Regards
Tuono
mikeaedmonds
Tuned and Synch'ed
Thx, I was going to attempt that, havent gotten around to it yet. Thx for the info, your fit is much better than my current fit.
I have installed agostinis on my tourer and did not have to remove the bags. I did have a heck of a time lining up the mounting brackets for the can. As well the heat shields do not fit the cans very well.
Mike
Agostini is making a new set of pipes and those are the ones I got. Model is Ti. Any other tips? I got the two cans and two pipes and two spring like things. Oh yes, NO INSTRUCTIONS.
mikeaedmonds
Tuned and Synch'ed
The staock pipes were a little difficult to remove, i did have to nudge them off with a block of wood and mallet. As for the new pipes, I had a little trouble lining up the the cans with the brackets.
Would you mind listing the steps? Obviously one heat shield has to come off, you left your saddlebags in place, was it a pain with them there? I'm just getting all of the info before hand because I want to try and do this tomorrow here at home. Oh yes, did you do this on the side stand?The staock pipes were a little difficult to remove, i did have to nudge them off with a block of wood and mallet. As for the new pipes, I had a little trouble lining up the the cans with the brackets.
Thank you!
James Chance
Cruisin' Guzzisti
Would you mind listing the steps? Obviously one heat shield has to come off, you left your saddlebags in place, was it a pain with them there? I'm just getting all of the info before hand because I want to try and do this tomorrow here at home. Oh yes, did you do this on the side stand?
Thank you!
Don't over think it. Todd's instructions are exactly what I did when mounting a set of Mistrals on a Cali1400 Custom. Block of wood, rubber mallet, allen wrench(s), and a can of WD40. And another set of hands would probably speed things up by a couple of minutes once all clamps are loose...
Jim
JimDon't over think it. Todd's instructions are exactly what I did when mounting a set of Mistrals on a Cali1400 Custom. Block of wood, rubber mallet, allen wrench(s), and a can of WD40. And another set of hands would probably speed things up by a couple of minutes once all clamps are loose...
Jim
Unfortunately I have a tendency to over think things when it comes to projects like this on either of my bikes. I won't have an extra set of hands tomorrow, it will be just me, so I'm on my own.
James Chance
Cruisin' Guzzisti
Jim
Unfortunately I have a tendency to over think things when it comes to projects like this on either of my bikes. I won't have an extra set of hands tomorrow, it will be just me, so I'm on my own.
I understand, I usually do the same thing. Anyway, another set of hands isn't NECESSARY, I didn't have any either. Just make sure you use the wood/mallet on the muffler can, NOT the clamp area (at the header entrance end). I started there, and immediately bent the part of the clamp that's attached to the header pipe. Didn't ruin it, but easily could have. Beat on the can only. Other than that, my wife probably could have done the job... ;-)
Jim
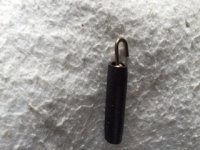
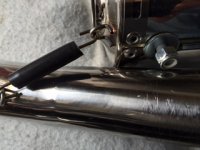
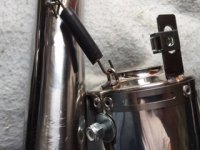
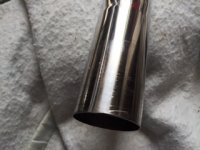
Here are my new slip ons, but they are NOT on the bike. First off, why can't i ever go in my garage and NOT get bit by the meanest and downright aggressive mosquitoes? They were buzzing in my ear, bitting the hell out of me! These are Agostini's newest I think, the model is called Ti. I was able to get the heat shields off then I started to try and place the pipes into the actual slip ons. I sprayed the crap out of the ppies and I was able to get them in but so far into the can. There are two black platic covered hooks and there was no way to get those hooks to meet between the cans and the pipes that go into the cans! I was and am so damn frustrated, not to mention sticky and sweaty. Look real close, you can see scratches on the pipe that goes into the can. What am I doing wrong?
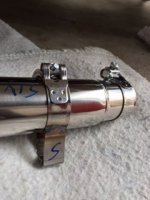
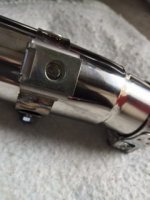
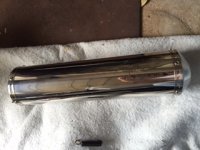


James Chance
Cruisin' Guzzisti
Do other Agostini slip ons have that little black covered hook thing to connect the can to the pipe?
My Mistrals didn't use this arrangement...
These are retaining springs (inside the plastic covering), right? I've seen a number of competition pipes that use this method, usually with no other clamping method. Anyway, install the slipons as far up the header as they will comfortably go, hook one end of the retainer, and use vice-grips to pull hard enough on the other end to bring it to the other hole. Or maybe use a rod of some sort to lever the spring's free end into position. Have you tried emailing Agostini (or maybe Moto International, AF1 Racing, etc.) for a copy of the mounting instructions??
This shouldn't be an insurmountable obstacle. Good luck...
James
Emails take forever with Agostini. Language barrier is another problem, but they do write English. I know this shouldn't be a big deal, it was a combo of things yesterday. Humidity, bugs biting and buzzing my ear and just the fact that there were no instructions. I emailed MPH in Texas and they told me the same thing, hard to get a hold of anyone in Italy, no instructions EVER in any box they ever sold. Surprised to say the least.
Emails take forever with Agostini. Language barrier is another problem, but they do write English. I know this shouldn't be a big deal, it was a combo of things yesterday. Humidity, bugs biting and buzzing my ear and just the fact that there were no instructions. I emailed MPH in Texas and they told me the same thing, hard to get a hold of anyone in Italy, no instructions EVER in any box they ever sold. Surprised to say the least.
