ploose
Tuned and Synch'ed
Anybody changed a tire yet or took the rear wheel off? Try to find a solution for an easy way to jack and take rear wheel off for rear gear oil change and tire in the future. Pics are welcome. Thanks in advance!
P
All,
I got my rear wheel off as well, to change the rear wheel gear oil (after break in) and to see what to do when needing a new tire. Shop manual is vague about the necessary details. Here my summary:
- 32mm nut / socket for axle, and size 40 allen for counter hold (right side at gear assembly), 100 Nm for torque of 32mm nut.
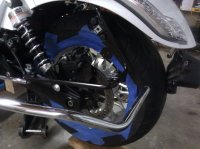
- Rear wheel and tire very tight in swing space, be careful not to scratch wheel when taking / handling break caliber , taped with masking tape to protect wheel.
- Took off rear panier bar (rear piece) and license plate assembly to get wheel out...yes it is all that tight back there (ground clearance and lateral clearance, unless you jack jack up way high to drop wheel out ..I did not feel comfortable doing that.
- Took off exhaust after crossover pipe.
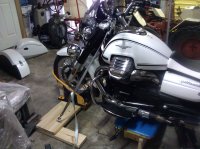
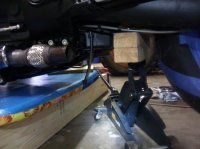
- Lifting point at cross member on rear swing assembly (front of rear tire), support with wood blocks then hydraulic jack, front of bike supported with front wheel choke.
- Lack of space, securing break caliper, IT WAS MORE DIFFICULT than on my Cafe Sport! What a bitch job this was for a basic maintenance routine!
P
All,
I got my rear wheel off as well, to change the rear wheel gear oil (after break in) and to see what to do when needing a new tire. Shop manual is vague about the necessary details. Here my summary:
- 32mm nut / socket for axle, and size 40 allen for counter hold (right side at gear assembly), 100 Nm for torque of 32mm nut.
- Rear wheel and tire very tight in swing space, be careful not to scratch wheel when taking / handling break caliber , taped with masking tape to protect wheel.
- Took off rear panier bar (rear piece) and license plate assembly to get wheel out...yes it is all that tight back there (ground clearance and lateral clearance, unless you jack jack up way high to drop wheel out ..I did not feel comfortable doing that.
- Took off exhaust after crossover pipe.
- Lifting point at cross member on rear swing assembly (front of rear tire), support with wood blocks then hydraulic jack, front of bike supported with front wheel choke.
- Lack of space, securing break caliper, IT WAS MORE DIFFICULT than on my Cafe Sport! What a bitch job this was for a basic maintenance routine!