• Ciao Guest - You’ve landed at the ultimate Guzzi site. NEW FORUM REGISTRATIONS REQUIRE EMAIL ACTIVATION - CHECK YOUR SPAM FOLDER - Use the CONTACT above if you need help. New to the forum? For all new members, we require ONE post in the Introductions section at the bottom, in order to post in most of the other sections. ALWAYS TRY A SEARCH BEFORE STARTING A NEW TOPIC - Most questions you may have, have likely been already answered. DON'T BE A DRIVE-BY POSTER: As a common courtesy, check back in and reply within 24 hours, or your post will be deleted. Note there's decades of heavily experienced Guzzi professionals on this site, all whom happily give endless amounts of their VALUABLE time for free; BE COURTEOUS AND RESPECTFUL!
  • There is ZERO tolerance on personal attacks and ANY HYPERLINKS to PRODUCT(S) or other competing website(s), including personal pages, social media or other Forums. This ALSO INCLUDES ECU DIAGnostic software, questions and mapping. We work very hard to offer commercially supported products and to keep info relevant here. First offense is a note, second is a warning, third time will get you banned from the site. We don't have the time to chase repeat (and ignorant) offenders. This is NOT a social media platform; It's an ad-free, privately funded website, in small help with user donations. Be sure to see the GTM STORE link above; ALL product purchases help support the site, or you can upgrade your Forum profile or DONATE via the link above.
  • Be sure to see the GTM STORE link also above for our 700+ product inventory, including OEM parts and many of our 100% Made-in-SoCal-USA GTM products and engine kits. In SoCal? Click the SERVICE tab above for the best in service, tires, tuning and installation of our products or custom work, and don't miss our GT MotoCycles® (not) art on the BUILDS tab above. WE'RE HERE ONLINE ONLY - NO PHONE CALLS MADE OR RECEIVED - DO NOT EMAIL AND ASK QUESTIONS OR ASK TO CALL YOU.
  • Like the new V100, GuzziTech is full throttle into the future! We're now running on an all-new server and we've updated our Forum software. The visual differences are obvious, but hopefully you'll notice the super-fast speed. If you notice any glitches or have any issues, please post on the Site Support section at the bottom. If you haven't yet, please upgrade your account which is covered in the Site Support section or via the DONATE tab above, which gives you full site access including the DOWNLOADS section. We really appreciate every $ and your support to keep this site ad-free. Create an account, sign in, upgrade your account, and enjoy. See you on the road in 2024.

Broken Rear Fender Tab - Best Adhesive?

ssmith996

Tuned and Synch'ed
Joined
Apr 28, 2017
Messages
57
Location
Green Bay, WI
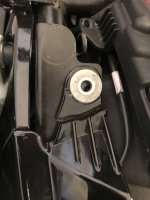
Sorry gentlemen, I am sure there are many threads already out there concerning this issue. Unfortunately, my search skills are apparently not very good, I can't find them. Anyone have any ideas on how to properly fixture and apply adhesive to broken 2014 California rear fender tabs? Thanks!
 
Broken fender tab The left is broken as shown in the photo. The right is cracked and will e broken soon. I am hoping there is a preferred polymer weld that may do the trick. Any help would e greatly appreciated. I hear this is a common problem.
 
I'll be surprised if that works. Too bad you're out of warranty - I believe early cases were replaced under warranty. I see in the picture that there is s nick on the left edge of the finder - looks to me like something put pressure there, causing the crack/break. Is there a similar nick on the other side where the crack hasn't turned into a break?
 
I'd use JB Weld and maybe drill some very small holes in plastic so it connects better squishing up into holes. Clean metal w/brake cleaner so oil dry.
 
I doubt any type of epoxy will work for more than a few rides. Unless you can fabricate or braze something that you know will hold up to the bumps, grinds and vibrations from this motorcycle its best to order a replacement. I had the same thing happen to my 2013 Custom, 2 of the 3 tabs sheared right off, got it replaced under warranty. I would guess they didn't use the correct formula to strengthen the plastic for the early molds of this rear fender. Also there were spacers underneath the earlier versions's tabs to help keep the tab and mount at relatively the same height so as not to apply too much downward force that will cause it to crack easier.
 
Thanks to everyone who responded! I will check the vertical alignment and have a piloted spacer machined, if necessary. I am not opposed to buying a new fender if I knew the same problem wouldn’t happen again. Are the newer fenders more resistant to fatigue failure?
 
Real find bailing wire to stitch the 2 pieces back together and a glue/filler to glue it all together.

I've used this:
s-l640.jpg
Used it to fill in where someone cut out the recess for the turn signals on my salvaged bodywork for my TT600. And also to make new tabs.
 
Worthy of note, make sure that the rear subframe that holds the back of the fender and plate assy isn’t broken as well. Often it is and is the root of these tabs breaking. Easy test is to lift up on the bottom of the fender and/or license plate.
 
Worthy of note, make sure that the rear subframe that holds the back of the fender and plate assy isn’t broken as well. Often it is and is the root of these tabs breaking. Easy test is to lift up on the bottom of the fender and/or license plate.

Will do! Thanks again!
 
Back
Top