I had a Norge, then I had an oil leak and so in order to fix that (and service the bike) a few weekends ago I started working on getting things ready to replace the oil pressure sensor and do a service. This means that in the grand activity to return the large pile of bits in my garage into a more motorcyclish sort of shape, I spent some time yesterday and today in the garage Doing Things.
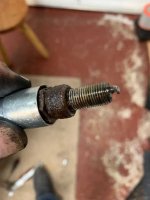
Yesterday first of all I replaced the in-tank fuel filter and the clips holding hose onto filter and tank outlet. I replaced the horribly expensive (~£45) fuel tank seal and put the pump / sender assembly back onto the tank. To test all is sealed okay, I'll need to put fuel back in but that can wait until the bike is closer to ready. I also have the special tool for the inner plugs now so they came out as well. One looked more or less okay but the other - well, look for yourself:

have replaced them with new ones, probably the first time that's been done in quite a while. They're supposed to be replaced every 20k or thereabouts and so I guess it's possible these were done 20k ago. Or not...
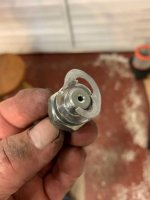
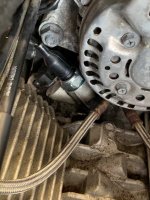
The next step was to get the pesky oil pressure sensor in pace. This is incredibly difficult to get to and without removing the alternator I don't think there's any way I could get torque wrench on it. The first washer suffered rather from my inbuilt heavy-handedness:

I think I did it up way too tight. For the second try, I coated the thread with Loctite thread sealant and managed to get it into place but not ridiculously tight:

Unfortunately, as we know, the only way to test it is to completely reassemble the bike and run it for a while. Hey ho.
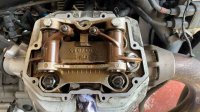
Next - while it's all apart - the valves needed to be done. I spent an awful lot of time cleaning old gasket and gasket goo off the rocker covers & heads. After I was sure that the mating surfaces were clean:

I did the valves. Before reattaching the rocker cover gasket I lightly applied Loctite flange sealant, gave it a few minutes and popped the cover back on. I know there are disputes about using gasket sealants of any type but personally I prefer to do so. After this was all done, I was reminded by a member of the MG Owners Club on Ar5ebook that I should have re-torqued the cylinder heads first. Curses - but I'm not having it all apart again, especially as I don't have a spare set of gaskets.
I have completed the valve adjustments on both cylinders, reattached rocker covers and put the plugs back in. The next work is to reinsert the air-box. This goes in between the frame rails and has two ducts to attach to the inlet tracts on the fuel injection. They do *not* want to go on. I spent a bit of time toeing about this PM trying to get the air-box (which barely fits) into place but I cannot get the air intake ducts to go over the inlets. I have called it quits for the day to avoid frustration and errors. It looks right now as though it would be easier to drop the engine out of the frame, fit the intake nozzles properly and then winch the engine back into the frame...
I shall go back to it later and have another go. We shall see...
Yesterday first of all I replaced the in-tank fuel filter and the clips holding hose onto filter and tank outlet. I replaced the horribly expensive (~£45) fuel tank seal and put the pump / sender assembly back onto the tank. To test all is sealed okay, I'll need to put fuel back in but that can wait until the bike is closer to ready. I also have the special tool for the inner plugs now so they came out as well. One looked more or less okay but the other - well, look for yourself:

have replaced them with new ones, probably the first time that's been done in quite a while. They're supposed to be replaced every 20k or thereabouts and so I guess it's possible these were done 20k ago. Or not...
The next step was to get the pesky oil pressure sensor in pace. This is incredibly difficult to get to and without removing the alternator I don't think there's any way I could get torque wrench on it. The first washer suffered rather from my inbuilt heavy-handedness:

I think I did it up way too tight. For the second try, I coated the thread with Loctite thread sealant and managed to get it into place but not ridiculously tight:

Unfortunately, as we know, the only way to test it is to completely reassemble the bike and run it for a while. Hey ho.
Next - while it's all apart - the valves needed to be done. I spent an awful lot of time cleaning old gasket and gasket goo off the rocker covers & heads. After I was sure that the mating surfaces were clean:

I did the valves. Before reattaching the rocker cover gasket I lightly applied Loctite flange sealant, gave it a few minutes and popped the cover back on. I know there are disputes about using gasket sealants of any type but personally I prefer to do so. After this was all done, I was reminded by a member of the MG Owners Club on Ar5ebook that I should have re-torqued the cylinder heads first. Curses - but I'm not having it all apart again, especially as I don't have a spare set of gaskets.
I have completed the valve adjustments on both cylinders, reattached rocker covers and put the plugs back in. The next work is to reinsert the air-box. This goes in between the frame rails and has two ducts to attach to the inlet tracts on the fuel injection. They do *not* want to go on. I spent a bit of time toeing about this PM trying to get the air-box (which barely fits) into place but I cannot get the air intake ducts to go over the inlets. I have called it quits for the day to avoid frustration and errors. It looks right now as though it would be easier to drop the engine out of the frame, fit the intake nozzles properly and then winch the engine back into the frame...
I shall go back to it later and have another go. We shall see...
