Having suffered from a knock from the front forks for some months with no sign of determining the cause, I decided to upgrade to a Matris cartridge kit. Being in the UK I sourced through a local company. My riding weight was taken for spring selection and I waited three weeks before taking delivery.
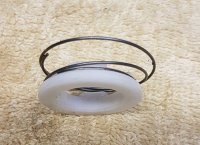
I removed the internals of both forks and also removed the stanchion tubes for inspection and to check the rebound valve in the bottom of the stanchion tube. This is a white nylon annulus that is spring loaded to keep it shut on the rebound stoke.

It opens on the compression stroke. I wanted to decide whether to leave it in place or remove. Sorry a little dirty as removed it from my used parts box for the photo.
I wanted all rebound and compression controlled by the cartridges without out any of the old damping present. Even with the plunger removed, the bottom volume of the fork, below the stanchion tube, still has to change its volume as the tube moves up and down. With the rebound valve in place the area for oil to flow past the valve when shut is the bypass between strut diameter (17.5mm) and the ID of the valve (20.5mm). This area is equal to the area of 20.5mm – area of 17.8mm. This is 330.1mm2 – 248.8mm2 = 81.6mm2.
Comparing this with the area of 2 x 8mm holes in the damper rod for compression damping (100mm2) the area is slightly less, so there will be some effect on both compression and rebound.
My conclusion is that the rebound valve must be removed to open up the flow at this point as damping should be controlled solely by the cartridge kit. Removal of the nylon annulus and its associated spring is straight forward, push out at an angle with a suitable blunt tool.
Matris specify in the instructions to use the existing top out spring and the hydraulic cone shaped bottom out piece. The top out spring is a tight push fit on to the plunger rod.
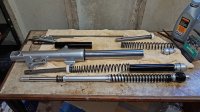
Here is a picture of one of the Matris cartridges alongside the standard suspension internals. The top out spring has been removed and placed on to the Matris lower strut.

I was a little worried over the securing of the top out spring as the plunger diameter is 20mm and the Matris strut only 17.8mm diameter, so I contacted Matris support via my dealer. They confirmed that the top out spring is to free float in the bottom of the fork tube.
I asked this.
"The existing plunger rod diameter is 20mm. The Metris shaft is 17.8mm. Hence the spring is not fixed or held and this may be a problem if it is loose inside the fork. Is there a part that is missing or should it be left out?"
The reply was “It is not a problem if the OD of our rod is smaller that the original one. The top original top out spring (that must be re-use on our fork kit) will be guided by the inner fork tube (as in all applications like this one).”
I continued on with the fitting with a view to dismantling after a short ride to see if there were any problems with this.
The rest of the installation was quite easy. It is important to measure the oil level with spring out, damper bled and depressed and stanchion tube fully in. 160mm is the air gap above the oil to the top of the fork stanchion. Matris provide 5W high quality oil.
After the oil level is done, the spring is inserted and the fork top adjuster is screwed into place. A lock nut is then tightened against the fork adjuster. The tube is then engaged with the adjuster and the wound in and tightened.
I checked the preload sag static and when sitting on the bike. I calculated I had approximately 31% rider sag so I left the preload fully wound out.
I set the rebound damping to the suggested 6 clicks out. I then pushed hard on the front to check the rebound. The bike compressed quickly and rebound in one movement with no further bounces. I went to 8 clicks and go an extra rebound bounce so went back to 6 clicks.
For compression I set to the suggested 6 clicks out and tested. The forks compressed quite quickly and were not over stiff so I decided to leave that there.
I then pushed on the bike saddle and bars at the same time to compare front with rear. The rear seemed to move easier so I increased the preload/rebound to stiffen slightly.
On the road the bike was transformed. No clonk from the front suspension. Bumps were easily soaked up and the harshness of before was gone. A complete change and will take a while before I get used to the new much better ride and start to play a little with the settings.
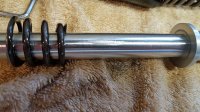
Back in the garage I removed the forks again to inspect how the top out spring had got on. This image shows damage on one of the Matris struts. The other had no marking.

Being Christmas and no one to ask at Matris I decided a drastic fix was required. I attached the old plunger rods with a hack saw to remove the part where the spring was attached to and dressing with a file. This meant removing the nylon seal area and I cut the plunger tube off at a point that gave me 25mm of tube to secure the spring. The plunger tube has an internal diameter the same as the Matris strut outside diameter. I then cut the section into two with a cut top to bottom to give two collets (just as in a valve spring collet). These col-lets fitted exactly and I was able to slide the top put spring over the collets and they were effectively fixed in place at the top of travel. I now have my permanent fix. Sorry no picture for this as I got carried away trying to finish. I will take a photo next time I'm in there!
I removed the internals of both forks and also removed the stanchion tubes for inspection and to check the rebound valve in the bottom of the stanchion tube. This is a white nylon annulus that is spring loaded to keep it shut on the rebound stoke.

It opens on the compression stroke. I wanted to decide whether to leave it in place or remove. Sorry a little dirty as removed it from my used parts box for the photo.
I wanted all rebound and compression controlled by the cartridges without out any of the old damping present. Even with the plunger removed, the bottom volume of the fork, below the stanchion tube, still has to change its volume as the tube moves up and down. With the rebound valve in place the area for oil to flow past the valve when shut is the bypass between strut diameter (17.5mm) and the ID of the valve (20.5mm). This area is equal to the area of 20.5mm – area of 17.8mm. This is 330.1mm2 – 248.8mm2 = 81.6mm2.
Comparing this with the area of 2 x 8mm holes in the damper rod for compression damping (100mm2) the area is slightly less, so there will be some effect on both compression and rebound.
My conclusion is that the rebound valve must be removed to open up the flow at this point as damping should be controlled solely by the cartridge kit. Removal of the nylon annulus and its associated spring is straight forward, push out at an angle with a suitable blunt tool.
Matris specify in the instructions to use the existing top out spring and the hydraulic cone shaped bottom out piece. The top out spring is a tight push fit on to the plunger rod.
Here is a picture of one of the Matris cartridges alongside the standard suspension internals. The top out spring has been removed and placed on to the Matris lower strut.

I was a little worried over the securing of the top out spring as the plunger diameter is 20mm and the Matris strut only 17.8mm diameter, so I contacted Matris support via my dealer. They confirmed that the top out spring is to free float in the bottom of the fork tube.
I asked this.
"The existing plunger rod diameter is 20mm. The Metris shaft is 17.8mm. Hence the spring is not fixed or held and this may be a problem if it is loose inside the fork. Is there a part that is missing or should it be left out?"
The reply was “It is not a problem if the OD of our rod is smaller that the original one. The top original top out spring (that must be re-use on our fork kit) will be guided by the inner fork tube (as in all applications like this one).”
I continued on with the fitting with a view to dismantling after a short ride to see if there were any problems with this.
The rest of the installation was quite easy. It is important to measure the oil level with spring out, damper bled and depressed and stanchion tube fully in. 160mm is the air gap above the oil to the top of the fork stanchion. Matris provide 5W high quality oil.
After the oil level is done, the spring is inserted and the fork top adjuster is screwed into place. A lock nut is then tightened against the fork adjuster. The tube is then engaged with the adjuster and the wound in and tightened.
I checked the preload sag static and when sitting on the bike. I calculated I had approximately 31% rider sag so I left the preload fully wound out.
I set the rebound damping to the suggested 6 clicks out. I then pushed hard on the front to check the rebound. The bike compressed quickly and rebound in one movement with no further bounces. I went to 8 clicks and go an extra rebound bounce so went back to 6 clicks.
For compression I set to the suggested 6 clicks out and tested. The forks compressed quite quickly and were not over stiff so I decided to leave that there.
I then pushed on the bike saddle and bars at the same time to compare front with rear. The rear seemed to move easier so I increased the preload/rebound to stiffen slightly.
On the road the bike was transformed. No clonk from the front suspension. Bumps were easily soaked up and the harshness of before was gone. A complete change and will take a while before I get used to the new much better ride and start to play a little with the settings.
Back in the garage I removed the forks again to inspect how the top out spring had got on. This image shows damage on one of the Matris struts. The other had no marking.

Being Christmas and no one to ask at Matris I decided a drastic fix was required. I attached the old plunger rods with a hack saw to remove the part where the spring was attached to and dressing with a file. This meant removing the nylon seal area and I cut the plunger tube off at a point that gave me 25mm of tube to secure the spring. The plunger tube has an internal diameter the same as the Matris strut outside diameter. I then cut the section into two with a cut top to bottom to give two collets (just as in a valve spring collet). These col-lets fitted exactly and I was able to slide the top put spring over the collets and they were effectively fixed in place at the top of travel. I now have my permanent fix. Sorry no picture for this as I got carried away trying to finish. I will take a photo next time I'm in there!
Last edited:
