• Ciao Guest - You’ve landed at the ultimate Guzzi site. NEW FORUM REGISTRATIONS REQUIRE EMAIL ACTIVATION - CHECK YOUR SPAM FOLDER - Use the CONTACT above if you need help. New to the forum? For all new members, we require ONE post in the Introductions section at the bottom, in order to post in most of the other sections. ALWAYS TRY A SEARCH BEFORE STARTING A NEW TOPIC - Most questions you may have, have likely been already answered. DON'T BE A DRIVE-BY POSTER: As a common courtesy, check back in and reply within 24 hours, or your post will be deleted. Note there's decades of heavily experienced Guzzi professionals on this site, all whom happily give endless amounts of their VALUABLE time for free; BE COURTEOUS AND RESPECTFUL!
  • There is ZERO tolerance on personal attacks and ANY HYPERLINKS to PRODUCT(S) or other competing website(s), including personal pages, social media or other Forums. This ALSO INCLUDES ECU DIAGnostic software, questions and mapping. We work very hard to offer commercially supported products and to keep info relevant here. First offense is a note, second is a warning, third time will get you banned from the site. We don't have the time to chase repeat (and ignorant) offenders. This is NOT a social media platform; It's an ad-free, privately funded website, in small help with user donations. Be sure to see the GTM STORE link above; ALL product purchases help support the site, or you can upgrade your Forum profile or DONATE via the link above.
  • Be sure to see the GTM STORE link also above for our 700+ product inventory, including OEM parts and many of our 100% Made-in-SoCal-USA GTM products and engine kits. In SoCal? Click the SERVICE tab above for the best in service, tires, tuning and installation of our products or custom work, and don't miss our GT MotoCycles® (not) art on the BUILDS tab above. WE'RE HERE ONLINE ONLY - NO PHONE CALLS MADE OR RECEIVED - DO NOT EMAIL AND ASK QUESTIONS OR ASK TO CALL YOU.
  • Like the new V100, GuzziTech is full throttle into the future! We're now running on an all-new server and we've updated our Forum software. The visual differences are obvious, but hopefully you'll notice the super-fast speed. If you notice any glitches or have any issues, please post on the Site Support section at the bottom. If you haven't yet, please upgrade your account which is covered in the Site Support section or via the DONATE tab above, which gives you full site access including the DOWNLOADS section. We really appreciate every $ and your support to keep this site ad-free. Create an account, sign in, upgrade your account, and enjoy. See you on the road in 2024.

Alternator Belt Replacement Summary

Ray1150

Cruisin' Guzzisti
GT Famiglia
Joined
Aug 15, 2009
Messages
275
Location
London
The bike had now done 32k miles and in line with the service recommendations I thought I'd replace the alternator belt as it wasn't big money.
I got the belt on ebay for £15.50 from Brooks Barn.
So, remove the lighting bar, oil cooler, right hand plastics and the belt cover.
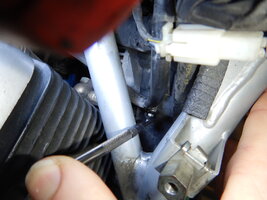
See pic, 2 and 3 hold the alternator in place, 1 is the adjuster that cannot be reached without removing the plastics.
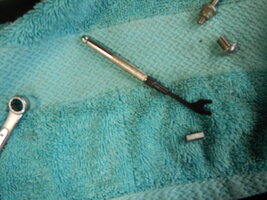
Loosen 2 and 3 and release the locknut and back off the adjuster (5mm hex head, 13 mm spanner).
Using a 24mm socket on the crank pulley turn the pulleys and guide the belt off the alternator pulley until it comes off, reverse the procedure for the new belt and tension the adjuster as instructed elsewhere on the forum using the special tool (your hand) so that you can twist the belt at the mid point between pulleys 90 degrees.
Tighten up 2 and 3 again and set the locknut on 1.
Job jobbed, now put it all back together.

So the £15.50 question, did it need doing? I've taken a picture but it doesn't show well that the old belt had V shaped groves inside the belt the new belt's groves were U shaped. There was also a lot of rubber deposited from belt wear, so from this comprehensive survey of 1 bike I would say yes get it done sometime after 30k miles as a preventative measure.

The final point is that people have been talking about a 740 or 750 belt, this was ordered to fit a Stelvio and turned up as a 730 and fitted without any problems. As I never adjusted it at all it probably doesn't matter within reason what size you fit as long as you tension it properly.

Hope this helps.

IMG 20160406 135304 IMG 20160406 135338 IMG 20160406 135520 IMG 20160406 140210
 
I have just replaced the belt on my Breva 1100 at 60,000Kms. I should have done it much earlier as it was down to only 1/2 the width. The rest of it had blocked the vents on the alternator front and rear as fibres and dust. I purchased a 740mm belt but that turned out too long as the adjuster wouldn't take up the slack, I put a 725mm belt on and the adj is now half way.

20160309 174601
 
I have just replaced the belt on my Breva 1100 at 60,000Kms. I should have done it much earlier as it was down to only 1/2 the width.
Impressive that held at all.
 
Yes I was very lucky, next ride could I have been in trouble, it just that its a time consuming job to inspect and adj, I found if you pull the rubber bung that covers the crankshaft bolt, shine a torch up there you can view the condition of the belt and push it with a rod you can judge the tension on it.
 
There was also a lot of rubber deposited from belt wear, so from this comprehensive survey of 1 bike I would say yes get it done sometime after 30k miles as a preventative measure.{/quote]

I did my G11 at 42,000 miles and I bet it'd go 50+. So "your mileage may vary".

Still I had a heck of a lot more trouble than you even though I had my front wheel and tank off.
 
Does anyone have a part number for an alternative to the MG belt for the 2012 Stelvio. Apparently Dayco makes ones but can seem to locate a part number.
 
All you need is the belt length and number of ribs. I imagine the belt is the same as the earlier model so 725 would be the one, with 6 ribs, very standard belt. The numbers will be printed on the existing belt.
Never seen a belt go like that one, are you sure nothing attacked it? The same belts are used in the automotive industry for far heavier applications and last far longer, even though they are in the open rather than under a cover. Are you certain both pulleys are aligned?
 
Just did this job on my '07 Breva. I used a Goodyear K040285 (28.5" long, theh part number) with adjuster backed all the way out- not in the middle as you experienced. iIt seems fairly tight but not overly so and now I have the full range of the adjuster to tighten it should that ever become necessary. This belt is about three quarters of an inch wide and has four ribs and 3 grooves, looking at it from the inside out.

PS-. Goodyear of course makes million of belts in different lengths. The one I used is also known as a 4PK727 (727 mm long, which is just the metric equivalent of the 28.5 inch specification (+/- .1 mm) in the other part number (K0400285).

To hedge my bets I also bought the slightly longer Goodyear K040292- also known as a 4pk741. This one is easier to install but requires the adjuster to be fully tight, with no room for further adjustment if it stretches.

PPS-. despite the lack of a fairing on the Breva ,there are a lot of tight spots doing this job. I suggest having some ball end hex wrenches on hand because you can't get in straight on the top two cover screws, unless you're okay with backing it out 30 degrees at a time. No special tool is required for the simple tensioning mechanism, although once again it's hard to get to. In this case a really long hex wrench- like 10 inches- would have made this easier to do. I tried using a 1/2 inch socket to hex converter but there's not enough room behind the frame member to get that one in.

Both belts were available for about $15 from O'Reilly Auto parts . They had them in the Boulder Colorado store in just 2 hours from their warehouse in Denver. If you're willing to wait, you can buy the same belt from Rock Auto for the amazingly low price of about $4.
 
Just followed these instructions to change the belt on my griso 1100 this eve, very helpful, thanks for posting!
 
Can be found at Lowes/Home Depot, makes the job a breeze
 
Just the thought of this makes me want a DRINK.

I broke the ratchet on one from tooltruck that's like gringo's, Frame it in the way but that tool works.
 
Last edited:
It goes without saying that wrenching on your Guzzi requires Grappa, Chianti or at least a Birra
 
Here's what I came up with. I cut about 1/2 inch off my 5mm hex wrench and got a 5mm wrench from McMaster Carr.
I have been working on Italian cars and bikes for decades and have never needed a 5mm wrench.
 

Attachments

  • 4B788CE7-9D62-475A-8FA0-016AA6DBF755.jpeg
    4B788CE7-9D62-475A-8FA0-016AA6DBF755.jpeg
    138.8 KB · Views: 28
  • 88947124-C391-4ADE-B4E3-9DA587971A40.jpeg
    88947124-C391-4ADE-B4E3-9DA587971A40.jpeg
    116.2 KB · Views: 28
That's a pretty neat tool. I have a 728mm belt ready to go, but I've got a 200 mile ride to get to where I'm going to change the belt. I may make a little tool like that.

My belt has 60,000 miles on it so I suppose it's high time that I changed it. If it fails out on the road, well, I've been told! But I have faith in this Stelvio ... it went 39,000 miles before I did the roller tappet upgrade and it was still going without shedding DLC into the oil ....

Lannis
 
So ... here's a Life Experience update on alternator belt changing on '09 Stelvios.

1. IF one were to take off the plastic side fairings, you can reach the 5mm adjuster hex and its 13mm locknut (#1 in the photo above) with regular wrenches. However, I just now had them off (MANY hours of labor) to replace the oil pressure switch, and I wasn't in any mood to do that again in the next decade. There's no way to get that locknut without unbolting something.

2. It turns out that if you remove the right-side exhaust header (two header studs and one clamp, a 5 minute job), you can use a 13mm crowfoot wrench to get the locknut, and either a very short 5mm hex on a very fine ratchet like gringo shows (although we used a $160 MATCO set), OR the cut-off hex and open-end like VT-Guzzi described above to turn the adjusting screw.

3. I had a 728 mm belt ready to go. The adjuster had to be backed ALL THE WAY off to turn the belt onto the pulleys, and less than half-a-turn of adjustment had it at the right tension. ON THIS PARTICULAR BIKE, nothing shorter than a 728, especially not a 725, would have fit. There's lots of adjustment up, so anything from 728 to 740 would work on this bike. Your belt path may vary.

4. We carefully examined the belt that had been on there for 60,000 miles, and it looked like new. If you bent it very hard "backward", you could see tiny cracks in the inside surface, but this belt could have gone another 60,000 miles. I probably won't go in there again for a belt, just like I won't go back in for the fuel filter that was clean as a whistle at 56,000.

The guys working with me found 4 or 5 loose or maladjusted things while we were in there. Shift lever joints, exhaust studs and clamps, owner-installed wiring melting onto the headers, etc, so it was a good thing no matter what to lovingly run one's hands over it every once in a while ....

Lannis
 
Back
Top