• Ciao Guest - You’ve landed at the ultimate Guzzi site. NEW FORUM REGISTRATIONS REQUIRE EMAIL ACTIVATION - CHECK YOUR SPAM FOLDER - Use the CONTACT above if you need help. New to the forum? For all new members, we require ONE post in the Introductions section at the bottom, in order to post in most of the other sections. ALWAYS TRY A SEARCH BEFORE STARTING A NEW TOPIC - Most questions you may have, have likely been already answered. DON'T BE A DRIVE-BY POSTER: As a common courtesy, check back in and reply within 24 hours, or your post will be deleted. Note there's decades of heavily experienced Guzzi professionals on this site, all whom happily give endless amounts of their VALUABLE time for free; BE COURTEOUS AND RESPECTFUL!
  • There is ZERO tolerance on personal attacks and ANY HYPERLINKS to PRODUCT(S) or other competing website(s), including personal pages, social media or other Forums. This ALSO INCLUDES ECU DIAGnostic software, questions and mapping. We work very hard to offer commercially supported products and to keep info relevant here. First offense is a note, second is a warning, third time will get you banned from the site. We don't have the time to chase repeat (and ignorant) offenders. This is NOT a social media platform; It's an ad-free, privately funded website, in small help with user donations. Be sure to see the GTM STORE link above; ALL product purchases help support the site, or you can upgrade your Forum profile or DONATE via the link above.
  • Be sure to see the GTM STORE link also above for our 700+ product inventory, including OEM parts and many of our 100% Made-in-SoCal-USA GTM products and engine kits. In SoCal? Click the SERVICE tab above for the best in service, tires, tuning and installation of our products or custom work, and don't miss our GT MotoCycles® (not) art on the BUILDS tab above. WE'RE HERE ONLINE ONLY - NO PHONE CALLS MADE OR RECEIVED - DO NOT EMAIL AND ASK QUESTIONS OR ASK TO CALL YOU.
  • Like the new V100, GuzziTech is full throttle into the future! We're now running on an all-new server and we've updated our Forum software. The visual differences are obvious, but hopefully you'll notice the super-fast speed. If you notice any glitches or have any issues, please post on the Site Support section at the bottom. If you haven't yet, please upgrade your account which is covered in the Site Support section or via the DONATE tab above, which gives you full site access including the DOWNLOADS section. We really appreciate every $ and your support to keep this site ad-free. Create an account, sign in, upgrade your account, and enjoy. See you on the road in 2024.

ITI speedometer lugs

Hydrolastic

Cruisin' Guzzisti
GT Contributor
Joined
May 25, 2020
Messages
105
Location
Pacific NW
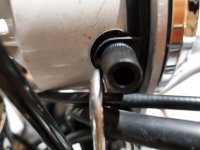
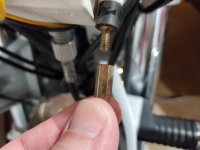
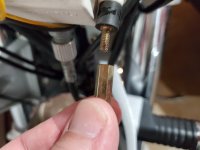
Riding my 2003 Cal Titanium yesterday, I noticed my speedometer was slowly clocking to the left yesterday, and that I could move it by hand. I figured the back cover was just loose, so I set about yesterday to snug things up. Unfortunately, it was loose because the rubber isolation lugs have come apart, one completely and the other near so. Has anyone had success in repairing this before? The lugs don't seem to be available separately from the gauge. I can glue them back together, but I'd like to do something more permanent. One thing - the answer is not to replace the gauges, that is out of the budget at this point.

Dave 20200620 133137
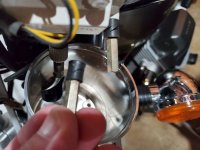
 
One other thing to watch for - if the gauge clocks to the left, it rests the odometer reset knob on the cable guide. The vibrations transmitted will slowly fatigue and crack the reset knob. I already replaced it with a new one.

20200620 133230
 
Gorilla glue may be your friend in this case. I'm pretty sure it can bond rubber to metal. Another possibility is to see if the end at the speedometer is removable. Then just fabricate solid mounts. The isolation mounts on airhead BMWs rectifiers fail like that and I use solid mounts to replace them.
 
One other question - the long brass nuts attached to the bushing - in most people's experience, are they snugged up all the way, or are they supposed to be unthreaded to meet the back of the outer housing? One was slightly loose, and one was all the way up. BTW, the mounts on the tachometer look perfectly fine.

Dave

20200622 132925
 

Attachments

  • 20200622_132925.jpg
    20200622_132925.jpg
    77.5 KB · Views: 11
Every one that I have ever seen after removing the exterior cover, is snugged all the way up.

It's a shame somebody overtightened that up to the point that it tore the rubber. What possesses people to keep turning nuts and screws to the point where they no longer turn anymore, thereby stripping and/or breaking them, befuddles me.

You might want to email your picture to somebody like Joel, and ask him if he can obtain that part or sell it to you?

https://www.guzzitech.com/forums/threads/professional-speedometer-repair.20569/#post-162343
 
What possesses people to keep turning nuts and screws to the point where they no longer turn anymore, thereby stripping and/or breaking them, befuddles me.

Might have been a farmer. I have a very long term friend who was brought up on, and now owns a 1/4million acre sheep station in the Pilbara. We each owned a 1981 Beemer R100RS. Every time he ventured south he'd stay with me and we'd catch up on the myriad of repair/service items on his bike. I'm sure his bike was a couple of Kg heavier than mine, due to the number of Time-Serts (like HeliCoils). I'm sure his theory of nuts and bolts was simply tighten up until it goes soft, then back it off 1/2 a turn.

Farmers in Oz are renown for their bush mechanic skills. If it can't be fixed with a hammer and a bit of fencing wire, then it can't be fixed - period!
 
Back
Top