moparrob
Just got it firing!
Let me start off by saying I have been riding for over 45 years and have come to demand decent performance from the front and rear suspension of any motorcycle I am riding. Unfortunately my 2001 Jackal 1100 had (in my opinion) pathetic front forks that would dive under braking and have poor compression and rebound dampening qualities over any surface. It was driving me nuts.
In an effort to improve the front suspension on the Jackal’s 45mm Marzocchi forks I decided to try to re-valve the forks using fork valve emulators and modifying the stock damping rods, as required. After doing some research (and because no one seemed to have the Race Tech straight rate springs which I originally wanted in stock) I had to go over the pond and got some Hyperpro progressive springs (model 623X) to go along with the emulators.
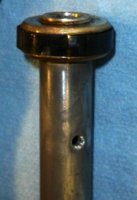
I also ended up purchasing Race Tech FEGV-S4301 valve emulators from our host, but did not realize they needed some adaptation to get them to work with the stock damper tubes. The top of the Marzocchi damper tube is NOT flat, as most damper tubes are. The tube is actually a metal tube with a white plastic 'piston' swaged on top. This means there is a circular 'hump' on top of the damper tube (sort of like this image)

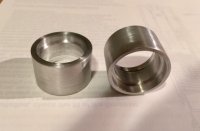
To overcome this I designed an adapter (See picture here) which is basically an aluminum sleeve which is .800” in length, and has two different bores on each end. One end has an ID of 1.165” and the other has an ID of 1.100”. You will need a friend with a lathe and get TWO of these made out of aluminum - one for each fork. The bottom of the adapter (smaller inside diameter) centers up on the damper tube and the top (larger inside diameter) accepts the base of the Gold Valve Emulator. YOU MUST HAVE THESE SPACERS MADE OR THE VALVES WILL NOT WORK.

I will not bore you with the exquisite details regarding how to disassemble your forks and remove the damper tubes. Once you remove the damper rods you will need to drill 4 new 8mm holes in the damper tube per the Race Tech instructions. You will also need to enlarge the original holes to 8mm. Drill one set above the original holes and one set below them, 90 degrees offset from the original holes. It should look like this when done.

After you follow the instructions to re-install the damper rods, adapters, emulators and new springs, and set the 15w fork oil to the appropriate level, you will need to trim your stock preload spacer to achieve the proper fork static and dynamic sag. Again, I will not bore you with the details of this procedure but I will tell you that in my situation (using the Hyperpro springs and a .800” adapter), I ended up trimming 10mm from my spacer, which resulted in about 20mm of spacer extending above the top of the fork tubes, which then had to be compressed by hand to tighten the fork caps. It was not easy to do by myself but I did eventually get it done. BE CAREFUL and do not strip, or cross thread, the aluminum fork caps which will result if you do not line them up properly.
I also took Todd’s advice and dropped the front forks 20mm in the fork tubes.
The end result is a front end that does not dive under braking, does not pogo over bumps and allows me to maintain my line while leaned over in a turn, which was not easily accomplished prior to the modifications. The turn in seems noticeably quicker and more precise and more sporting.
The bottom line is it was definitely worth it and I highly recommend exploring your own mechanical prowess as often as possible to create the bike that YOU want to ride.
In an effort to improve the front suspension on the Jackal’s 45mm Marzocchi forks I decided to try to re-valve the forks using fork valve emulators and modifying the stock damping rods, as required. After doing some research (and because no one seemed to have the Race Tech straight rate springs which I originally wanted in stock) I had to go over the pond and got some Hyperpro progressive springs (model 623X) to go along with the emulators.
I also ended up purchasing Race Tech FEGV-S4301 valve emulators from our host, but did not realize they needed some adaptation to get them to work with the stock damper tubes. The top of the Marzocchi damper tube is NOT flat, as most damper tubes are. The tube is actually a metal tube with a white plastic 'piston' swaged on top. This means there is a circular 'hump' on top of the damper tube (sort of like this image)

To overcome this I designed an adapter (See picture here) which is basically an aluminum sleeve which is .800” in length, and has two different bores on each end. One end has an ID of 1.165” and the other has an ID of 1.100”. You will need a friend with a lathe and get TWO of these made out of aluminum - one for each fork. The bottom of the adapter (smaller inside diameter) centers up on the damper tube and the top (larger inside diameter) accepts the base of the Gold Valve Emulator. YOU MUST HAVE THESE SPACERS MADE OR THE VALVES WILL NOT WORK.

I will not bore you with the exquisite details regarding how to disassemble your forks and remove the damper tubes. Once you remove the damper rods you will need to drill 4 new 8mm holes in the damper tube per the Race Tech instructions. You will also need to enlarge the original holes to 8mm. Drill one set above the original holes and one set below them, 90 degrees offset from the original holes. It should look like this when done.

After you follow the instructions to re-install the damper rods, adapters, emulators and new springs, and set the 15w fork oil to the appropriate level, you will need to trim your stock preload spacer to achieve the proper fork static and dynamic sag. Again, I will not bore you with the details of this procedure but I will tell you that in my situation (using the Hyperpro springs and a .800” adapter), I ended up trimming 10mm from my spacer, which resulted in about 20mm of spacer extending above the top of the fork tubes, which then had to be compressed by hand to tighten the fork caps. It was not easy to do by myself but I did eventually get it done. BE CAREFUL and do not strip, or cross thread, the aluminum fork caps which will result if you do not line them up properly.
I also took Todd’s advice and dropped the front forks 20mm in the fork tubes.
The end result is a front end that does not dive under braking, does not pogo over bumps and allows me to maintain my line while leaned over in a turn, which was not easily accomplished prior to the modifications. The turn in seems noticeably quicker and more precise and more sporting.
The bottom line is it was definitely worth it and I highly recommend exploring your own mechanical prowess as often as possible to create the bike that YOU want to ride.
