• Ciao Guest - You’ve landed at the ultimate Guzzi site. NEW FORUM REGISTRATIONS REQUIRE EMAIL ACTIVATION - CHECK YOUR SPAM FOLDER - Use the CONTACT above if you need help. New to the forum? For all new members, we require ONE post in the Introductions section at the bottom, in order to post in most of the other sections. ALWAYS TRY A SEARCH BEFORE STARTING A NEW TOPIC - Most questions you may have, have likely been already answered. DON'T BE A DRIVE-BY POSTER: As a common courtesy, check back in and reply within 24 hours, or your post will be deleted. Note there's decades of heavily experienced Guzzi professionals on this site, all whom happily give endless amounts of their VALUABLE time for free; BE COURTEOUS AND RESPECTFUL!
  • There is ZERO tolerance on personal attacks and ANY HYPERLINKS to PRODUCT(S) or other competing website(s), including personal pages, social media or other Forums. This ALSO INCLUDES ECU DIAGnostic software, questions and mapping. We work very hard to offer commercially supported products and to keep info relevant here. First offense is a note, second is a warning, third time will get you banned from the site. We don't have the time to chase repeat (and ignorant) offenders. This is NOT a social media platform; It's an ad-free, privately funded website, in small help with user donations. Be sure to see the GTM STORE link above; ALL product purchases help support the site, or you can upgrade your Forum profile or DONATE via the link above.
  • Be sure to see the GTM STORE link also above for our 700+ product inventory, including OEM parts and many of our 100% Made-in-SoCal-USA GTM products and engine kits. In SoCal? Click the SERVICE tab above for the best in service, tires, tuning and installation of our products or custom work, and don't miss our GT MotoCycles® (not) art on the BUILDS tab above. WE'RE HERE ONLINE ONLY - NO PHONE CALLS MADE OR RECEIVED - DO NOT EMAIL AND ASK QUESTIONS OR ASK TO CALL YOU.
  • Like the new V100, GuzziTech is full throttle into the future! We're now running on an all-new server and we've updated our Forum software. The visual differences are obvious, but hopefully you'll notice the super-fast speed. If you notice any glitches or have any issues, please post on the Site Support section at the bottom. If you haven't yet, please upgrade your account which is covered in the Site Support section or via the DONATE tab above, which gives you full site access including the DOWNLOADS section. We really appreciate every $ and your support to keep this site ad-free. Create an account, sign in, upgrade your account, and enjoy. See you on the road in 2024.

V7 III 820cc Big Bore Kit - '17-20

I...

  • Love this and plan on doing it to my V7 III

    Votes: 26 74.3%
  • Am content with stock power

    Votes: 9 25.7%

  • Total voters
    35
We've done them this way. Several customers that came down from Canada, or there's always affordable bike shipping via uShip.com

Have considered that route. Makes me a little nervous. Either way, as usual, I need to start stacking pennies. Regardless of the coin shortage.
 
Added to the first post of this thread also, but figured I'd post it here as an update to those who view via "New Posts."

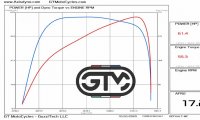
Dyno'ed my V7 III 820cc Racer with GTM 2-1 exhaust today. Still not really broken in (and still for sale), but we up'ed the 54hp/49 lb.ft. rear wheel numbers to 61.4hp/55 lb.ft. with this exhaust over stock mufflers, and 749cc all stock is 47hp/45 lb.ft.
This is a 14.5 hp and 10 lb.ft gain.
Note how impressive the (blue trace) torque curve is with this exhaust, compared to stock on the first graph post of this thread.

GTM V7 820R 2 1 DYNO WM
 
Just ordered the BBK and bored cylinders to do the job myself and am concerned that I bit off more than I can chew. Anyone have any diagrams or instructions for this install? Any special tools I might need or things to be aware of? I like to wrench but have never built or worked on an engine. Thank you!
 
Just ordered the BBK and bored cylinders to do the job myself and am concerned that I bit off more than I can chew. Anyone have any diagrams or instructions for this install? Any special tools I might need or things to be aware of? I like to wrench but have never built or worked on an engine. Thank you!
use the engine manual for reference.
I'm sure you'll need a piston ring expander, along with a ring compressor.
 
Just ordered the BBK and bored cylinders to do the job myself and am concerned that I bit off more than I can chew. Anyone have any diagrams or instructions for this install? Any special tools I might need or things to be aware of? I like to wrench but have never built or worked on an engine. Thank you!
So you are going to do the cylinder bore and re-coat yourself? WOW.
 
So you are going to do the cylinder bore and re-coat yourself? WOW.

It’s a bit confusing - but I think he is getting the pistons and barrels ?
So it’s « just an Install » still not trivial - taking the Speedo off was trivial :p

Sometimes it’s almost better to be young and ambitious vs. older and experienced... cause you just go for it
 
KB -- buy it now: ebay.com/sch/m.html?_odkw=&_ssn=scott.nieman&hash=item21702aa9b5:g:ANsAAOSwn55ezcQk&item=143615764917&_osacat=0&_from=R40&_trksid=p2046732.m570.l1313&_nkw=moto+guzzi+euro+4&_sacat=0

The print service I used no longer seems to be offering them.

I have all three printed manuals that I will loan you if needed.

Sent you PM.
 
It’s a bit confusing - but I think he is getting the pistons and barrels ?
I will be interested to see as Todd only offers the pistons (no barrels), though he does note that they "may" be able to offer a cylinder replacement kit. I am following this with interest as that 820cc kit is on my list.
 
I will be interested to see as Todd only offers the pistons (no barrels), though he does note that they "may" be able to offer a cylinder replacement kit. I am following this with interest as that 820cc kit is on my list.
I too will be watching this with considerable interest. As will my wife, because if this tips me into getting a V7, she gets to take over the Ducati Scrambler...
 
KB -- buy it now: ebay.com/sch/m.html?_odkw=&_ssn=scott.nieman&hash=item21702aa9b5:g:ANsAAOSwn55ezcQk&item=143615764917&_osacat=0&_from=R40&_trksid=p2046732.m570.l1313&_nkw=moto+guzzi+euro+4&_sacat=0

The print service I used no longer seems to be offering them.

I have all three printed manuals that I will loan you if needed.

Sent you PM.
Thank you!
 
It’s a bit confusing - but I think he is getting the pistons and barrels ?
So it’s « just an Install » still not trivial - taking the Speedo off was trivial :p

Sometimes it’s almost better to be young and ambitious vs. older and experienced... cause you just go for it

Yes Todd is sending me pistons and cylinders machined and recoated. I will just install them, but that is daunting to me. I am hoping to learn in the process without causing any damage.
 
Yes Todd is sending me pistons and cylinders machined and recoated. I will just install them, but that is daunting to me. I am hoping to learn in the process without causing any damage.
Thanks, below is a Youtube video on top end replacement for an HD from my friend Shane. It’s a HD push-rod V-twin video, but same principal. Tools needed would be a torque wrench and piston ring compression tool to make life easier, though not mandatory for the rings... which the rings are the most fragile part of the process. Take your time, have the parts and service manual PDFs open, and carefully disassemble, clean and lay everything out in an organized manner. The group here can be of help with basic questions (but we can’t help with every step).

 
Todd -- I believe ring gap alignment is critical for most modern engines. Is this true for the MG V7. Do you have any guidance on gap alignment and positioning eg vis a vis crankshaft or exhaust port?
 
Todd -- I believe ring gap alignment is critical for most modern engines. Is this true for the MG V7. Do you have any guidance on gap alignment and positioning eg vis a vis crankshaft or exhaust port?

I am hoping that Todd is willing to place the rings on the pistons and the pistons in the cylinders and then ship them to me that way so that I know they are on properly and that the gaps are clocked in the right orientation. All I would have to do it push the pistons out enough to slide the wrist pins through without exposing the rings. A lot of big bore kits are sent this way and it would take a lot of the room for error out of the equation.
 
Todd -- I believe ring gap alignment is critical for most modern engines. Is this true for the MG V7. Do you have any guidance on gap alignment and positioning eg vis a vis crankshaft or exhaust port?
Guys, again and again please... this isn't my Inbox. I can't catch every message here addressed to me. Yes, directions on ring clocking comes with the piston kit, and can be also be easily found with Google.
I am hoping that Todd is willing to place the rings on the pistons and the pistons in the cylinders and then ship them to me that way so that I know they are on properly and that the gaps are clocked in the right orientation. All I would have to do it push the pistons out enough to slide the wrist pins through without exposing the rings. A lot of big bore kits are sent this way and it would take a lot of the room for error out of the equation.
Will reply via email.
 
For those of you interested in this upgrade, I completed the install and took it for a ride today. It took me to two days and I have three kids under the age of 5 at home haha.

All the reviews people left for the pistons are correct: the sound this engine produces is amazing and deep and the torque difference is pronounced. The engine is definitely louder but I'm not complaining. I'm very happy I went ahead with this. I have a whole new appreciation for the engineering involved in this machine, which is fitting given that yesterday was the 100 year anniversary of MG. If you are planning to do the installation yourself you will need the engine manual for torque specs and order of operations. You should watch as many videos as possible on YouTube of cylinder removal and piston/piston ring installation etc. Oh, and installing the circlips is as b***h.

I have two issues at this point that need to be resolved. The first is that I didn't have extra $ for the SAS delete kit. Instead, I removed the hoses and capped the port. The problem is that I just left the wiring loose and the check engine light is on and the only code relates to SAS failure. I need that electrical connector doohickie (resistor? simulator?) that comes with the kit or something that accomplishes that. If anyone here has any ideas for me on this it would be much appreciated.

The second issue is that although I adjusted the valve clearances there is a sound coming from the left set that sounds kinda loose. I'll have to look at them again.

Edit: it was the exhaust valve making the noise. All good now!
 
Last edited:
Back
Top