radioheadmike
Tuned and Synch'ed
Thanks for sharing!
Follow along with the video below to see how to install our site as a web app on your home screen.
Note: This feature may not be available in some browsers.
Any reason why the hose from the tank to the canister can't be left open, then plug the hose from the Canister back to the intake manifold and leave the electronic valve in place so it doesn't throw an error code?
I've experienced the pressure/vacuum build-up on my tank and that means to me it's not venting to neutral pressure very well. I have other bikes with the evap canister system still intact that don't build pressure.
For now I removed the spring in the gas cap as a quicky fix/test. But I'd prefer to put the spring back in and vent the line to air.
It's much simpler, the downside is that you may possibly smell some gasoline vapors.I ended up removing the spring instead of removing the cannister. I am noticing a quicker engine turnover with a slight press of the ignition button. The weather has cooled up here, so I can't really do any further testing. What exactly is the science behind the spring? What's the negative impact of removing it?
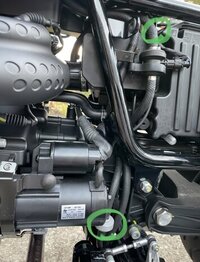
Mike, if you want to keep the canister I might suggest removing the on the bottom of the electronic valve and capping that as I've shown in my post. Leave the hose in position, or zip tie as needed. Then remove the other non-electric valve from the bottom of the tank vent line and leave it in position, maybe zip tie as needed, but leaving the tank vent line open. Both of these locations are easily accessible by removing the left side cover and plastic starter motor cover.
The allen wrench under the seat will work for both covers. This would make it easier to both do the needed capping/uncapping and putting it back to stock if need be. It' much easier to reach these locations then working under the bike where the canister is.
I'm happy to confirm that for you too, Alexandros. Disconnecting the canister eliminated the hiccup immediately. Google V7 850 hiccup for more reading.
Sarah
This is new territory, as I haven't seen a V7-850 quite yet. It looks like they finally stepped up and put a quality (Bosch) valve on! I'd say leave it, otherwise yes, you'd likely get a CEL.
The big reason for gutting or removing the plastic orange/blue valve was because they failed often, causing tank pressurization.


Rode it to work yesterday (10 miles one way). Left the plug in place and no check engine light. Guessing that as long as the valve is still plugged in, the ECU won’t know the difference, valve actuates when told to, but doesn't DO anything FOR the EVAP system. As everyone has already indicated, engine runs GREAT compared to pre-mod.Thanks for posting. I haven't gotten the time to dig into one yet. The grey/green valve pops apart with a little heat, and can be easily/affectively gutted and snapped backed together. It's documented on the other V7 Evap thread.
Let us know if you get the Check Engine Light (CEL).
Very good, the SAS system is a bit more (somehow) smarter. Plugging it on the V85TT and 1400 gives a CEL. Ride on, enjoy!Left the plug in place and no check engine light. Guessing that as long as the valve is still plugged in, the ECU won’t know the difference, valve actuates when told to, but doesn't DO anything FOR the EVAP system.
Thanks for posting. So the pump that pulls the air from the lines is different from the Bosch pump then, correct? My pigtail plugged in, and no CEL? I would note to leave the Bosch pump connected, so thanks for confirming that as well.I did the evap removal and the SAS block off kit on my 2021 V7850 Special. I used the SAS block off kit listed for the V7III and had no issues. Bike runs great, don't understand the 'pigtail' concerns, supplied pigtail for the V7III kit plugged right in and as I mentioned, my V7850 responded beautifully to these mods.
Note - leave the Bosch valve thing connected electrically or you'll get the CEL. I disconnected the 'in' and the 'out' hoses to that valve and capped the now open fittings with vacuum caps.
The Bosch valve (shown clearly in post #1 above) is different from the “SAS pump” - thanks for confirming that the SAS pump is the same. So @FedeleMotoGuzzi - you are all set with what was sent. Please carefully peruse the SAS thead and video I have on YouTube.Not sure what you are referring to as the 'Bosch' pump ... but if it's that gadget that sits on top of the engine below the tank, with the two hoses going to the reed valves and the longer hose going to the air box (?) ... that gadget is outwardly identical on both the V7III 750 and the V7 850,
Waiting for rain. Those are the days I try to do my bench or garage work, including the SAS mod. Will report back here once completed and post test runs.The Bosch valve (shown clearly in post #1 above) is different from the “SAS pump” - thanks for confirming that the SAS pump is the same. So @FedeleMotoGuzzi - you are all set with what was sent. Please carefully peruse the SAS thead and video I have on YouTube.
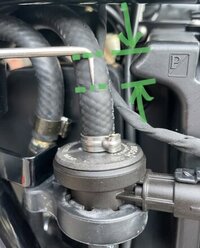
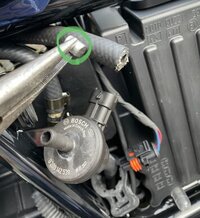
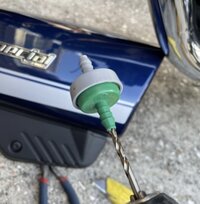
Thanks for this post. Trying to sort out the hiccup today. What would happen if you didn’t drill out the check/breather valve? Couldn’t one just take this part out and put a connect?My 2021 850 Special was experiencing the typical “cutout” issue we have all historically described. My Moto Guzzi dealer mechanic actually called last week and without saying the exact words, encouraged me to pursue the EVAP mod which he said came from their discussion with Italy. Finally had time to deal with mine today. I prefer to do mechanic’ing so things don’t appear like a hack job. So, for my mod, I drilled out the check valve then reinstalled. For the vacuum hose, I made a 5/16” diameter 3/8” long metal slug for a plug. Inserted the slug in the hose 1 inch above the Bosch vent valve, then reconnected that hose to vent valve and reinstalled the factory clamps. All this to say, my system "appears" stock, but functions per the modification. Lastly, as expected, it cured the engine “cutout” issue.
View attachment 24140View attachment 24141View attachment 24142View attachment 24143
Thank you! Worked like a charm!!!My 2021 850 Special was experiencing the typical “cutout” issue we have all historically described. My Moto Guzzi dealer mechanic actually called last week and without saying the exact words, encouraged me to pursue the EVAP mod which he said came from their discussion with Italy. Finally had time to deal with mine today. I prefer to do mechanic’ing so things don’t appear like a hack job. So, for my mod, I drilled out the check valve then reinstalled. For the vacuum hose, I made a 5/16” diameter 3/8” long metal slug for a plug. Inserted the slug in the hose 1 inch above the Bosch vent valve, then reconnected that hose to vent valve and reinstalled the factory clamps. All this to say, my system "appears" stock, but functions per the modification. Lastly, as expected, it cured the engine “cutout” issue.
View attachment 24140View attachment 24141View attachment 24142View attachment 24143
I see you got the results you were after! To answer your question about the dual colored valve, @GTM® says these valves can be warmed up a bit and the two halves separated then gutted. I drilled mine out “just because”. However, as you probably discovered, the drill bit immediately bites into these guts and the guts start spinning inside the valve. Requires just a tad bit of persuasion to push through.Thank you! Worked like a charm!!!