• Ciao Guest - You’ve landed at the ultimate Guzzi site. NEW FORUM REGISTRATIONS REQUIRE EMAIL ACTIVATION - CHECK YOUR SPAM FOLDER - Use the CONTACT above if you need help. New to the forum? For all new members, we require ONE post in the Introductions section at the bottom, in order to post in most of the other sections. ALWAYS TRY A SEARCH BEFORE STARTING A NEW TOPIC - Most questions you may have, have likely been already answered. DON'T BE A DRIVE-BY POSTER: As a common courtesy, check back in and reply within 24 hours, or your post will be deleted. Note there's decades of heavily experienced Guzzi professionals on this site, all whom happily give endless amounts of their VALUABLE time for free; BE COURTEOUS AND RESPECTFUL!
  • There is ZERO tolerance on personal attacks and ANY HYPERLINKS to PRODUCT(S) or other competing website(s), including personal pages, social media or other Forums. This ALSO INCLUDES ECU DIAGnostic software, questions and mapping. We work very hard to offer commercially supported products and to keep info relevant here. First offense is a note, second is a warning, third time will get you banned from the site. We don't have the time to chase repeat (and ignorant) offenders. This is NOT a social media platform; It's an ad-free, privately funded website, in small help with user donations. Be sure to see the GTM STORE link above; ALL product purchases help support the site, or you can upgrade your Forum profile or DONATE via the link above.
  • Be sure to see the GTM STORE link also above for our 700+ product inventory, including OEM parts and many of our 100% Made-in-SoCal-USA GTM products and engine kits. In SoCal? Click the SERVICE tab above for the best in service, tires, tuning and installation of our products or custom work, and don't miss our GT MotoCycles® (not) art on the BUILDS tab above. WE'RE HERE ONLINE ONLY - NO PHONE CALLS MADE OR RECEIVED - DO NOT EMAIL AND ASK QUESTIONS OR ASK TO CALL YOU.
  • Like the new V100, GuzziTech is full throttle into the future! We're now running on an all-new server and we've updated our Forum software. The visual differences are obvious, but hopefully you'll notice the super-fast speed. If you notice any glitches or have any issues, please post on the Site Support section at the bottom. If you haven't yet, please upgrade your account which is covered in the Site Support section or via the DONATE tab above, which gives you full site access including the DOWNLOADS section. We really appreciate every $ and your support to keep this site ad-free. Create an account, sign in, upgrade your account, and enjoy. See you on the road in 2024.

homemade Stelvio skid plate

Billd

Tuned and Synch'ed
Joined
Sep 1, 2009
Messages
74
Location
Castlegar, BC
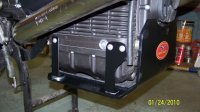
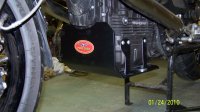
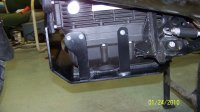
Wanted a skid plate that was a bit more robust than the original as supplied on the bike. Made this out of 1/4" aluminum plate. 1/4" rubber matting glued to inside surface of skid plate and in contact with motor . Next project is replacement of front fender to gain more clearance between fender and wheel. If someone has already done a fender mod would like to hear about and see pictures of same.
 

Attachments

  • 100_0339.jpg
    100_0339.jpg
    498.5 KB · Views: 701
  • 100_0340.jpg
    100_0340.jpg
    501 KB · Views: 702
  • 100_0341.jpg
    100_0341.jpg
    504.4 KB · Views: 700
It uses the same mounting screw as original so no different in that respect. Considered the cooling question during construction and think it will be as good and perhaps better than original but only guessing on that one. Don't plan on running this full time, only on the Alaska trip were ambient temperature is lower. Primary purpose is to soak up stones!
 
Nice looking piece.........maybe you need to start a manufacturing process for the rest of us in the USA. This could help fund your trip to the great white north :!: :!:

I was lucky enough to find a aluminum OEM unit on eBay before Xmas from a dealer that was throwing in the towel, I purchased it for 0.42 on the dollar, plus shipping.

BTW, If you add the factory crash bars your unit will work just fine :D

Another thought.........put a hole in the bottom where the oil filter resides, then add a cover plate held on by a few allen cap screws and the unit will never have to be removed for service (oil change).
 
Thats not a bad idea about the hole for the oil filter and a cover plate. Will give that some consideration, thanks.
 
I'm not generally envious of people in life...But I am of you guys who can just make things like that :mrgreen:
 
Billd said:
Thats not a bad idea about the hole for the oil filter and a cover plate. Will give that some consideration, thanks.
I think I'd stick with the easier to access screws on the side rather than blind, road grim cover screws on the bottom, but that's just me.
 
My opinion, for what it's worth, is I agree with Ron, that a oil filter hole in the bottom, defeats the purpose of the plate.
If it were my luck, it would bash a hole in the oil filter! Plus one would get all the mud and muck up inside, possibly getting in the engine upon removal of the filter.
 
Read the whole post.......

"Another thought.........put a hole in the bottom where the oil filter resides, then add a cover plate held on by a few allen cap screws and the unit will never have to be removed for service (oil change)."

The plastic stock piece doesn't hold up very well, I broke it on a rock while riding a WV highway :D through the mountains and poked a pin hole in the oil filter. Thankfully I was only 3 miles back in the woods and was able to get back to a hard surfaced road, park the bike and hitch hiked back to the Toy Hauler (125 miles / 5.5 hours). Came back with the truck and toy hauler and hauled the beast home. I have a stock MG aluminum piece now, but if Bill starts making these I would buy one and sell the stock unit. Bill's has more attachment points than the stock MG unit and looks a whole lot stronger.
 
The home made skid plate is removed the same way as the plastic plate, I even used the same pan head allan screws that came with the bike. If you look at the photos you can see them, goes on and off same as original. Thanks for all your comments guys!
 
Back
Top