• Ciao Guest - You’ve landed at the ultimate Guzzi site. NEW FORUM REGISTRATIONS REQUIRE EMAIL ACTIVATION - CHECK YOUR SPAM FOLDER - Use the CONTACT above if you need help. New to the forum? For all new members, we require ONE post in the Introductions section at the bottom, in order to post in most of the other sections. ALWAYS TRY A SEARCH BEFORE STARTING A NEW TOPIC - Most questions you may have, have likely been already answered. DON'T BE A DRIVE-BY POSTER: As a common courtesy, check back in and reply within 24 hours, or your post will be deleted. Note there's decades of heavily experienced Guzzi professionals on this site, all whom happily give endless amounts of their VALUABLE time for free; BE COURTEOUS AND RESPECTFUL!
  • There is ZERO tolerance on personal attacks and ANY HYPERLINKS to PRODUCT(S) or other competing website(s), including personal pages, social media or other Forums. This ALSO INCLUDES ECU DIAGnostic software, questions and mapping. We work very hard to offer commercially supported products and to keep info relevant here. First offense is a note, second is a warning, third time will get you banned from the site. We don't have the time to chase repeat (and ignorant) offenders. This is NOT a social media platform; It's an ad-free, privately funded website, in small help with user donations. Be sure to see the GTM STORE link above; ALL product purchases help support the site, or you can upgrade your Forum profile or DONATE via the link above.
  • Be sure to see the GTM STORE link also above for our 700+ product inventory, including OEM parts and many of our 100% Made-in-SoCal-USA GTM products and engine kits. In SoCal? Click the SERVICE tab above for the best in service, tires, tuning and installation of our products or custom work, and don't miss our GT MotoCycles® (not) art on the BUILDS tab above. WE'RE HERE ONLINE ONLY - NO PHONE CALLS MADE OR RECEIVED - DO NOT EMAIL AND ASK QUESTIONS OR ASK TO CALL YOU.
  • Like the new V100, GuzziTech is full throttle into the future! We're now running on an all-new server and we've updated our Forum software. The visual differences are obvious, but hopefully you'll notice the super-fast speed. If you notice any glitches or have any issues, please post on the Site Support section at the bottom. If you haven't yet, please upgrade your account which is covered in the Site Support section or via the DONATE tab above, which gives you full site access including the DOWNLOADS section. We really appreciate every $ and your support to keep this site ad-free. Create an account, sign in, upgrade your account, and enjoy. See you on the road in 2024.

Narrowing side bags mounts

RokonRon

Tuned and Synch'ed
Joined
Aug 14, 2009
Messages
41
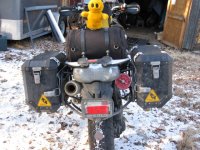
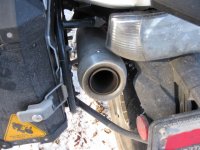
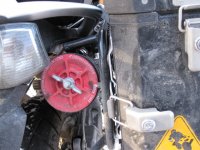
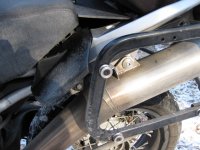
I mentioned I had moved my bags in almost 1 1/2" on each side in the "aux tank" topic and someone wanted to see pictures, since its getting off topic for the aux tank discussion I thought I'd start a new topic, so here it is.

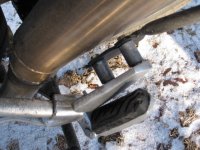
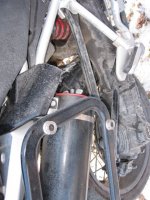
I removed the passenger grab rail then removed the silver plastic part that has the rectangular loops that look like they are there to mount bags, but aren't. I broke out my trust hack saw and started cutting away the plastic so I could mount the bag racks to the frame. At present I using some small spacer on the top two mounts, but I'm thinking I can remove them and bring the bags another 1/4"-1/2" and that will give me a little over 3" narrower bags overall.

The black part in the 'left front top mount' picture is the silver plastic piece the I took the hack saw to, I painted it black because it was black plastic under the silver paint. I don't like the looks of it and will spray it silver the next time I have it off.

I put spacers in the front lower mounts then cut 2 3/4" out of the rear lower support loop and rewelded it.

Here are some pictures. I've got a couple more of the right side, but it wont let me upload more than 5 pictures at a time. If anyone wants to see them I'll post them.
 

Attachments

  • IMG_0121.JPG
    IMG_0121.JPG
    168.5 KB · Views: 1,150
  • IMG_0122.JPG
    IMG_0122.JPG
    122.2 KB · Views: 1,150
  • IMG_0123.JPG
    IMG_0123.JPG
    137.5 KB · Views: 1,150
  • IMG_0124.JPG
    IMG_0124.JPG
    127.8 KB · Views: 1,150
  • IMG_0125.JPG
    IMG_0125.JPG
    134.3 KB · Views: 1,150
kwn306 said:
BTW, how noisy is that pipe?
It's louder than stock, but not too bad. It has a nice rumble to it, it sounds like an Italian motorbike should. I like it!
 
In the picture you posted with the ferry with Mr. Happy.........who / what is the manufacture of the mirrors that you are using and are those anti-vibration isolators screwed into the mounts before the mirrors were installed?
 
kwn306 said:
In the picture you posted with the ferry with Mr. Happy.........who / what is the manufacture of the mirrors that you are using and are those anti-vibration isolators screwed into the mounts before the mirrors were installed?
I had to look that one up. :D I got them from KLR650.com. There are actually two parts, the bottom is a Mirror Vibration Isolator 033-9996 and the top is the Mirror 033-1117. The mirrors have a ball joint at the bottom so the mirror can be push out of the way for off road riding.
 
These

Interesting, would they work on all Guzzis, esp. those nice chromed stock Norge ones with their nifty ball joint? :laugh:
 
RokonRon said:
kwn306 said:
In the picture you posted with the ferry with Mr. Happy.........who / what is the manufacture of the mirrors that you are using and are those anti-vibration isolators screwed into the mounts before the mirrors were installed?
I had to look that one up. :D I got them from KLR650.com. There are actually two parts, the bottom is a Mirror Vibration Isolator 033-9996 and the top is the Mirror 033-1117. The mirrors have a ball joint at the bottom so the mirror can be push out of the way for off road riding.

I thought so, going to have to purchase me a set, I am sick and tired of looking at my elbows with the stock mirrors. :lol: The people at KLR 650.com are great to deal with, purchased many farkles for my 2006, then the middle son totaled it falling asleep and running off the road at 2 AM one morning :eek: He was sore for two weeks but no damage to him......I wanted to kill him but the wife got in the way :roll: Some day I will own another.
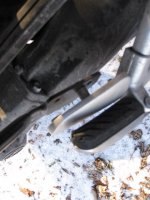
 
Thanks for the pictures Ron. That really is pretty straightforward, something I hadn't looked closely at.

Unfortunately, I got one of the early Mistral pipes and it is just a tad too loud for me run on a regular basis. Maybe it is time to play some more with it.
 
Hi,

I am planning to narrow and lowering my side backs as well,
Can you show some more pictures ?

Regards, Henk
 
HenkL said:
Hi,

I am planning to narrow and lowering my side backs as well,
Can you show some more pictures ?

Regards, Henk
Henk,
Here are a few more pictures


The hardest part of narrowing the bags is dealing with the lower front mounts, near the passenger pegs. I didn't want to do anything drastic to the front support arms in case I didn't like the results and wanted to go back to the original mounts. That's why I have the large spacers on the front mounts. Since I like the results I'll be adjusting (read bending) the front support arms to match the passenger peg mounts and get rid of the spacers.
Hope this helps,
Ron
 

Attachments

  • IMG_0126.JPG
    IMG_0126.JPG
    61.4 KB · Views: 985
  • IMG_0127.JPG
    IMG_0127.JPG
    87 KB · Views: 985
  • IMG_0128.JPG
    IMG_0128.JPG
    76.8 KB · Views: 985
Hi Ron,

Thanks for the pictures. It gave me some ideas and finally decided to not cut in my Stelvio but using 4 small stainless steel plates 67x30x5 mm to mount behind the original holders.
I narrowed it by 70 mm ( 2 3/4")total and lowered it 37 mm (1 1/2") The construction went a bit backwards.
I cut the lower support at one end and seperated the other end from the fixing plate. Than I shaped it to fit and fixed one end with a supporting screw (temporarely). Next week I will have it welded and painted again.
I am very confident with this solution as it does not effect the sidebars of the original bags.
I will enclose some pictures now. (5 is the max.) I have some more if you are interested.
Regards, Henk
 

Attachments

  • IMG_1113[1].jpg
    IMG_1113[1].jpg
    88.9 KB · Views: 299
  • IMG_1101[1].jpg
    IMG_1101[1].jpg
    77.4 KB · Views: 299
  • IMG_1105[1].jpg
    IMG_1105[1].jpg
    77.4 KB · Views: 299
  • IMG_1106[1].jpg
    IMG_1106[1].jpg
    74.1 KB · Views: 299
  • IMG_1107[1].jpg
    IMG_1107[1].jpg
    85.8 KB · Views: 299
HenkL said:
Hi Ron,

Thanks for the pictures. It gave me some ideas and finally decided to not cut in my Stelvio but using 4 small stainless steel plates 67x30x5 mm to mount behind the original holders.
I narrowed it by 70 mm ( 2 3/4")total and lowered it 37 mm (1 1/2")
Wow, that's a great idea. I never really like those useless slots things on the sides and not being shy with the hacksaw I just hacked them off, but I can understand how some might not want to go that far.
I will enclose some pictures now. (5 is the max.) I have some more if you are interested.
More pictures are always better. :D I'd really be interested to see what you have done to the lower front support arms, since I've decided to keep the bags narrowed I'd like to get rid of the large spacers I used to attach the arms to the passenger pegs.

Ron
 
Hi,
I cut the existing weldings with a cutting machine. The one with the front end mountingplate is a bit difficult, but if you do it carefully it can be done. I also bend this end to fit and bring in line with the bag support construction. The other end of the support is grinded to fit with the old welding part. Because I also lowered the construction the adjustments are bigger than in your case. You can make things fit exactly if you carefully do the work. The welding still needs to be done.
See the pictures and good luck !
Regards, Henk
 

Attachments

  • IMG_1195[1].jpg
    IMG_1195[1].jpg
    116.7 KB · Views: 271
  • IMG_1196[1].jpg
    IMG_1196[1].jpg
    81.6 KB · Views: 271
  • IMG_1199[1].jpg
    IMG_1199[1].jpg
    60.8 KB · Views: 271
  • IMG_1202[1].jpg
    IMG_1202[1].jpg
    116.3 KB · Views: 271
Back
Top