• Ciao Guest - You’ve landed at the ultimate Guzzi site. NEW FORUM REGISTRATIONS REQUIRE EMAIL ACTIVATION - CHECK YOUR SPAM FOLDER - Use the CONTACT above if you need help. New to the forum? For all new members, we require ONE post in the Introductions section at the bottom, in order to post in most of the other sections. ALWAYS TRY A SEARCH BEFORE STARTING A NEW TOPIC - Most questions you may have, have likely been already answered. DON'T BE A DRIVE-BY POSTER: As a common courtesy, check back in and reply within 24 hours, or your post will be deleted. Note there's decades of heavily experienced Guzzi professionals on this site, all whom happily give endless amounts of their VALUABLE time for free; BE COURTEOUS AND RESPECTFUL!
  • There is ZERO tolerance on personal attacks and ANY HYPERLINKS to PRODUCT(S) or other competing website(s), including personal pages, social media or other Forums. This ALSO INCLUDES ECU DIAGnostic software, questions and mapping. We work very hard to offer commercially supported products and to keep info relevant here. First offense is a note, second is a warning, third time will get you banned from the site. We don't have the time to chase repeat (and ignorant) offenders. This is NOT a social media platform; It's an ad-free, privately funded website, in small help with user donations. Be sure to see the GTM STORE link above; ALL product purchases help support the site, or you can upgrade your Forum profile or DONATE via the link above.
  • Be sure to see the GTM STORE link also above for our 700+ product inventory, including OEM parts and many of our 100% Made-in-SoCal-USA GTM products and engine kits. In SoCal? Click the SERVICE tab above for the best in service, tires, tuning and installation of our products or custom work, and don't miss our GT MotoCycles® (not) art on the BUILDS tab above. WE'RE HERE ONLINE ONLY - NO PHONE CALLS MADE OR RECEIVED - DO NOT EMAIL AND ASK QUESTIONS OR ASK TO CALL YOU.
  • Like the new V100, GuzziTech is full throttle into the future! We're now running on an all-new server and we've updated our Forum software. The visual differences are obvious, but hopefully you'll notice the super-fast speed. If you notice any glitches or have any issues, please post on the Site Support section at the bottom. If you haven't yet, please upgrade your account which is covered in the Site Support section or via the DONATE tab above, which gives you full site access including the DOWNLOADS section. We really appreciate every $ and your support to keep this site ad-free. Create an account, sign in, upgrade your account, and enjoy. See you on the road in 2024.

Voltage at idle and Oxford grips.

Forseti

Cruisin' Guzzisti
Joined
Sep 7, 2009
Messages
181
Location
Napanee
I was doing a little checking since I seem to have an issue with my heated grips and wondered what the voltage at idle should be on these things... On mine it seems to be a bit high at 13.8v (checked at the battery) My Oxford grips are wired direct to the battery.
So i was thinkin.. perhaps I am getting too much and frying the Oxford controller????? I am on the second controller now.. the first would not turn off but worked for the heat... and this one turns off and on just fine but won't give any heat.. the lights for percentage heat don't come on at all either.

What are the odds of getting two bad controllers? :unsure:
 
I wired two different bike up with Oxfords just the way you did and they worked fine. On my Stelvio I took the Oxford controller off and wired the grips into the bike controller that is part of the ECU. It only has three settings-low,med, and high and it works fine. You have to be at a standstill to change the setting but I just set it at the med. When the bike engine is turned off and then back on the grip heaters come back on at their last setting, it works fine. You could try that if you are on your second controller. Do not think your voltage is a problem.
 
Billd said:
I wired two different bike up with Oxfords just the way you did and they worked fine. On my Stelvio I took the Oxford controller off and wired the grips into the bike controller that is part of the ECU. It only has three settings-low,med, and high and it works fine. You have to be at a standstill to change the setting but I just set it at the med. When the bike engine is turned off and then back on the grip heaters come back on at their last setting, it works fine. You could try that if you are on your second controller. Do not think your voltage is a problem.

So... would you be able to direct me to the location of the relay required?? I have seen on here which one to get but not where the empty socket is as well as where the fuse is located?? I have found the wires (I think anyhow). Pic's are good. lol
I was thinking I might try going this route.
 
If you look in the fuse/relay box in the right uper fairing, (Visible from the seat.) you'll find the relay listed in the inside of the cover. What you are unlikely to find is the realay as Guzzi in their infinite wisdom don't supply one with the bike but neither do they supply one with the heated grip kit! :roll:

Luckily the relay is a generic item available at 'Wottalottacrap Auto' or your local auto electrician for pennies. It is identical to the other one next to it in the fusebox.

Pete

PS, From what I've heard the chances of having two bad controllers is quite high with Oxfords. Mine went bad but it was the fuse holder not the controller that was the problem but they are a bit iffy.
 
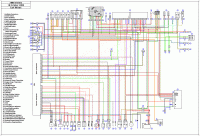
I used the wiring diagram as found on Gregory Benders web site and just wired the Oxford grips into the wires as per that drawing. They are found on the right and left side of the bike, removed the fairing to find them. I think they were solid green and white with a black tracer. Don't take my word for it check the drawing. Thats all I had to do, it maybe that with the Canadian bikes they do include the relay and fuse as heated grips in this part of the world are likely. It was very easy to do other than fairing removal. You may be able to fine the wires complete with connector with out removeing the fairing. They are ty rap to main wiring harness on each side.
 
Here is a copy of the electrical drawing. Better than the one in the WS manual.
 

Attachments

  • wiring diagram.gif
    wiring diagram.gif
    243.5 KB · Views: 236
Back
Top