• Ciao Guest - You’ve landed at the ultimate Guzzi site. NEW FORUM REGISTRATIONS REQUIRE EMAIL ACTIVATION - CHECK YOUR SPAM FOLDER - Use the CONTACT above if you need help. New to the forum? For all new members, we require ONE post in the Introductions section at the bottom, in order to post in most of the other sections. ALWAYS TRY A SEARCH BEFORE STARTING A NEW TOPIC - Most questions you may have, have likely been already answered. DON'T BE A DRIVE-BY POSTER: As a common courtesy, check back in and reply within 24 hours, or your post will be deleted. Note there's decades of heavily experienced Guzzi professionals on this site, all whom happily give endless amounts of their VALUABLE time for free; BE COURTEOUS AND RESPECTFUL!
  • There is ZERO tolerance on personal attacks and ANY HYPERLINKS to PRODUCT(S) or other competing website(s), including personal pages, social media or other Forums. This ALSO INCLUDES ECU DIAGnostic software, questions and mapping. We work very hard to offer commercially supported products and to keep info relevant here. First offense is a note, second is a warning, third time will get you banned from the site. We don't have the time to chase repeat (and ignorant) offenders. This is NOT a social media platform; It's an ad-free, privately funded website, in small help with user donations. Be sure to see the GTM STORE link above; ALL product purchases help support the site, or you can upgrade your Forum profile or DONATE via the link above.
  • Be sure to see the GTM STORE link also above for our 700+ product inventory, including OEM parts and many of our 100% Made-in-SoCal-USA GTM products and engine kits. In SoCal? Click the SERVICE tab above for the best in service, tires, tuning and installation of our products or custom work, and don't miss our GT MotoCycles® (not) art on the BUILDS tab above. WE'RE HERE ONLINE ONLY - NO PHONE CALLS MADE OR RECEIVED - DO NOT EMAIL AND ASK QUESTIONS OR ASK TO CALL YOU.
  • Like the new V100, GuzziTech is full throttle into the future! We're now running on an all-new server and we've updated our Forum software. The visual differences are obvious, but hopefully you'll notice the super-fast speed. If you notice any glitches or have any issues, please post on the Site Support section at the bottom. If you haven't yet, please upgrade your account which is covered in the Site Support section or via the DONATE tab above, which gives you full site access including the DOWNLOADS section. We really appreciate every $ and your support to keep this site ad-free. Create an account, sign in, upgrade your account, and enjoy. See you on the road in 2024.

Spark Plug Boot hassels

pnguzzi

Cruisin' Guzzisti
Joined
Sep 8, 2009
Messages
144
Just had the bike serviced a couple of weeks ago and the tech managed to damage the spark plug boots! The shop was unaware that Guzzi makes a removal tool!! $175 ouch :evil: One of the plug boots failed last weekend on a trek, out with the silicone and electrical tape, saved the trip.
Seems like they like to micro split right at the 90 degree bend, and it certainly is not visible until its to late. Has anybody come up with a removal method, aftermarket tool or alternative spark plug boot?
Thanks
 
I think Pete R. suggests that after the boot is removed (with the special tool or very carefully) tie a string to it for easier removal the next time.
 
Figure this one out.

The original spark plug boot had three sealing rings around it.
The updated boot only has two sealing rings around it. Should be easier to pull out, but it really isn't.

BUT, the head design allows water, dirt and bug to go directly in the head into the spark plug hole. There is no need for the sealing rings, which just make it difficult to unplug the caps. :roll:

This occured to me this past weekend when I washed the bike. No start. Pulled the cosmetic covers, and there is a little swimming pool of water on top of the plug cap. If the seals were not there, it would not have been a problem because the water would drain away from the spark plug easily.

I'm cutting them off.
 
pete roper said:
NGK SB05E plug caps solve the problem.

Pete

Pete,

I did a google search and these are not in the US only in Europe but they come in two different colors (Red or Black). Since I have the faster red model should I spring for the red cap? These pull off of the spark plug OK? They are not a 90 deg angle, no problems with fitment with the Stelvio's beauty covers?

Speaking of beauty covers, lost one of the buttons that covers the screw that holds the beauty covers down, just ordered a replacement from my dealer............$11.50 USD ea, that's stupid money for a little rubber cap.
 
Wayne Orwig said:
Figure this one out.

The original spark plug boot had three sealing rings around it.
The updated boot only has two sealing rings around it. Should be easier to pull out, but it really isn't.

BUT, the head design allows water, dirt and bug to go directly in the head into the spark plug hole. There is no need for the sealing rings, which just make it difficult to unplug the caps. :roll:

This occured to me this past weekend when I washed the bike. No start. Pulled the cosmetic covers, and there is a little swimming pool of water on top of the plug cap. If the seals were not there, it would not have been a problem because the water would drain away from the spark plug easily.

I'm cutting them off.

I am confused... :eek: are you saying that there is a drainage hole below the seal rings? Meaning if the water gets past the seal rings it has the ability to drain and not short the plug. I would have thought the purpose of the seal rings was ... stop water from reaching the plug and shorting it out..
 
There is a drain hole. The Caps are also sealed. I have no idea why they went for such a complex and failure prone design.

Yes the SB05E's fit. Why would I of suggested them if they didn't? What does it matter what colour they are? You can't see them!

As for the badges? Yes, they wash off. Answer? Glue 'em on with a bit of silastic.

The original caps are delicate but it is possible to remove them, with care, and I've taken to using rubber grease on the sealing rings to make them easier to remove next time.

Pete
 
pnguzzi said:
I am confused... :eek: are you saying that there is a drainage hole below the seal rings? Meaning if the water gets past the seal rings it has the ability to drain and not short the plug. I would have thought the purpose of the seal rings was ... stop water from reaching the plug and shorting it out..

Drainage hole nothing. There actually is a very large passage (cooling hole?) from the front near the exhaust to the back near the intake. Rain water passes directly to the spark plug. (not a problem with a good cap). But certainly no need for a fancy sealed cap. I'm pretty sure there is also a drain hole out the side. (very complex casting indead)
Which also means, when you go to take out the spark plugs, make sure you clean out the spark plug cavity very well before removing the plug, unless you want to get all of those bugs and sand into the cylinder.
 
Wayne Orwig said:
Drainage hole nothing. There actually is a very large passage (cooling hole?) from the front near the exhaust to the back near the intake. Rain water passes directly to the spark plug. (not a problem with a good cap). But certainly no need for a fancy sealed cap. I'm pretty sure there is also a drain hole out the side. (very complex casting indead)
Which also means, when you go to take out the spark plugs, make sure you clean out the spark plug cavity very well before removing the plug, unless you want to get all of those bugs and sand into the cylinder.

Is there? I hadn't noticed that? (Scratches head!) I'll go and have another look at the head I have on the bench. Not sayin' yer wrong. Just that I hadn't noticed it but I'm pretty thick! :D There is definitely a drain hole out the side. I always give the plug-ole a good blow out wiuth compresed air before taking the plug out. All sorts of horrible griblies get in there!
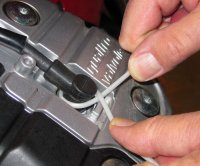
Pete
 
top tip Guzzi-Leif appreciate that ;)

My Stelvio has been running like a dog below 2k revs on inspection I noted my left plug sparking against the head - I removed the plug cap and cannot see any damage but I am 1k since last service so suspect dealer buggered my cap. I have taped it over for a temp fix and intend to order a set of NGK SB05E to solve this problem for the future thankyou for the suggestion (should have known really as with all my bikes in the 70's and 80's the 1st thing you did was put NGK plug caps on)

Quick qusetion before I order do I need screw or nut type ? and how do I remove old cap with out damagng the lead ? I know sadly I am not so mechanically competent but can learn.
 
Back
Top