• Ciao Guest - You’ve landed at the ultimate Guzzi site. NEW FORUM REGISTRATIONS REQUIRE EMAIL ACTIVATION - CHECK YOUR SPAM FOLDER - Use the CONTACT above if you need help. New to the forum? For all new members, we require ONE post in the Introductions section at the bottom, in order to post in most of the other sections. ALWAYS TRY A SEARCH BEFORE STARTING A NEW TOPIC - Most questions you may have, have likely been already answered. DON'T BE A DRIVE-BY POSTER: As a common courtesy, check back in and reply within 24 hours, or your post will be deleted. Note there's decades of heavily experienced Guzzi professionals on this site, all whom happily give endless amounts of their VALUABLE time for free; BE COURTEOUS AND RESPECTFUL!
  • There is ZERO tolerance on personal attacks and ANY HYPERLINKS to PRODUCT(S) or other competing website(s), including personal pages, social media or other Forums. This ALSO INCLUDES ECU DIAGnostic software, questions and mapping. We work very hard to offer commercially supported products and to keep info relevant here. First offense is a note, second is a warning, third time will get you banned from the site. We don't have the time to chase repeat (and ignorant) offenders. This is NOT a social media platform; It's an ad-free, privately funded website, in small help with user donations. Be sure to see the GTM STORE link above; ALL product purchases help support the site, or you can upgrade your Forum profile or DONATE via the link above.
  • Be sure to see the GTM STORE link also above for our 700+ product inventory, including OEM parts and many of our 100% Made-in-SoCal-USA GTM products and engine kits. In SoCal? Click the SERVICE tab above for the best in service, tires, tuning and installation of our products or custom work, and don't miss our GT MotoCycles® (not) art on the BUILDS tab above. WE'RE HERE ONLINE ONLY - NO PHONE CALLS MADE OR RECEIVED - DO NOT EMAIL AND ASK QUESTIONS OR ASK TO CALL YOU.
  • Like the new V100, GuzziTech is full throttle into the future! We're now running on an all-new server and we've updated our Forum software. The visual differences are obvious, but hopefully you'll notice the super-fast speed. If you notice any glitches or have any issues, please post on the Site Support section at the bottom. If you haven't yet, please upgrade your account which is covered in the Site Support section or via the DONATE tab above, which gives you full site access including the DOWNLOADS section. We really appreciate every $ and your support to keep this site ad-free. Create an account, sign in, upgrade your account, and enjoy. See you on the road in 2024.

Griso RH footrest plate removal question

MrMorrisSD

Tuned and Synch'ed
Joined
Oct 25, 2011
Messages
85
Location
San Diego, CA
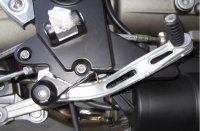
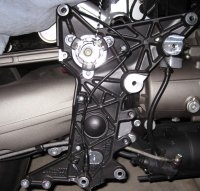
Hi all. Unfortunately, I laid down my Griso on its right side recently, doing about 20-25mph. Among the usual scrapes, the bike also received a bent rear-brake pedal, and along with that the brake-pedal attachment tab on the right-side (RS) footrest plate snapped off. So now, of course, the plate needs to come off so I can repair or replace it.

In the factory shop manual, for the RS plate removal procedure, it describes removing the entire rear brake assembly---caliper and all---along with the plate. And the manual also says to remove the air box. My question is, are these two steps really necessary, or is the manual just being... overly thorough?

For the rear brake, would it be alright just to disconnect the components from the plate's inboard side and then secure them to the bike in an upright orientation using cable ties or similar?

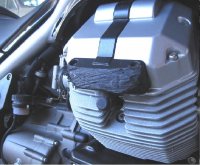
And is the air box removal a must-do? From the pics in the manual I cannot tell why you'd need to remove it, so I thought I'd ask people with a lot more experience in this area.

Thanks in advance.
 
I've just pulled the whole motor/gearbox /swing arm out of mine to deepen the engine rear main retainer bolt holes and put it back successfully :D :D and I didnt remove the airbox. I removed both side plates so the advice in the manual is probably written to help keep things together for these larger type procedures.
Yes undo em and hang em somewhere would be fine.
Let us know if you ended up welding them and if it was worth the agony every time you hit a pothole :roll: . I have welded Tonti bottom triple clamps before that lasted three years of all types of roads(lots of dirt) in remote N/W Australia before I replaced them and they held up fine. I only worried for the first 1500 miles then I completely forgot about them till next some one asked me about it. :whistle: :whistle:
 
Thanks. That's what I figured (regarding the removal process). A new plate will cost $238-US from the local MG dealer, so I figured the part might be repairable for a lot less money.

A friend of mine who knows more about welding than I do says that for cast aluminum it is best to have it TIG welded. I don't know anyone with a TIG welding setup so I'll have to shop around and get a quote.... which takes time away from my job. So I may end up just ordering the new one anyway. And maybe try and see if I can have the broken one repaired at a more convenient time, to have as a 'spare', if the welding isn't too expensive. But either way, I have to remove mine now so I can do what's necessary.

BTW, here is another important question: is that plate structural to the bike in any way? More to the point, once removed, can I still move/roll the bike around without anything getting out of alignment? (Like the plate's mounting holes etc.)
 
MrMorrisSD said:
In the factory shop manual, for the RS plate removal procedure, it describes removing the entire rear brake assembly---caliper and all---along with the plate. And the manual also says to remove the air box. My question is, are these two steps really necessary, or is the manual just being... overly thorough?.

No, that's crap.
I did exactly the same to mine when I dropped it on my drive.
The lug that holds the rear brak pedal just snapped.
It was a good few years ago now, but I removed the plate and brake assembly really easily, without any of that aggro.
It was back in 2007, and my memory is a bit vague now, but it was very easy.
If memory serves, you have three main bolts (with spacers), that hold the plate in situ.
If you remove these, you can partially remove the plate to get in and release the pedal assembly.
The whole job took me 30 minutes and I'm no mechanic.
 
Same thing happened to mine. I had mine installed at the dealer. Hopefully your brake assembly was not bent in the spill. That part costs around $150. Luckily the dealer was kind enough to pull one off one of the showroom Griso s so i did not have to wait another week.
 
Thanks guys. Sounds like the swap will be easy once I have the new parts.

Unfortunately, the the brake pedal did get mangled too. And the foot peg snapped clean off. I'm actually very relieved though that the CARC apparatus suffered no damage/road-contact at all. What surprised me is that the footpeg itself is only a US-$8 part! So why is the brake lever $150?? I guess the short answer is that the pedal is an Aprilia part common to other models of Guzzis as well as Aprilias. The brake lever must only be for the Griso, hence much lower production numbers? And it could be forged, whereas the foot rest is obviously just a casting.

Wanna see what the damage looks like? Check out the pics below. What I'm not bothering to share are the following, which suffered scrapes to varying degrees: oil cooler housing, bar end weight, fr brake lever, rt front turn signal, and mirror. But that damage is just cosmetic.
 

Attachments

  • Griso_damage_1.JPG
    Griso_damage_1.JPG
    55.8 KB · Views: 459
  • Griso_damage_2.JPG
    Griso_damage_2.JPG
    64.9 KB · Views: 459
  • Griso_damage_3.JPG
    Griso_damage_3.JPG
    67.4 KB · Views: 459
Wow. I just got an email today from my local dealer where I ordered the parts. They are in already. I'm amazed. I was sure that one or two things were going to be on some insane backorder list to come out of Italy eventually.
 
Same thing happened last year. I got the parts from M.I. in Seattle.
I replaced, in the street with the brake switch the problem as I was not planning to follow the manual about the wiring.
Likewise removing the brake caliper.

The unscrewing the brake switch was accomplished by simply cutting & tagging the wires :twisted:
Using proper connectors to splice the wires, worked so far.

Holding the brake master cylinder in place with a small bungee cord worked well.

Good Luck
jim
 
Hi Jim. Thanks. It's all back together again, and it rides nicely.

If you were talking about the brake-light switch, that sounds like a smart idea, cutting the wire and splicing in connectors (waterproof I'd have to assume).

One tricky thing to do when reinstalling the switch the simple way, meaning the way I did it, was to 'pre back-twist' the switch and its wire so that it'd thread all the way into the hole on the plate. I suppose I could have spun the plate itself around 7-8 times to reattach the switch, but they way I was supporting the plate would have made that very hard. Re-connecting the wires as you did after the switch was installed would have made this task much easier.

BTW, in the pic you can see the black nylon cord I used to hang/support the brake assy.
 

Attachments

  • plate_flipped_around.jpg
    plate_flipped_around.jpg
    826.2 KB · Views: 287
Back
Top