• Ciao Guest - You’ve landed at the ultimate Guzzi site. NEW FORUM REGISTRATIONS REQUIRE EMAIL ACTIVATION - CHECK YOUR SPAM FOLDER - Use the CONTACT above if you need help. New to the forum? For all new members, we require ONE post in the Introductions section at the bottom, in order to post in most of the other sections. ALWAYS TRY A SEARCH BEFORE STARTING A NEW TOPIC - Most questions you may have, have likely been already answered. DON'T BE A DRIVE-BY POSTER: As a common courtesy, check back in and reply within 24 hours, or your post will be deleted. Note there's decades of heavily experienced Guzzi professionals on this site, all whom happily give endless amounts of their VALUABLE time for free; BE COURTEOUS AND RESPECTFUL!
  • There is ZERO tolerance on personal attacks and ANY HYPERLINKS to PRODUCT(S) or other competing website(s), including personal pages, social media or other Forums. This ALSO INCLUDES ECU DIAGnostic software, questions and mapping. We work very hard to offer commercially supported products and to keep info relevant here. First offense is a note, second is a warning, third time will get you banned from the site. We don't have the time to chase repeat (and ignorant) offenders. This is NOT a social media platform; It's an ad-free, privately funded website, in small help with user donations. Be sure to see the GTM STORE link above; ALL product purchases help support the site, or you can upgrade your Forum profile or DONATE via the link above.
  • Be sure to see the GTM STORE link also above for our 700+ product inventory, including OEM parts and many of our 100% Made-in-SoCal-USA GTM products and engine kits. In SoCal? Click the SERVICE tab above for the best in service, tires, tuning and installation of our products or custom work, and don't miss our GT MotoCycles® (not) art on the BUILDS tab above. WE'RE HERE ONLINE ONLY - NO PHONE CALLS MADE OR RECEIVED - DO NOT EMAIL AND ASK QUESTIONS OR ASK TO CALL YOU.
  • Like the new V100, GuzziTech is full throttle into the future! We're now running on an all-new server and we've updated our Forum software. The visual differences are obvious, but hopefully you'll notice the super-fast speed. If you notice any glitches or have any issues, please post on the Site Support section at the bottom. If you haven't yet, please upgrade your account which is covered in the Site Support section or via the DONATE tab above, which gives you full site access including the DOWNLOADS section. We really appreciate every $ and your support to keep this site ad-free. Create an account, sign in, upgrade your account, and enjoy. See you on the road in 2024.

Seriously?

Toadride

Cruisin' Guzzisti
Joined
Apr 2, 2012
Messages
272
Location
Nelson
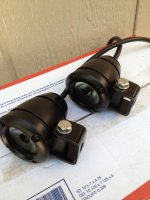
My replacement Mondo Motos running lights were waiting here when I got back from my trip and, altho I am impressed with the construction and heft of the lights themselves, I almost fell down laughing when I pulled out the brackets. Peter Youngblood had shown us some pics and also had experienced mount failures with these before making up some substantial billet aluminium replacements. What he failed to do was put their size in perspective. To wit: I introduce one mount and my thumb. :laugh:

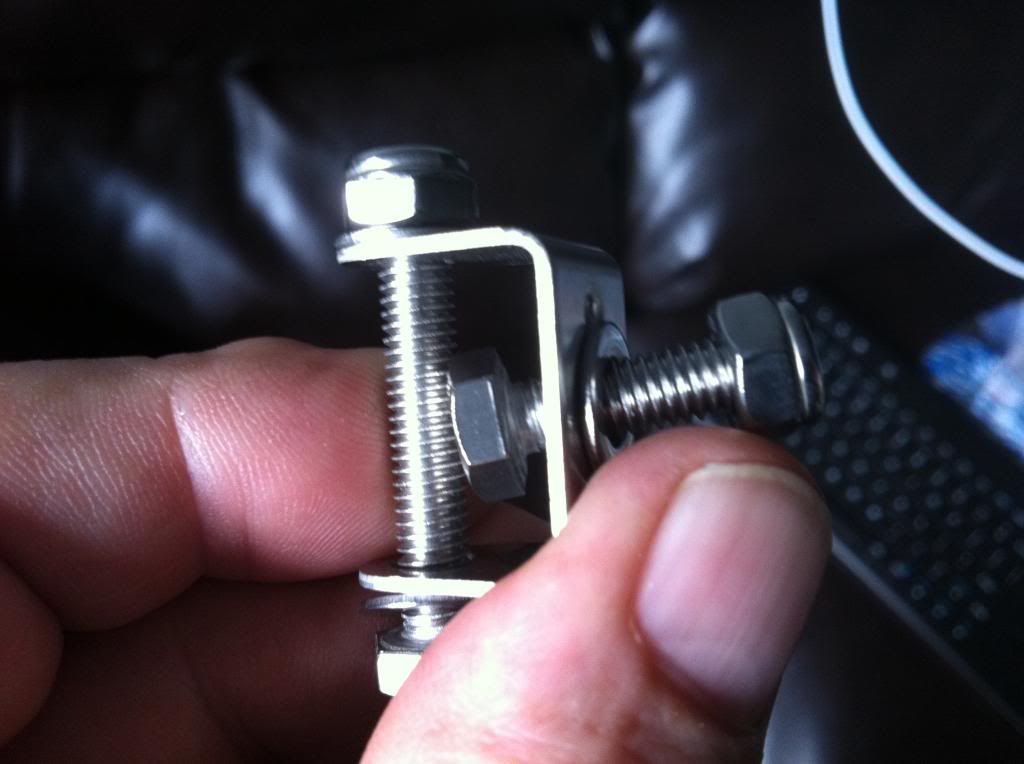
Are u freakin kidding me?
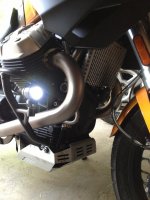
Todd Egan did say to me (and I think I agree) that prolly mounting any light on those crashbars will sooner more so than later, lead to failure. I think his words were 'like mounting them on a paint mixer' :lol:
So, with that in mind I am going to try to figure a better mounting area and grind those posts right off of there. Open to suggestions here.
 
vibration is the issue... then do what manufacturers do.... isolate the lamps by making a rubber connection, same idea as a motor mount. Get to it! Now, and post pictures when ur done! Ok, and sell them cheap to us too. And... don't write anymore until ur finished. :evil:

Vivo
 
Doug, I think your bracket is actually a bit thicker than the one I got with the lights. Maybe they have upgraded. At any rate, the brute force method works too.
IMG_4747-M.jpg

I have an extra pair if you are interested. Just need a mailing address.

Peter Y.
 
Toad,

They are seriously the cheapest excuse for a mounting bracket you can imagine. I got the same lights for my Stelvio and just shook my head when I saw those flimsy brackets. I have an excellent hardware store close by that sells aluminum plate up to 1/8". I bent and drilled a couple of brackets out of that and ready to install.

One question to any and all: Which is the pos (+) and neg (-) wire? Don't want to fry anything at this point.

Thanks, Mike R.
 

Attachments

  • photo (1).JPG
    photo (1).JPG
    182.8 KB · Views: 524
Mike,
Looking at thelight, snap connectors and the harness, I have the blue (of blue and brown) on the light meeting the black (of black and red) on the harness. That should indicate that blue (and black) is ground.
 
pyoungbl said:
Doug, I think your bracket is actually a bit thicker than the one I got with the lights. Maybe they have upgraded. At any rate, the brute force method works too.
IMG_4747-M.jpg

I have an extra pair if you are interested. Just need a mailing address.

Peter Y.

Peter,
My photo is oddly deceptive. Looking at it in front of me, that bracket is half that thickness.
 
But I am still serious about finding a better mounting location. For one obviously the vibration but also any light mounted there is pretty well toast if the bike goes over. Even tho I had already thrown out my toasted stock set, when I got rear ended the bike landed on the road at precisely the crashbar light mount.
 
Found the lighting wiring diagram in the tech section of the forum. Thanks for the quick response, though. The blue wire is ground, yellow/black is positive.
 

Attachments

  • photo (2).JPG
    photo (2).JPG
    308 KB · Views: 497
I noticed one particular, for me, interesting detail on your Stelvio, Mike1230, namely the oil cooler guard.
Looks nice.
Where can I get one of these?

Thanks,

BlizzG
 
Blizz,

That's a piece of screen from an aluminum screen door guard. Here's a link to what I used:

http://www.hardwareandtools.com/M-D-Bui ... 4Aod6mAAdg

There's enough there to make at least 4 oil cooler screens for your Stelvio! Note how the expanded metal screen is installed to allow air to pass thru from the front but stop small rocks and dirt that come off the tire. A fenda extenda will be installed at some point in the future.

Good luck

Mike Ranalletta
 
Back
Top