• Ciao Guest - You’ve landed at the ultimate Guzzi site. NEW FORUM REGISTRATIONS REQUIRE EMAIL ACTIVATION - CHECK YOUR SPAM FOLDER - Use the CONTACT above if you need help. New to the forum? For all new members, we require ONE post in the Introductions section at the bottom, in order to post in most of the other sections. ALWAYS TRY A SEARCH BEFORE STARTING A NEW TOPIC - Most questions you may have, have likely been already answered. DON'T BE A DRIVE-BY POSTER: As a common courtesy, check back in and reply within 24 hours, or your post will be deleted. Note there's decades of heavily experienced Guzzi professionals on this site, all whom happily give endless amounts of their VALUABLE time for free; BE COURTEOUS AND RESPECTFUL!
  • There is ZERO tolerance on personal attacks and ANY HYPERLINKS to PRODUCT(S) or other competing website(s), including personal pages, social media or other Forums. This ALSO INCLUDES ECU DIAGnostic software, questions and mapping. We work very hard to offer commercially supported products and to keep info relevant here. First offense is a note, second is a warning, third time will get you banned from the site. We don't have the time to chase repeat (and ignorant) offenders. This is NOT a social media platform; It's an ad-free, privately funded website, in small help with user donations. Be sure to see the GTM STORE link above; ALL product purchases help support the site, or you can upgrade your Forum profile or DONATE via the link above.
  • Be sure to see the GTM STORE link also above for our 700+ product inventory, including OEM parts and many of our 100% Made-in-SoCal-USA GTM products and engine kits. In SoCal? Click the SERVICE tab above for the best in service, tires, tuning and installation of our products or custom work, and don't miss our GT MotoCycles® (not) art on the BUILDS tab above. WE'RE HERE ONLINE ONLY - NO PHONE CALLS MADE OR RECEIVED - DO NOT EMAIL AND ASK QUESTIONS OR ASK TO CALL YOU.
  • Like the new V100, GuzziTech is full throttle into the future! We're now running on an all-new server and we've updated our Forum software. The visual differences are obvious, but hopefully you'll notice the super-fast speed. If you notice any glitches or have any issues, please post on the Site Support section at the bottom. If you haven't yet, please upgrade your account which is covered in the Site Support section or via the DONATE tab above, which gives you full site access including the DOWNLOADS section. We really appreciate every $ and your support to keep this site ad-free. Create an account, sign in, upgrade your account, and enjoy. See you on the road in 2024.

NTX, Tank removal (Problem).

Marshy

Tuned and Synch'ed
GT Contributor
Joined
Apr 9, 2012
Messages
73
Location
Whitehaven
I have a 2011 Stelvio NTX.

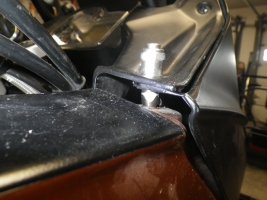
My Problem when trying to remove the petrol/gas tank. At the front on top there are two fixings/bolts that hold the side wind deflectors and screw into tank.

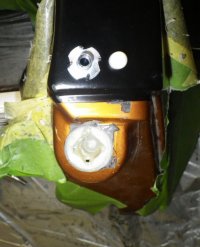
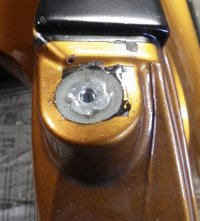
Problem, one side came out the other just turns, I can see by other side it is a threaded insert into the tank. I can't remove tank without bolt removed.

Any suggestions please.

Marshy. :(
 
It's a known issue that occurred to many and Piaggio has been replacing tanks under warranty because of this. It's a poorly designed insert -- has an almost round profile -- plus these stud bolts (as the parts fiche calls them) often have stripped threads; mine did right from the start.

To get it out, put a hex bit in a drill and spin the thing so it heats up the plastic around it and comes out clean.

It's kind of a waste to replace a whole tank afterwards when the problem can be easily fixed with a different profile insert and epoxy but if the bike is under warranty, I would not want to make fixes like this.
 
Makaruska,

Unfortunately it's out of warranty, what you suggest as fix is probably the only way, will give it a try, being careful.

Thanks,
Marshy
 
Marshy, don't let the 12 month warranty stop you from trying a claim for replacement from Guzzi. It's a common enough problem that Guzzi just might replace the tank for you.

I had the same thing happen to my NTX and got a warranty replacement. Now I don't have those wind wings installed and only torque the 6mm screws finger tight. As I recall, the replacement tank was $567.

Part of the problem is that the hardware used to secure the wind wings has flats so you can use a wrench to tighten. that leads to too much force on those 6mm threads.

Peter Y.
 
Peter,

The warranty ran out last September, bought the bike new 2011, I've had a few warranty claims since purchasing.
I will contact my dealer and see if there's any chance.

All I was going to do was check the wiring cables, for any rubbing as a few posts have been on this issue, I had the Ignition wiring replaced last year.

Next job will be check and grease swinging arm/suspension linkage. :eek:

Peter M.
 
I'm not tracking on this. Would you mind posting a photo of the issue.

Note: I'm slow on the uptake...
 
Hellgate,

Sorry no picture at moment, will try tomorrow.

But if this helps, on the fairing and either side there is a small wind deflector attached from the top and the side, my issue is the top, the clear plastic is screwed onto a bolt head this in turn is screwed through the fairing and into the tank. This is the bit that is just turning.

Hope this helps.
Peter.
BUMP
Just to keep this thread current...My '12 NTX with 2 months left on warranty has this issue on both sides. The PO yanked the canister, so it's no mystery as to who over tightened those nuts and stripped the nutserts out of the tank. Guzzi is indeed providing a new (orange) tank under warranty, but they're backordered for at least a month.

It really is a shame to waste a tank just for this. That, plus I'm one of those who don't trust dealership folks to do anything without messing something else up. I'm mulling over whether to repair it myself. But they already have the tank on order and would probably not be amused if I cancelled the warranty repair. We'll see how it plays out.
 
I didn't have the stud turn in the tank but I did have the top SS screw into the stud seize when the bike was brand new. I had to drill the head off the screw. I was then able to screw the threaded portion out. I think I've broken every one of those crappy panel nuts on the bike also. I need to find replacements.
Alan NZ
 
Well finally got round to repairing the rotating stud in the Stelvio tank, first prior to starting I manage to source new new part.

This is the way I managed to remove and fix my problem.

Image

First was to drill out the top piece of the stud, so front fairing could be removed for better access to lower part of the stud.

Image

Once access was gained, I managed to drill and remove remaining piece of thread.

Image

At this stage i was able to carefully remove any packing that held the stud in, once material was removed the stud just could be pulled out.

Image

This is the stud that is encased in the tank, it seams that it is just pressed in and glued on top, plus only four flat sides to stop it turning.

Image

It was my own decision to replace the original part back in, but I ensured all areas, metal and plastic where carefully prepared before glueing back in, I used Araldite to fix in position, just hope it works, it does seem to be a better fix.

Image


Marshy.
 
I had the same problem on my 2012 NTX ,but I was able to pry it out easily, just lay a catalog at least 1/2 inch thick then a piece of sheet metal or alum. About 1/8" thick on the tank behind the stuck screw and use a flat pry bar to pry up on the bolt, it'll pop right out ,then open up the hole a bit and use some adhesive such as JB weld or 30min. Epoxy as I did to glue the funny little nut back in, worked great.
 
  • Like
Reactions: raz
I had the same problem on my 2012 NTX ,but I was able to pry it out easily, just lay a catalog at least 1/2 inch thick then a piece of sheet metal or alum. About 1/8" thick on the tank behind the stuck screw and use a flat pry bar to pry up on the bolt, it'll pop right out ,then open up the hole a bit and use some adhesive such as JB weld or 30min. Epoxy as I did to glue the funny little nut back in, worked great.
That sounds like a good way to go. I was going to use a mini slide hammer to bump them out. The only reason I haven't repaired it myself yet is because the PO put a small nick in the tank, so a new tank would be a bonus. Got a call yesterday telling me they haven't forgotten me, but the tank is still on backorder.

Stu
 
Update. Prying didn't work. Neither did the slide hammer. I let the dealer's guys spin 'em till they got hot enough to pull loose. New tank on the bike now with only minor heat damage to fairing tabs, but it's hidden. Good to go.
 
Put a socket on it with an extension and pull to one side and push down while you are slowly turning. Should be enough grab to hold it while it unscrews. I had to to that to mine...and I had loctite on it...seemed like a good idea at the time.
 
Put a socket on it with an extension and pull to one side and push down while you are slowly turning. Should be enough grab to hold it while it unscrews. I had to to that to mine...and I had loctite on it...seemed like a good idea at the time.
Read post just above yours. Problem solved. Thanks anyway.
 
BUMP!
Thought I'd resurrect this old thread as I'm currently dealing with THE SAME DAMN PROBLEM! LOL.

If I can get mine out I think I'm going to find two oversized nuts (the nut equivalent of a fender washer) and use a dremel tool to imbed them into the tank plastic and then seat them with epoxy resin.

Seems that MG would have addressed this by now with some retrofit "barbed inserts" or a Tee Nut type apparatus? I'm thinking that warranty replacement fuel tanks for a $1 part failure would get very OLD very quickly.

Guess that I'll be spinning and prying tomorrow morning! LOL.

RD
 
I just put the stud in lightly snug and make the allen tight while you hold on to the hex portion of the stud with deflector on, It can't back out that way. no need to get the stud tight on the insert.
 
Hey gringo,

Sorry for the HUGE picture but I couldn't get it to resize.

So this style tee nut below is what I used in place of the poorly designed "roundish" imbed that was originally molded into the fuel tank. I positioned it where the flat aspect of the tee nut (upside down from picture) was flush with the flat aspect of the fuel tank.
I used a Dremel tool to "recess" and make a little room where this would fit nicely (made me feel like a dentist! ;)). But BEWARE doing this as the amount of plastic in those forward "horn" parts of the fuel tank .............. IS NOT AS THICK as one would think from looking at it! It's pretty easy to scrape/shave away too much material and begin to get into the "inside of the tank".
Then I set these Tee Nuts into the tank with a JB Weld epoxy specially formulated for plastics. So far, so good.

I took some pictures during the process, but don't have those available at the moment.
I'll post those up later with some notes/observations/explanations.

To gringo's point above .......... I absolutely agree with your take on it, and my guess is that it was designed to be used that way.
When I reassembled everything I just tightened the studs "finger tight". And once you fasten the winglets to the stud while keeping the stud from tightening further, that connection will then hold everything just fine.
As long as the JB Weld product adhered to the tank well, I think that the repair has to be much stronger than the original approach.
RD
04-02056.jpg
 
Looks like what a wood worker would use.
GUILTY as charged John!
Guilty as charged. :nod:

Here's a description of what I did to fix my stripped imbeds, with some corresponding pictures below.

I spun the nut assembly with a drill until it warmed up the plastic around it hoping it would make it a bit more pliable.
Then protected the area with a book, used a T-handle wrench for a fulcrum, and then wedged the imbedded part out with a wrench.
Even though the plastic was well warmed up, it still took a good amount of effort to pop the imbed out of the hole.

I then used a 10mm on the bottom of the imbed, a 12mm on the top part, and took it apart and that allowed me to disassemble the surrounding tupperware and expose it all for a repair. (and finish the canisterectomy)

Then I used a small gouge and a dremel tool to relieve the hole enough to accept the stainless "Tee Nut" and it's barbs.

Once I got the Tee Nuts all situated exactly where I wanted them to "live", I then epoxied the Tee Nuts into the holes making sure that they were flush with the surrounding plastic & centered where they needed to be. It all worked pretty well.

So far it has been a rock solid repair.
Even though I think that this Tee Nut repair feels "very locked in" would probably hold up to several ft/lbs, I'll only ever tighten it as tight as I can with my fingers.
No sense being ham-fisted if there's no need.

I sure appreciate all the information, insight and instruction that I got from the posts above in this thread.
RD
 

Attachments

  • fullsizeoutput_f3a.jpeg
    fullsizeoutput_f3a.jpeg
    128.8 KB · Views: 10
  • IMGP1381.JPG
    IMGP1381.JPG
    109.7 KB · Views: 12
  • fullsizeoutput_f42.jpeg
    fullsizeoutput_f42.jpeg
    67.3 KB · Views: 11
  • fullsizeoutput_f46.jpeg
    fullsizeoutput_f46.jpeg
    87.9 KB · Views: 12
Back
Top