• Ciao Guest - You’ve landed at the ultimate Guzzi site. NEW FORUM REGISTRATIONS REQUIRE EMAIL ACTIVATION - CHECK YOUR SPAM FOLDER - Use the CONTACT above if you need help. New to the forum? For all new members, we require ONE post in the Introductions section at the bottom, in order to post in most of the other sections. ALWAYS TRY A SEARCH BEFORE STARTING A NEW TOPIC - Most questions you may have, have likely been already answered. DON'T BE A DRIVE-BY POSTER: As a common courtesy, check back in and reply within 24 hours, or your post will be deleted. Note there's decades of heavily experienced Guzzi professionals on this site, all whom happily give endless amounts of their VALUABLE time for free; BE COURTEOUS AND RESPECTFUL!
  • There is ZERO tolerance on personal attacks and ANY HYPERLINKS to PRODUCT(S) or other competing website(s), including personal pages, social media or other Forums. This ALSO INCLUDES ECU DIAGnostic software, questions and mapping. We work very hard to offer commercially supported products and to keep info relevant here. First offense is a note, second is a warning, third time will get you banned from the site. We don't have the time to chase repeat (and ignorant) offenders. This is NOT a social media platform; It's an ad-free, privately funded website, in small help with user donations. Be sure to see the GTM STORE link above; ALL product purchases help support the site, or you can upgrade your Forum profile or DONATE via the link above.
  • Be sure to see the GTM STORE link also above for our 700+ product inventory, including OEM parts and many of our 100% Made-in-SoCal-USA GTM products and engine kits. In SoCal? Click the SERVICE tab above for the best in service, tires, tuning and installation of our products or custom work, and don't miss our GT MotoCycles® (not) art on the BUILDS tab above. WE'RE HERE ONLINE ONLY - NO PHONE CALLS MADE OR RECEIVED - DO NOT EMAIL AND ASK QUESTIONS OR ASK TO CALL YOU.
  • Like the new V100, GuzziTech is full throttle into the future! We're now running on an all-new server and we've updated our Forum software. The visual differences are obvious, but hopefully you'll notice the super-fast speed. If you notice any glitches or have any issues, please post on the Site Support section at the bottom. If you haven't yet, please upgrade your account which is covered in the Site Support section or via the DONATE tab above, which gives you full site access including the DOWNLOADS section. We really appreciate every $ and your support to keep this site ad-free. Create an account, sign in, upgrade your account, and enjoy. See you on the road in 2024.

Replacement Horns

Nik

Tuned and Synch'ed
Joined
Oct 21, 2011
Messages
34
Location
Ashford, Surrey
Hi
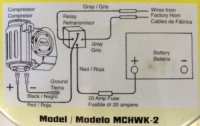
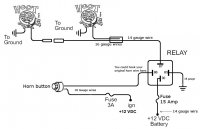
Am putting a pair of horns on my Stelvio.
Two horns, 4 pin relay, lots of wire.
Am going to try and fit them in the upper air duct in the side fairing covers, may need to create a mounting bracket as there's nothing near to fasten them to.

Anyone have a wiring diagram/ hints+ tips please.

Best regards
Nik
 
Try a search here for all sections, plenty of posts on the subject.
 
GT-RX
Thanks for your reply. I've searched the site as best I can as you say there are a lot of posts but I can't find a simple wiring diagram for wiring in 2 horns. I don't need the bikes full wiring chart. Sorry to be so 'high maintenance'.
Best regards
Nik
 
Usually the wiring kit to add a second horn will cover it, or are you just adding one on your own?

Posted for future use:
 

Attachments

  • HornRelayWiring.jpg
    HornRelayWiring.jpg
    81.8 KB · Views: 187
  • HornWiring-1.jpg
    HornWiring-1.jpg
    48.7 KB · Views: 186
Hi
Two completely new horns and making up the wiring myself. Only using the two wires to the original horn.
Hope this helps and thanks for your help.
Best regards
Nik.
 
Does the original horn use a relay, if not you could burn out the horn switch with too much current passing through it. On my Breva I installed a relay and used the original horn wires to operate it. This in turn operated a compressor for 2 air horns.
 
Kevin.NZ said:
Does the original horn use a relay, if not you could burn out the horn switch with too much current passing through it. On my Breva I installed a relay and used the original horn wires to operate it. This in turn operated a compressor for 2 air horns.

The Stelvio does NOT use a stock relay. The horn button is huge metal pieces and unlikely to be damaged. But the stock wiring will not handle the current very well.

I ran my dual Fiamms from the stock wiring. Occasionally one of the horns would fail to kick on due to the weak wiring.
I ran a fused hot wire from the battery to a relay, used an easy frame ground. Made a bit difference in the sound level too.

I mounted the horns on each side of the oil cooler.

As for the schematic. A quick Google gets you:
http://bit.ly/UeK9Q0
 
Thanks all for your help. Yes I had planned to use a fused wire from the battery to the relay and find an earth on the frame. I was mainly after which wires go where on the relay.

I have also looked at siting them by the top of the oil cooler but really wanted them hidden away.
I like a bit of 'stealth' noise! LOL.
Cheers all
Nik.
 
Not to be talking down to anyone...but you can get your relay info here: http://www.bcae1.com/relays.htm

I'd recommend using the OEM horn + connection (check with a volt meter to make sure you are correct) as the trigger for your new relay. Then connect a + fuzed wire from the battery to the relay. The relay will have a ground connection and you can find lots of good places for that. Finally, connect the horns to the switched output from the relay. It is important to use large enough wire on the battery-to-relay circuit as well as the relay-to-horn. These horns really gobble up electrons and you don't want to choke off that supply if you want loud horns.
 
Nik said:
Thanks all for your help. Yes I had planned to use a fused wire from the battery to the relay and find an earth on the frame. I was mainly after which wires go where on the relay.

I have also looked at siting them by the top of the oil cooler but really wanted them hidden away.
I like a bit of 'stealth' noise! LOL.
Cheers all
Nik.
I just finished installing a pair of horns from a GL1500 Gold Wing. Really wanted GL1800 horns but couldn't find any other than new. I installed 1-to-2 splitters on each terminal of the left horn and plugged the bike's original wires onto that horn. Then I made a harness for the right horn from 16-gauge wire with heat shrink covering all but 3" on each end. The original horn was removed, and with the lower oil cooler bolt out, the new harness slipped under and behind the oil cooler. Finished by attaching the new harness to the right horn and to the remaining terminals at the left horn. The bike now sounds like a big ol' American car when the horn button is pressed, and no warmth can be felt either on the wires or terminals, even after 10 seconds of continuous use. So I'm not worried about the wiring and didn't use a relay. Ymmv.

For location, I removed the side panels and the cadmium colored 13mm hex nuts/studs that are used as stand-offs at the lower front of each panel. Then used the nuts/studs to secure the horn brackets with the front side of each horn facing the outside of the bike. The horns are completely hidden with the panels reinstalled. I have a pic of the install if you need it.

Stu
 
Thanks all very much for the diagrams and the advice.
I'm almost there now and have devised a mounting bracket to go from the same location as in Stu's post but is bent enough to site the horns completely in the upper air duct of the side panels. Totally out of sight. I made them out of some 10" shed door hinges so should be man enough to cope with the vibrations. All now sprayed and lacquered, looking good.
Thanks all again, now to go riding and frighten the good people of London if they transgress.

Best regards
Nik.
 
Back
Top