• Ciao Guest - You’ve landed at the ultimate Guzzi site. NEW FORUM REGISTRATIONS REQUIRE EMAIL ACTIVATION - CHECK YOUR SPAM FOLDER - Use the CONTACT above if you need help. New to the forum? For all new members, we require ONE post in the Introductions section at the bottom, in order to post in most of the other sections. ALWAYS TRY A SEARCH BEFORE STARTING A NEW TOPIC - Most questions you may have, have likely been already answered. DON'T BE A DRIVE-BY POSTER: As a common courtesy, check back in and reply within 24 hours, or your post will be deleted. Note there's decades of heavily experienced Guzzi professionals on this site, all whom happily give endless amounts of their VALUABLE time for free; BE COURTEOUS AND RESPECTFUL!
  • There is ZERO tolerance on personal attacks and ANY HYPERLINKS to PRODUCT(S) or other competing website(s), including personal pages, social media or other Forums. This ALSO INCLUDES ECU DIAGnostic software, questions and mapping. We work very hard to offer commercially supported products and to keep info relevant here. First offense is a note, second is a warning, third time will get you banned from the site. We don't have the time to chase repeat (and ignorant) offenders. This is NOT a social media platform; It's an ad-free, privately funded website, in small help with user donations. Be sure to see the GTM STORE link above; ALL product purchases help support the site, or you can upgrade your Forum profile or DONATE via the link above.
  • Be sure to see the GTM STORE link also above for our 700+ product inventory, including OEM parts and many of our 100% Made-in-SoCal-USA GTM products and engine kits. In SoCal? Click the SERVICE tab above for the best in service, tires, tuning and installation of our products or custom work, and don't miss our GT MotoCycles® (not) art on the BUILDS tab above. WE'RE HERE ONLINE ONLY - NO PHONE CALLS MADE OR RECEIVED - DO NOT EMAIL AND ASK QUESTIONS OR ASK TO CALL YOU.
  • Like the new V100, GuzziTech is full throttle into the future! We're now running on an all-new server and we've updated our Forum software. The visual differences are obvious, but hopefully you'll notice the super-fast speed. If you notice any glitches or have any issues, please post on the Site Support section at the bottom. If you haven't yet, please upgrade your account which is covered in the Site Support section or via the DONATE tab above, which gives you full site access including the DOWNLOADS section. We really appreciate every $ and your support to keep this site ad-free. Create an account, sign in, upgrade your account, and enjoy. See you on the road in 2024.

GT CNC Lower Pegs Silver

Bgarceau

Tuned and Synch'ed
GT Contributor
Joined
Jul 5, 2014
Messages
43
Location
Mont Vernon, NH USA
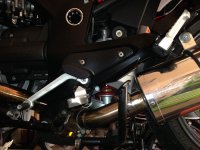
I just received a set of these from Todd. I read the other posts on the topic of lowered pegs and decided to give it a go. Here is how this worked out on my '08 Sport 1200...

I found it very easy to actually do the replacement. I have a set of snap ring pliers which were useful when pulling the stud. The stock return springs fit right in place with the new pegs.

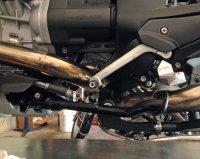
Once in place I had an immediate conflict with the side stand and left side peg. I have a lesser problem with the Norge center stand that the PO installed. I will address that later this week I think. Here's how I worked out the side stand issue.

The side stand contacts the lowered pegs. So in looking at the side stand itself I noticed that it makes contact with its frame at a place where there is enough metal (thick enough) for me to drill and tap a hole for a stainless 5mm hex head screw that I had. It's probably not useful to provide the screw specs, other than it is 4mm diameter (the screw shaft) which appears to be a good size to allow drilling/tapping in-line with the part of the side stand frame where the kick stand makes contact.

Here are some pictures that should provide better explanation. The final picture shows the resulting extra space now between the stowed kickstand and the new peg. Once I put the screw in place I had a bit too much clearance, so I removed it and ground the head down. There is now about a half inch.
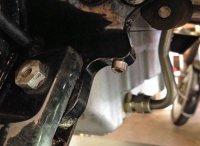
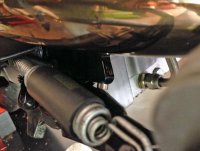
Kickstand Standoff Screw11

Kickstand Standoff Screw12

Kickstand Standoff Screw10

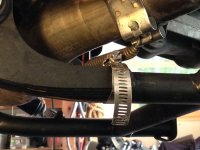
The center stand definitely needs some work. The replacement silencer (which I bought from a friend, used) did not include the tab (as on the stock silencer) for the rubber pad on the center stand. So when the stand is up, it was contacting the pipe directly. I added a pipe clamp to act as a standoff until I can maybe fabricate something like the shelf-like thing welded to the stock silencer that the center stand bumper contacts.

Since the shifter was a little low with the stock pegs I don't feel a need to adjust for the new pegs. I felt the same about the brake lever so for the moment the setup is pretty good. I plan to put some significant miles on this coming week and will update this post if needed.
 
Last edited:
The center stand definitely needs some work. With the replacement silencer (which I bought from a friend, used), you can see in the picture above that it did not include the tab for the rubber pad on the center stand, and so it contacts the pipe directly.

Since the shifter was a little low with the stock pegs I don't feel a need to adjust for the new pegs. I felt the same about the brake lever so for the moment the setup is pretty good.
I plan to put some significant miles on this coming week and will update this post if needed."

OK, back from an extended ride today. The lowered pegs provided even more relief from the prior cramped position, which of course was the reason I got them. The new seat and these pegs have been a huge improvement. Long ride - no more cramped leg issues. Nice.

The brake height is still right on.

However, the shifter is unfortunately just a little too high. When I got back I adjusted the shifter arm one place lower on the but this resulted in contact with the side stand when downshifting.

For now then I am just getting used to having the shifter a bit high. Todd advised me that I could also adjust the shifter height using the screw adjustments. I attempted to do this but could only get a wrench on the lower nut. It appears that mere mortals would need to remove the starter to get to both.

I may give that adjustment option another try this coming week.
 
Last edited:
You could try the euro sidestand. I had the same problem upon lowering my pegs, and the euro sidestand (straight, not dogleg) solved the problem. Got mine from Moto International.
 
You could try the euro sidestand. I had the same problem upon lowering my pegs, and the euro sidestand (straight, not dogleg) solved the problem. Got mine from Moto International.

Yes, that is an option that I am considering. Do you recall whether a different bracket or other parts are also needed for the strait side stand?
 
Last edited:
I like your solution with the hex screw - very clean.

I had similar interference with Goldwing pegs. I nipped the offending corner off the sidestand plate with a swazall and hit it with some black spray paint.

Now, if I could just keep my heel from resting on the centerstand arm (rubber bushing cut in half for cornering clearance).
 
The center stand definitely needs some work. The replacement silencer (which I bought from a friend, used) did not include the tab (as on the stock silencer) for the rubber pad on the center stand. So when the stand is up, it was contacting the pipe directly. I added a pipe clamp to act as a standoff until I can maybe fabricate something like the shelf-like thing welded to the stock silencer that the center stand bumper contacts.

I further investigated the center stand issue, where it was in almost constant contact with my heel when riding. I was able to readjust the position of the pipe clamp that I had earlier added, and that did the trick. The stand no longer or rarely touches my shoe.

So here's a few pictures showing the use of the leftover stock pipe spring and the repositioning of the clamp.

CenterstandStandoff1

CenterstandStandoff2

One concern I had right along was that whatever I put under there to solve this problem had to stay put. Having something fall off that gets delivered right to rear tire at speed, or with a passenger was not acceptable. All of this to me appears to be solidly in place.
 
Back
Top