• Ciao Guest - You’ve landed at the ultimate Guzzi site. NEW FORUM REGISTRATIONS REQUIRE EMAIL ACTIVATION - CHECK YOUR SPAM FOLDER - Use the CONTACT above if you need help. New to the forum? For all new members, we require ONE post in the Introductions section at the bottom, in order to post in most of the other sections. ALWAYS TRY A SEARCH BEFORE STARTING A NEW TOPIC - Most questions you may have, have likely been already answered. DON'T BE A DRIVE-BY POSTER: As a common courtesy, check back in and reply within 24 hours, or your post will be deleted. Note there's decades of heavily experienced Guzzi professionals on this site, all whom happily give endless amounts of their VALUABLE time for free; BE COURTEOUS AND RESPECTFUL!
  • There is ZERO tolerance on personal attacks and ANY HYPERLINKS to PRODUCT(S) or other competing website(s), including personal pages, social media or other Forums. This ALSO INCLUDES ECU DIAGnostic software, questions and mapping. We work very hard to offer commercially supported products and to keep info relevant here. First offense is a note, second is a warning, third time will get you banned from the site. We don't have the time to chase repeat (and ignorant) offenders. This is NOT a social media platform; It's an ad-free, privately funded website, in small help with user donations. Be sure to see the GTM STORE link above; ALL product purchases help support the site, or you can upgrade your Forum profile or DONATE via the link above.
  • Be sure to see the GTM STORE link also above for our 700+ product inventory, including OEM parts and many of our 100% Made-in-SoCal-USA GTM products and engine kits. In SoCal? Click the SERVICE tab above for the best in service, tires, tuning and installation of our products or custom work, and don't miss our GT MotoCycles® (not) art on the BUILDS tab above. WE'RE HERE ONLINE ONLY - NO PHONE CALLS MADE OR RECEIVED - DO NOT EMAIL AND ASK QUESTIONS OR ASK TO CALL YOU.
  • Like the new V100, GuzziTech is full throttle into the future! We're now running on an all-new server and we've updated our Forum software. The visual differences are obvious, but hopefully you'll notice the super-fast speed. If you notice any glitches or have any issues, please post on the Site Support section at the bottom. If you haven't yet, please upgrade your account which is covered in the Site Support section or via the DONATE tab above, which gives you full site access including the DOWNLOADS section. We really appreciate every $ and your support to keep this site ad-free. Create an account, sign in, upgrade your account, and enjoy. See you on the road in 2024.

1975 T3 Race Bike questions

rat

Just got it firing!
Joined
May 21, 2010
Messages
7
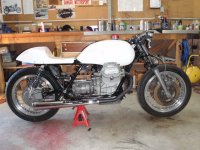
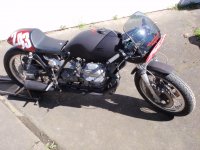
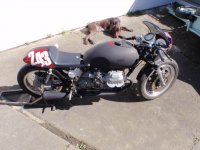
Hi All new to this scene, I have a 1975 T3 850. It is being put on the track as a classic race bike in NZ.
I have just stripped it down and are dressing it for the track.

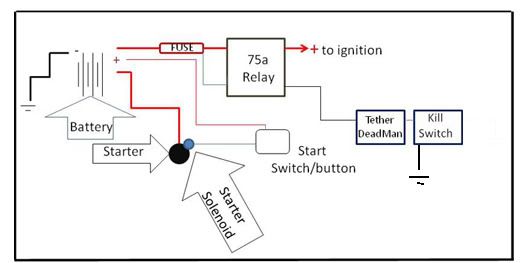
Q. Does anyone have or can supply me with info or a Diagram for a race loom to rewire my bike?
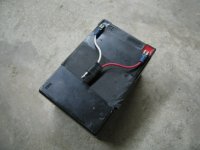
I want to run a Total Loss system ( Small Battery,Points/ coils, kill switch) real basic, and I would like to have a crack myself.

Any help / advice would be greatly recieved.

Thanks

RAT
 
I think you mentioned just about all that goes into the entire system. ;)

Start by tearing off the entire old system.
Fit a good earth for the battery. From the battery plus, wire up via a hooked-on fuse near the battery, straight up to the kill-switch, from where you supply the transponder (if not battery operated), the coils+, ignition system (if electronic) and the oil pressure lamp. The oil pressure lamp is earthed from the switch located at the engine, the coils-minus comes from the ignition system (or distributor if ol'fashioned) and if you use an electronic ignition system it will need some earth as well. Don't forget to earth the transponder (if not battery operated).

Tip1: Don't buy the cheapest kill-switch in the shop, they seem to give problems after a few wet races!

Tip2: The kill-switch should obviously be located in a handy position in order to deal with e.g. a stuck carb slider. BUT don't fit it so close to the handle bar that a racing-nervous, fumbling thumb can get to it accidentally at a crucial time such as a starting grid. Ask me how I know! :oops:

rolf j
V7-Sport for the track
 
Nice pic in the avatar Rolf. I hope it has less weight to carry around than our effort

3299920004_0c845fa827.jpg
:mrgreen:

Rat? If you want to email me I'll tell you how we run ours. You need a lanyard.

pete
 
Nope Pete!
On the contrary, I now consider applying for attendance in my own cla Forgotten Era >25occ With "Passenger" :cry:

rolf j
V7-Sport for the track
 
A bit of advice:

1. Take advantage of Pete's offer, you'll not get it better from anybody else!
2. Resist the temptation to spend all efforts on the engine before the other parts of the bike are sorted, such as brakes and suspension. A friend of mine - good rider, but with only a few seasons under the belt - reaches the upper half of the list with a bog stock T3, with 30mm carbs and all! (at least on our short'ish race tracks). His speciality is to hang on with the best through the windy bits and outbreak those who powers past him on the last part of the straight. ;)
3. Overhaul the brakes and use what you have, you'll out-break everyone in your class with the originals.
4. Don't spend money on expensive footpeg-sets. They're consumables for track use! (on an ordinary two-wheeler that is). The best is to mak'em yourself and have spares handy in the toolbox.
5. Don't spend money on e.g. Lafranconi silencers and similar types. They're heavy, loud, expensive and restrictive, i.e. everything you don't want on a race bike. Go for an open, big absorption damper off eBay or from your local, cheap after-market part pusher.
6. Make yourself some ground clearance (on an ordinary two-wheeler that is). If you route the headers slung under the sump like Rob&Pete's bike in the picture above, you have more lean angle available than anyone in your class, only restricted by your guts!
7. You get all info you'll need from Pete regarding the engine++ department. Fit Pete's windage-plate in the sump! (and obviously fit a sump ring). I use such a plate and I've never had oil in the ventilation on the track bike going at high revs. I use the simple, small LM1-style oil separator with its valve thoroughly smashed-up with a screw driver, replaced by an LM3-style ball valve on the large bellhouse connection. The final outlet goes into a mandatory bottle, that never has a drop in it! (and yes, I run 948cc) :)

rolf j
V7-Sport for the track
 
Hey Rat,

Looks like great fun!
Here's how I wired my V7 Sport used in Land Speed Racing:

RaceIgnition2.jpg


LSR is a little different environment than what you are doing so my layout needs are probably different than yours.

I use a very large 75 amp relay because it was the strongest relay, with screw on terminals and rock solid mounting that I could find. It works flawlessly.

The start button is always hot so I can rotate the engine with the ignition off. I also run with the alternator charging the battery for reliability. I used to run W/O battery using a BFC (large capacitor) and an external battery/power line, but that was VERY cumbersome. Now I have a small 12V gel battery that is enough to start the beast. I don't think it would last very long with halogen lights, turn signals, heated grips and a jaccuzi attached.

Here's my thether:

DeadManTether.jpg


The kill is the uppermost switch in the left hand pill box. The lower rocker on the pill box is my data acquision enable .... but that's another story.

In my style of racing there isn't much stearing going on (hopefully a straight line) so I can get away with the proximity of hand grip and engine kill.

I use a Pingle tether and it works OK but if you can get a better one ($$$) you might consider it. The tether (and kill) are KEY COMPONENTS and reliability is critical to having a nice day.

I am considering running a side car and would like to see how you attached yours to the T3. In LSR we don't have anyone on the side cars but they must withstand a 170 pound test. The platform minimum is 12" x 30". The minimum tire size is 5" wheel.

Good luck,

Alex
 
Thanks for the good advice guys.
Have set up the basic system as decribed above to some extent without any hassel, and the bike is now getting some final engineering done to tidy it up, by the guy who built the sidecar in my pic that I swing on. Yep going to run a standard engine for a couple of seasons till I can ride the pants off it, then will look at tarting up the power plant, sticking with the 30mm carbs and standard linked brakes also just for starters. So should be ready in time for the next classic meeting here.
Will post some pics when I get the bike back.
 
Don't know what the rules are where you race, but I must tell you, going from the stock VHB 30's to 32 PHF's made a very significant difference in performance on my street, near stock T3. Way more top end with little if any loss down below. For my money, the most performance bang for the buck you can get on a T3. Lot's more folks have gone to 36 PHFs with very good results, & they are easier to mount than the 32's. I just happened to get the 32's easily at a very good price. Either way, the stock VHB's are way too restrictive anywhere above, say, 4500 rpm. As for the integrated brakes-I'd keep them too, I like them a lot.
 
Thanks for that, yep after doing a season or two, new carbs and big valve heads will go on it. just a matter to what I can pick up. Tho Moto Kiwi guzzi supplies are very good to deal with.
 
here is a pic of the bike coming together.
 

Attachments

  • Guzzi Rebuild14.JPG
    Guzzi Rebuild14.JPG
    270 KB · Views: 1,380
Looking great.

I'll post some pix in a couple of days of the simple wiring harness I did for my racer with total loss.
 
Battery plugs into the wiring harness via a trailer hitch connector. + from battery goes to of kill switch and then to coil. I have a Dyna ignition so an grounding/earthing kill switch is not recommended by Dyna. Mine is a click on click off. - from battery goes to earth. I have all the earths at the same location and also have a wire connecting this location to the timing cover for an extra special ground :)

The trailer hitch connector is the 'ignition switch'

Total loss, no fuses, no problems ever.

Hope this makes sense.
 

Attachments

  • IMG_5664.JPG
    IMG_5664.JPG
    89.9 KB · Views: 722
  • IMG_5666.JPG
    IMG_5666.JPG
    79.6 KB · Views: 722
  • IMG_5669.JPG
    IMG_5669.JPG
    88.8 KB · Views: 722
  • IMG_5670.JPG
    IMG_5670.JPG
    78.8 KB · Views: 722
Thanks for that.
Bike was fired up for the first time as a race bike today.
A quick thrash down the road and all is good.
Time to fit in a track day or two before the first race in late Sept.

Thanks all for your wisdom.

Charlie.
 
Here is a pic of the bike before its first race on sunday, At Taupo NZ.
 

Attachments

  • Finished 243 2.JPG
    Finished 243 2.JPG
    287.1 KB · Views: 616
  • Finished 243 12.JPG
    Finished 243 12.JPG
    289.5 KB · Views: 616
Back
Top