• Ciao Guest - You’ve landed at the ultimate Guzzi site. NEW FORUM REGISTRATIONS REQUIRE EMAIL ACTIVATION - CHECK YOUR SPAM FOLDER - Use the CONTACT above if you need help. New to the forum? For all new members, we require ONE post in the Introductions section at the bottom, in order to post in most of the other sections. ALWAYS TRY A SEARCH BEFORE STARTING A NEW TOPIC - Most questions you may have, have likely been already answered. DON'T BE A DRIVE-BY POSTER: As a common courtesy, check back in and reply within 24 hours, or your post will be deleted. Note there's decades of heavily experienced Guzzi professionals on this site, all whom happily give endless amounts of their VALUABLE time for free; BE COURTEOUS AND RESPECTFUL!
  • There is ZERO tolerance on personal attacks and ANY HYPERLINKS to PRODUCT(S) or other competing website(s), including personal pages, social media or other Forums. This ALSO INCLUDES ECU DIAGnostic software, questions and mapping. We work very hard to offer commercially supported products and to keep info relevant here. First offense is a note, second is a warning, third time will get you banned from the site. We don't have the time to chase repeat (and ignorant) offenders. This is NOT a social media platform; It's an ad-free, privately funded website, in small help with user donations. Be sure to see the GTM STORE link above; ALL product purchases help support the site, or you can upgrade your Forum profile or DONATE via the link above.
  • Be sure to see the GTM STORE link also above for our 700+ product inventory, including OEM parts and many of our 100% Made-in-SoCal-USA GTM products and engine kits. In SoCal? Click the SERVICE tab above for the best in service, tires, tuning and installation of our products or custom work, and don't miss our GT MotoCycles® (not) art on the BUILDS tab above. WE'RE HERE ONLINE ONLY - NO PHONE CALLS MADE OR RECEIVED - DO NOT EMAIL AND ASK QUESTIONS OR ASK TO CALL YOU.
  • Like the new V100, GuzziTech is full throttle into the future! We're now running on an all-new server and we've updated our Forum software. The visual differences are obvious, but hopefully you'll notice the super-fast speed. If you notice any glitches or have any issues, please post on the Site Support section at the bottom. If you haven't yet, please upgrade your account which is covered in the Site Support section or via the DONATE tab above, which gives you full site access including the DOWNLOADS section. We really appreciate every $ and your support to keep this site ad-free. Create an account, sign in, upgrade your account, and enjoy. See you on the road in 2024.

2012 Stelvio NTX removal and installation of front wheel

leafman60

Cruisin' Guzzisti
Joined
Jan 7, 2009
Messages
219
Location
Pensacola, FL
This issue is given virtually no attention in the Guzzi owners manual or shop manual. Installing the axle and tightening the pinch bolts is the most critical part of the process. It's easy, once you've done it.

The 2012 NTX has a redesigned fork leg axle pinch clamp to minimize past problems of broken axle clamps.


Wheel removal -

1. Place bike on center stand and place support block under engine to prevent the bike from inadvertently falling forward without the front wheel.

2. Remove the two 13 mm mount bolts attaching each brake caliper and let them hang out of way.

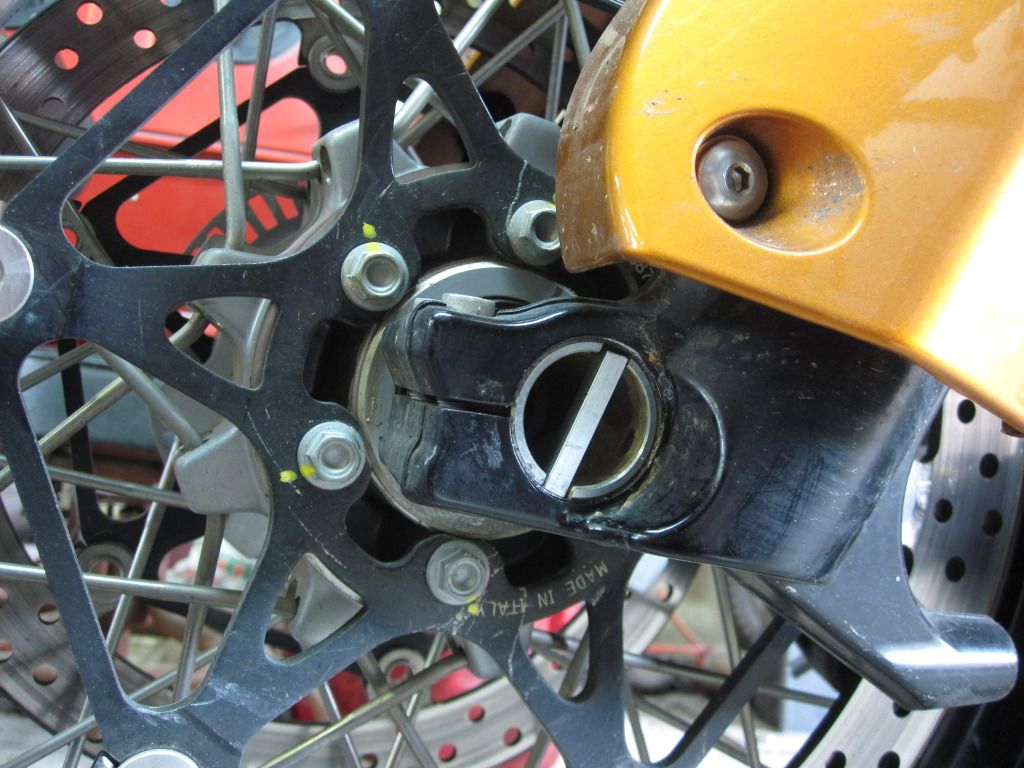
3. Loosen and remove 30 mm front axle nut and then loosen socket head axle pinch bolts.

4. Using a wood mallet or soft drift, tap threaded end of axle into the right fork leg to reveal pulling holes on non-threaded end of axle. With screwdriver or suitable pin inserted into hole(s), pull axle out while supporting wheel.

Alternatively, you can drift the axle out far enough to simply grab the non-threaded end with one hand while holding top of wheel with the other and yank the axle out.

5. Remove wheel and note the removable spacer on rider’s right side of wheel at the bearing.


Wheel installation –

1. Prepare assembly parts. Remove and clean rider's right side axle spacer and lightly grease seal lip. Insert right side spacer with flange position out from wheel. Blow any loose dirt or debris from pinch bolts and clamps. Wipe bore of fork axle holes clean. Clean and lightly grease axle.

2. Carefully position wheel between forks and line-up axle holes.

3. While supporting wheel from beneath or holding with one hand, insert axle into rider’s left fork and through the wheel. Line up right side hole and push axle on through using hand pressure or wood mallet.

4. Tighten 30 mm big axle nut hand-tight with a wrench until the axle spins in fork holes. This will pull the axle and wheel up against the spacer on the rider's right side of the axle. Run down all four pinch bolts only finger tight. Don’t tighten pinch bolts yet.

5. Inspect brake pads and install brake calipers and torque bolts to 50NM.

6. Remove support under engine and carefully push bike off center stand. Compress forks by bouncing a time or two to make sure fork legs align on axle. Visually inspect brake rotor alignment in calipers.

7. Leave bike off center stand and tighten rider’s left fork pinch bolts in alternating steps to 10 NM. This keeps axle from turning while tightening axle nut. Don’t tighten riders right pinch bolts yet.

An alternative to hold axle from turning is to cut a short piece of key stock or use something similar to insert into the end notches of the non-threaded end of the axle.

8. Tighten big 30 mm axle nut to 80 NM. Loosen the rider's left pinch bolts again if you did not use the key stock method of holding the axle, bounce the forks one more time and then tighten all four pinch bolts in alternating steps to 10 NM.

9. Pump-up brake calipers with brake lever.

Torque settings front wheel:
Brake caliper mounts 13 mm head size, 50 NM
Big axle nut 30 mm head size, 80 NM
Pinch bolts socket head, 10 NM

10 NM = 88.5 inch pounds = 7.376 foot pounds
 
Great write up as usual Leafman....now pictures would have sent it over the top... :D

How did you get the torque setting for the pinch bolts. 15NM converts to 8 ft-lbs. Seems awfully loose. Last bike with similar setup was 18 ft-lbs????
 
You think pics would help? It is so simple, I thought pics would not add much. The key part is securing the axle and pinch bolts.

I have a torque wrench that will go that low. It's 10 NM and, yes, that is not very tight. I think you could do it by feel with a standard-style Allen "L" wrench. Just good snug.

10 NM = 88.5 inch pounds = 7.376 foot pounds

I'll be removing the tire again before long and I'll make some digital pics then and come back and add them. This go-around was to install my front tire pressure sensor inside my current tire which is already about 50 percent worn.
 
You don't smear lube on the axle? I've had a few axles rust on place over the year and learned the hard way to smear something on the axle to prevent rust.

I noticed that you align the forks, then snug the pinch bolts, then tighten the axle nut which may pull the forks out of alignment. :?:
 
Wayne Orwig said:
You don't smear lube on the axle? I've had a few axles rust on place over the year and learned the hard way to smear something on the axle to prevent rust.

I noticed that you align the forks, then snug the pinch bolts, then tighten the axle nut which may pull the forks out of alignment. :?:


Step #1 of "installation" includes greasing the axle.

The axle and pinch bolt thing is the confusing part of this and the Guzzi manuals do not deal with it as far as I know.

BMW uses a similar, though different, front axle assembly for their late model bikes and their instruction manuals are much better detailed than the Guzzi manuals.

The BMW axle is first threaded hand-tight into the receiving fork leg since they have no axle nuts. The forks are bounced for alignment which is accommodated by the non-threaded side of the axle. The axle is then torqued down and the pinch bolts tightened. I assume accommodating fork alignment by one side is due to some indexing of the brake caliper positions to the non-aligning side of the forks (such is the case for H-D forks too).

The Guzzi forks should work the same way. You snug down the axle nut to pull the the axle to that side against its bearing step and any subsequent alignment will be taken on the non-threaded side.

The added complication with the NTX is there is no way to tighten the front axle without it spinning unless you hold it with a special tool or improvise one as I did with key stock as I indicated.

My purpose in adding the sequence of first tightening the rider's left pinch bolts was to provide a method of properly tightening the axle and pulling everything up without having to use a special tool or the key stock. I went back and tried to clarify this by adding the subsequent loosening of the rider's left pinch bolts, another bounce and re-tightening everything just for good measure.

If you use the key stock method, as I actually did, you can eliminate the intermediate step of first tightening and then loosening the the rider's left pinch bolts. Just hold the axle, torque the big nut down and then tighten all the pinch bolts after you've bounced the forks.

Improvised method of holding axle ( that's one pic I did get )-

IMG_1782.jpg


If you think the best way is to tighten the pinch bolts on the threaded side of the axle before torquing the axle down to its specification, have at it. 80 NM of torque will likely pull out any alignment held by the 10 NM small bolts anyway. That just seems contrary to the other systems I've learned.

One last observation. I think we may be a bit anal about all this alignment. I have not noticed any significant movement of the NTX forks or of my several late model BMW forks when I bounce them before tightening the axle
pinch bolts. Just my own observation.
 
Today's forks are pretty hard to get out of alignment. I stopped doing the bounce thing with the first disk brake bike. I leave the pinch bolts loose, tighten the axle, tighten the pinch bolts, and install the brake calipers last. You are more apt to get the tubes not parallel if you use the disk brake(s) to bounce the front end.
 
leafman60 said:
If you think the best way is to tighten the pinch bolts on the threaded side of the axle before torquing the axle down to its specification, have at it.

I always tighten the left pinch bolts to hold the axle. Torque down the axle nut. Then loosen the left pinch bolts and bounce it to realign. Then tighten the pinch bolt last.

As mentioned, it may not really mean much, but the pinch bolts should be last for proper alignment.

Edit: right to left side
 
Wayne Orwig said:
leafman60 said:
If you think the best way is to tighten the pinch bolts on the threaded side of the axle before torquing the axle down to its specification, have at it.

I always tighten the left pinch bolts to hold the axle. Torque down the axle nut. Then loosen the righ pinch bolts and bounce it to realign. Then tighten the pinch bolt last.

As mentioned, it may not really mean much, but the pinch bolts should be last for proper alignment.


Respectfully, loosening the right side pinch bolts after you torque the axle nut, as you say, does not accomplish anything. At that point, the only alignment possibility is with the rider's left side pinch bolt clamp. If you want to do an alignment bounce after tightening the axle nut, you should loosen the riders left bolts as outlined in the above procedure. Having a clamp on the right side is somewhat superfluous.

Once you tighten the axle nut there is no alignment possible on the right side since the axle is then pulled tight against the right fork and the right side spacer. The axle has a machined step on the left side that engages the wheel bearing and pulls the wheel assembly to the right when the axle is tightened. After the axle is snugged or tightened, only the left fork clamp is free to move once its pinch bolts are loosened.
 
john zibell said:
Today's forks are pretty hard to get out of alignment. I stopped doing the bounce thing with the first disk brake bike. I leave the pinch bolts loose, tighten the axle, tighten the pinch bolts, and install the brake calipers last. You are more apt to get the tubes not parallel if you use the disk brake(s) to bounce the front end.

Reading some old posts here - good point about not using the brakes to bounce the forks. I have always done this in the past. but as you say, clamping the discs could contribute to misalignment.
Alan NZ
 
Just so you all know if you change the front a lot that ring nut will not live long at 80nm. better to stay about 40 -60 like EVERY other bike with thin axle nuts this size. and axle this thickness
 
Hey guzzisti, I took my wheels off and got some new tires put on my elephant 2014 NTX from my local Cycle Gear and when I got the wheels back home from the shop I noticed that only one spacer was on the front wheel. I looked at the Guzzi manual exploded views and sure enough they call out just one spacer to be installed on the rider's left side. None on the Nut side? Am I missing something? When I go to tighten the nut sure enough the fork pulls into the disc. Can any of you take a look at your bike and let me know if you have the spacer on both sides of the wheel? Thank you so much.
Upload 2020 7 17 2 45 31
 
Never mind... I figured out my issue. The MG diagram seems to be wrong. The spacer goes on the ABS ring side of the wheel, rider right side at least on my bike. It is not necessary on the rider left side as the spindle/axle wider diameter on that side acts as a stopper itself.
Upload 2020 7 17 10 55 12
 
Last edited:
Back
Top