Doing it for my first time. Oil capacity in the manual is 4 ltrs. I assume not all will drain out. In particular from the oil cooler. Can I expect to use the full 4 ltrs to top up? Should I go with 3.5 ltrs and then run and recheck. Perhaps fill cold to the lower mark on dip stick and then run. Any recommendations appreciated
Navigation
Install the app
How to install the app on iOS
Follow along with the video below to see how to install our site as a web app on your home screen.
Note: This feature may not be available in some browsers.
More options
-
Ciao Guest - You’ve landed at the ultimate Guzzi site. NEW FORUM REGISTRATIONS REQUIRE EMAIL ACTIVATION - CHECK YOUR SPAM FOLDER - Use the CONTACT above if you need help. New to the forum? For all new members, we require ONE post in the Introductions section at the bottom, in order to post in most of the other sections. ALWAYS TRY A SEARCH BEFORE STARTING A NEW TOPIC - Most questions you may have, have likely been already answered. DON'T BE A DRIVE-BY POSTER: As a common courtesy, check back in and reply within 24 hours, or your post will be deleted. Note there's decades of heavily experienced Guzzi professionals on this site, all whom happily give endless amounts of their VALUABLE time for free; BE COURTEOUS AND RESPECTFUL!
-
There is ZERO tolerance on personal attacks and ANY HYPERLINKS to PRODUCT(S) or other competing website(s), including personal pages, social media or other Forums. This ALSO INCLUDES ECU DIAGnostic software, questions and mapping. We work very hard to offer commercially supported products and to keep info relevant here. First offense is a note, second is a warning, third time will get you banned from the site. We don't have the time to chase repeat (and ignorant) offenders. This is NOT a social media platform; It's an ad-free, privately funded website, in small help with user donations. Be sure to see the GTM STORE link above; ALL product purchases help support the site, or you can upgrade your Forum profile or DONATE via the link above.
-
Be sure to see the GTM STORE link also above for our 700+ product inventory, including OEM parts and many of our 100% Made-in-SoCal-USA GTM products and engine kits. In SoCal? Click the SERVICE tab above for the best in service, tires, tuning and installation of our products or custom work, and don't miss our GT MotoCycles® (not) art on the BUILDS tab above. WE'RE HERE ONLINE ONLY - NO PHONE CALLS MADE OR RECEIVED - DO NOT EMAIL AND ASK QUESTIONS OR ASK TO CALL YOU.
-
Like the new V100, GuzziTech is full throttle into the future! We're now running on an all-new server and we've updated our Forum software. The visual differences are obvious, but hopefully you'll notice the super-fast speed. If you notice any glitches or have any issues, please post on the Site Support section at the bottom. If you haven't yet, please upgrade your account which is covered in the Site Support section or via the DONATE tab above, which gives you full site access including the DOWNLOADS section. We really appreciate every $ and your support to keep this site ad-free. Create an account, sign in, upgrade your account, and enjoy. See you on the road in 2024.
You are using an out of date browser. It may not display this or other websites correctly.
You should upgrade or use an alternative browser.
You should upgrade or use an alternative browser.
2016 Audace Oil Change
- Thread starter Johnap
- Start date
I never put in the capacity on any vehicle. Always short 1 qt then run & top up. Fill the filter before installation and add 3lt. Top up till you like it on the stick. My bikes blow out till 1/2 way down the stick so I stop there.
Yes. Access to the metal clips that secure the air filter cover is tight. I recommend you take careful note of how the clips work as you remove each one. Reinstalling the less accessible clips can be 'entertaining.'
Stephen
Stephen
"ENTERTAINING" : that must be the understatement of the year. I did the airbox mod 6 months ago while installing Todd's fueling package and still haven't got the two side clips back on, after initially swearing at it for two hours.Yes. Access to the metal clips that secure the air filter cover is tight. I recommend you take careful note of how the clips work as you remove each one. Reinstalling the less accessible clips can be 'entertaining.'
Stephen
I have a feeling the factory attaches the lid and clips before fitting the whole airbox to the intake. For the moment I have just wedged some small dense foam pieces between box lid and battery, where the side clips are, until such time as i need to take the tank off. Seemes to work well enough. There is a rubber seal in the lid anyway to take up any tiny slack.
Last edited:
I found it easier to get the side clips back on if I removed the side covers
I found it easier to get the side clips back on if I removed the side covers
Yep tried that, even disconnected ancilliary relay blocks etc on rhs, but no way I could find space to get fingers or any tool I possessed into that tiny space. Even going at it sideways, the subframe just got in the way. Todd suggested using some kind of dental "picker" tool, which I may yet try,
Yep tried that, even disconnected ancilliary relay blocks etc on rhs, but no way I could find space to get fingers or any tool I possessed into that tiny space. Even going at it sideways, the subframe just got in the way. Todd suggested using some kind of dental "picker" tool, which I may yet try,
Having said that I did it today without removing the side covers. I took the battery out, pulled all the wiring that I could well out of the way and held it back, took the small fuse block off its mount, and that gave a clear shot at it. It was still a pain in the arse but I managed to get it past the bottom 2 clips and managed to clip them back on using a long screwdriver.
Having said that I did it today without removing the side covers. I took the battery out, pulled all the wiring that I could well out of the way and held it back, took the small fuse block off its mount, and that gave a clear shot at it. It was still a pain in the arse but I managed to get it past the bottom 2 clips and managed to clip them back on using a long screwdriver.
Yep they certainly didn't make it easy. After trying countless times and watching the clips fall out and disappear into some hidden recess in the bikes bowels while simultaneously swearing like a trooper, I stuck with the foam wedges, they can be removed and replaced in less than 2 seconds and actually give a tighter fit - ha ha
Yep they certainly didn't make it easy. After trying countless times and watching the clips fall out and disappear into some hidden recess in the bikes bowels while simultaneously swearing like a trooper, I stuck with the foam wedges, they can be removed and replaced in less than 2 seconds and actually give a tighter fit - ha ha
How do the foam wedges work Paul, is there a picture somewhere?
How do the foam wedges work Paul, is there a picture somewhere?
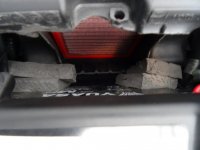
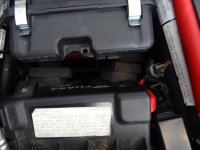
Well nothing hi-tech that's for sure, more like bodgeneering. Simply cut some small dense foam pieces from a garage flooring mat that I had kicking around and wedged them between airbox lid and battery - I'm sure I could have made it smaller and neater, but it was a super quick fix while doing the air-box mod and fueling package, so I could test it (you can see the BMC filter through the lid) and it has now become semi-permanent. Of course being wedged they are super easy to put in place and remove and they hold the lid tight on the sides (like the clips were supposed to do) so no dirty air get passed the seal. They also have stayed in place, so no worries they might come loose or move.
Attachments
Well nothing hi-tech that's for sure, more like bodgeneering. Simply cut some small dense foam pieces from a garage flooring mat that I had kicking around and wedged them between airbox lid and battery - I'm sure I could have made it smaller and neater, but it was a super quick fix while doing the air-box mod and fueling package, so I could test it (you can see the BMC filter through the lid) and it has now become semi-permanent. Of course being wedged they are super easy to put in place and remove and they hold the lid tight on the sides (like the clips were supposed to do) so no dirty air get passed the seal. They also have stayed in place, so no worries they might come loose or move.
Simple and it works, love it. You have to wonder why Guzzi couldn't come up with something much easier.


