Seems that this comes up often for the Ago crash-bars (which we sell HERE). This is in addition the poorly translated instructions sent with them, so here go:
- Remove voltage regulator and horn (as applicable).
- Remove the plastic covers on the frame bolts (as applicable).
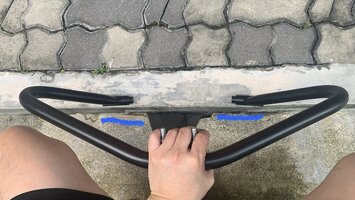
- Place the crash bar in position. You can lasso the headers without removing them, one side at a time. We recommend some tape on the headers and crash-bars to preserve the (black) finishes. The angle should face backward towards the cylinders, not forward.
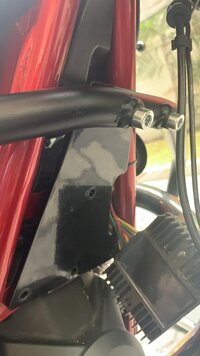
- Install the top frame bracket loosely onto the crash-bars using provided hardware, spacers and nuts. Align so that the notch in the adapter plate allows lines/wires to clear. For models needing horn relocation, we place the stock horn assy/bracket on the outside of the crash-bar bolt (see pic below).
- Remove stock lower frame bolts, and Install the new frame bolts through the crash bar and into the frame using the stock nuts. The bar typically needs to be pushed down to match with the frame bolt position. You may need help to do this. You typically have to turn/thread them in. An allen socket is best.
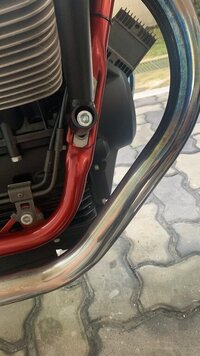
- Once the bar is attached to the frame, the top adapter plate holes should line up with the holes at the top of the frame. Insert bolts, and torque upper and lower bolts to spec. The nuts on the backside are tough to get to, especially with ABS equipped bikes. Flex head ratcheting closed-end wrenches are helpful.
- Torque the bottom frame bolts to ~37 ft/lbs (50 nm).

- Remove voltage regulator and horn (as applicable).
- Remove the plastic covers on the frame bolts (as applicable).
- Place the crash bar in position. You can lasso the headers without removing them, one side at a time. We recommend some tape on the headers and crash-bars to preserve the (black) finishes. The angle should face backward towards the cylinders, not forward.
- Install the top frame bracket loosely onto the crash-bars using provided hardware, spacers and nuts. Align so that the notch in the adapter plate allows lines/wires to clear. For models needing horn relocation, we place the stock horn assy/bracket on the outside of the crash-bar bolt (see pic below).
- Remove stock lower frame bolts, and Install the new frame bolts through the crash bar and into the frame using the stock nuts. The bar typically needs to be pushed down to match with the frame bolt position. You may need help to do this. You typically have to turn/thread them in. An allen socket is best.
- Once the bar is attached to the frame, the top adapter plate holes should line up with the holes at the top of the frame. Insert bolts, and torque upper and lower bolts to spec. The nuts on the backside are tough to get to, especially with ABS equipped bikes. Flex head ratcheting closed-end wrenches are helpful.
- Torque the bottom frame bolts to ~37 ft/lbs (50 nm).