• Ciao Guest - You’ve landed at the ultimate Guzzi site. NEW FORUM REGISTRATIONS REQUIRE EMAIL ACTIVATION - CHECK YOUR SPAM FOLDER - Use the CONTACT above if you need help. New to the forum? For all new members, we require ONE post in the Introductions section at the bottom, in order to post in most of the other sections. ALWAYS TRY A SEARCH BEFORE STARTING A NEW TOPIC - Most questions you may have, have likely been already answered. DON'T BE A DRIVE-BY POSTER: As a common courtesy, check back in and reply within 24 hours, or your post will be deleted. Note there's decades of heavily experienced Guzzi professionals on this site, all whom happily give endless amounts of their VALUABLE time for free; BE COURTEOUS AND RESPECTFUL!
  • There is ZERO tolerance on personal attacks and ANY HYPERLINKS to PRODUCT(S) or other competing website(s), including personal pages, social media or other Forums. This ALSO INCLUDES ECU DIAGnostic software, questions and mapping. We work very hard to offer commercially supported products and to keep info relevant here. First offense is a note, second is a warning, third time will get you banned from the site. We don't have the time to chase repeat (and ignorant) offenders. This is NOT a social media platform; It's an ad-free, privately funded website, in small help with user donations. Be sure to see the GTM STORE link above; ALL product purchases help support the site, or you can upgrade your Forum profile or DONATE via the link above.
  • Be sure to see the GTM STORE link also above for our 700+ product inventory, including OEM parts and many of our 100% Made-in-SoCal-USA GTM products and engine kits. In SoCal? Click the SERVICE tab above for the best in service, tires, tuning and installation of our products or custom work, and don't miss our GT MotoCycles® (not) art on the BUILDS tab above. WE'RE HERE ONLINE ONLY - NO PHONE CALLS MADE OR RECEIVED - DO NOT EMAIL AND ASK QUESTIONS OR ASK TO CALL YOU.
  • Like the new V100, GuzziTech is full throttle into the future! We're now running on an all-new server and we've updated our Forum software. The visual differences are obvious, but hopefully you'll notice the super-fast speed. If you notice any glitches or have any issues, please post on the Site Support section at the bottom. If you haven't yet, please upgrade your account which is covered in the Site Support section or via the DONATE tab above, which gives you full site access including the DOWNLOADS section. We really appreciate every $ and your support to keep this site ad-free. Create an account, sign in, upgrade your account, and enjoy. See you on the road in 2024.

Aux Fuel Tank

Mike.C said:
Mate of mine uses THIS TANK FOAM HERE in his enduro race bikes, might be worth a try.

Great project Ray.

Yep, we're looking at that evomx foam. They claim it doesn't break down due to gas additives, and is good for 15 years. But that comes at a price of @ $100 for 6 gal. We may just put a baffle or two in the tank design instead.....not sure yet. Or try and find some military grade reticulated polyurethane foam on our own at a better price.
 
The prototype is done!

We've cut out all the templates and are done with all the gluing and taping. Our prototype is assembled, less the mounting legs and pin. Here are some photos of it sitting on the bike, with and without the trunk. Please excuse my lame photography skills. These were obviously not taken in a studio. ;)
We tried to build the model to follow the lines of the bike as closely as we could. You be the judge. We're still on target for @ 6 gallons, for a total fuel volume of @11 gallons, which I believe is close to the iron-butt limit, not that I'll ever ride one. The topcase you see is a Givi E55. It's as big as they come. The front of the tank is designed such that it acts as a backrest, or you could add a thin piece of padding to it if you wanted to.
 

Attachments

  • Tank1.jpg
    Tank1.jpg
    280.3 KB · Views: 887
  • Tank3.jpg
    Tank3.jpg
    368 KB · Views: 887
  • Tank4.jpg
    Tank4.jpg
    275.8 KB · Views: 887
  • Tank5.jpg
    Tank5.jpg
    277.1 KB · Views: 887
  • Tank6.jpg
    Tank6.jpg
    237.9 KB · Views: 887
Here are a few more photos with the luggage all mounted.
 

Attachments

  • Tank7.jpg
    Tank7.jpg
    437.4 KB · Views: 880
  • Tank8.jpg
    Tank8.jpg
    281.9 KB · Views: 880
  • Tank9.jpg
    Tank9.jpg
    363.2 KB · Views: 880
Question:

If the bottom of the AUX fuel cell is higher than the bottom of the OEM fuel tank, why would you want to add the complexity of an electric fuel pump when gravity will move the fuel for you? All that would be needed would be a manual fuel valve.

The AUX fuel cells I've messed with have been gravity-fed and work great.

p.s. your design looks great!
 
rocker59 said:
Question:

If the bottom of the AUX fuel cell is higher than the bottom of the OEM fuel tank, why would you want to add the complexity of an electric fuel pump when gravity will move the fuel for you? All that would be needed would be a manual fuel valve.

The AUX fuel cells I've messed with have been gravity-fed and work great.

p.s. your design looks great!

Thanks for the feedback!

I know I've posted a lot of pages here. And a lot of it was just me thinking out loud. Part of my original thought was to let the OEM tank siphon from the aux tank. That didn't work out. But if you take the time to start from the beginning, you'll see that the transfer hose from the aux tank is tapped into the top of the OEM tank. And since the bottom of the aux tank is lower than the top of the OEM tank, it takes a pump to transfer the fuel up hill. You can sort of get an idea of the relation between the aux tank and OEM tank in the last picture I posted. I suppose a guy could try and tap into the bottom of the OEM tank. I just couldn't find a logical place to do that, and I was more afraid of a leak there as well. The electronics, in my opinion, also provide a measure of safety in making sure fuel doesn't flow when I don't want it to. And it's easy as flipping an easy to reach toggle switch when I do.
 
I had an interesting conversation with a gentleman from Crest Technologies today. They are the company that manufactures most of the foam products we see advertised to prevent sloshing in fuel tanks. I let him know about the project I've been working on, and his first question was "What kind of fuel are you putting into the tank?". When I answered "pump gas", he said they have nothing that will work. We spoke for quite some time, but the bottom line is that any foam product will break down and gum up your filter or worse if you use any fuel that has ethanol. Of course, in the US, most all pump gas now contains certain levels of ethanol. Some up to 85%. This ethanol will begin to break down the foam (he had a more technical term) in a matter of hours. He specifically mentioned he sent letters to many of the companies we've mentioned here (EVOMX,etc) telling them to print some sort of warning indicating that pump gas should not be used with their products. So I guess that idea is out.

He did mention some alternatives. Perhaps some sort of "steel wool" type configuration made out of aluminum or copper. Perhaps some sort of wadded up screening made from polypropylene. Maybe even a bunch of old nylons. We've also thought about just welding some partitions into the tank. The issue with that is those welds would show through the walls of the tank and ruin the smooth stealth-fighter look. I suppose those could be hidden with a proper coating on the tank. Maybe something like spray-in truck bed liner. But that stuff is pretty heavy. Anyway, it's back to the drawing board on this topic.
 
While it won't sound like a lot of progress as it's written here, we have made some significant progress. First, we've decided to use internal baffles to prevent sloshing. As written above, there isn't any good foam product available that won't break down using pump gas. But we've figured out a way to put baffles in the tank without welding on exposed smooth surfaces. We'll weld a horizontal plane in the middle of the tank where the two curved angle pieces meet on the outside edges. Then we'll weld a few vertical pieces off that to prevent severe side to side and/or front to back sloshing. It should work slick as cow slobber and not add any significant weight or cause any significant reduction in volume. A bit more work and material, but a good permanent fix.

Secondly, we've got the measurements done for the mounting points. We're going to use the same three points as the stock seat. First, for the two front round pins, I got some 5/8" ID heater hose to cover them and keep them from getting scratched up when the tank is mounted. And I'll slip a hose washer over each pin first to prevent any side to side movement, then the 3/4" long piece of heater hose, sliced to allow for easy on/off, to protect the pin itself. We've got the latch pin done in CAD, so we'll be able to machine that piece and thread it into a boss on the tank for easy adjustment.

I still need to find some rubber pieces for the 5 cushions that rest on the frame. I'll be heading to Home Depot soon to see what I can find. We're going to use the same principle as the latch pin. We'll mount them into a threaded boss so they'll be adjustable to suit each bike and any individual ideosyncrasies each may have.

I guess I'm a little surprised I haven't seen much feedback on this project. I know it's taking some time to do, but we're working hard to get it right. It seems there may be a few folks who would rather see a two gallon tank that mounts on the right side between the frame and pannier. I guess my take on that is if you don't want six gallons, don't completely fill this tank. :D 
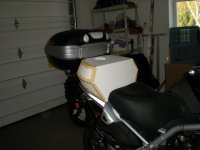
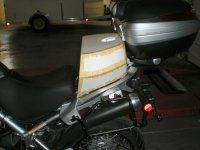
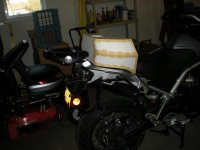
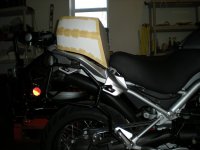
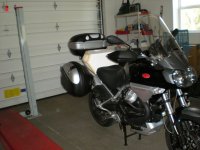
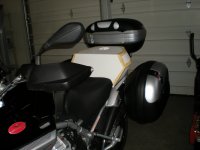
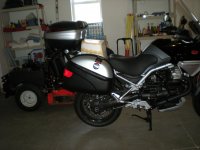
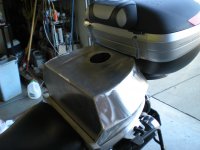
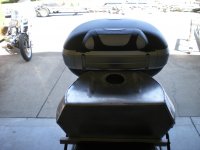
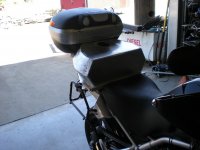
And I understand that this tank would prevent a passenger from coming along for the ride. But how often does a passenger want to ride further than the range of the OEM tank? That's why we're setting this up so it can be easily removed and replaced by the stock passenger seat in just seconds for those times when your S/O is ready to ride.

What say you all? Are we on the right track here?
 
Progress has certainly slowed, but we are still making progress. The task at hand is modeling the mounting and support points for the tank. We're building a plywood model of the base so we're sure to get the clearances perfected before we go to the welder. CAD is a wonderful tool, and my engineer friends won't settle for anything less than perfect. My goal is to have this thing done before the national rally in June. More to come.....
 
The engineered drawings are finally done. I had the flat patterns printed today, and took them to the welding shop. We're still working on some of the details for the mounting points, but the tank itself is ready to build. This has certainly taken longer than I expected. But the fit and finish are going to be a lot more precise than I expected too. For example, we are having to create a 3.75" wide notch on the back of the tank at the center/bottom to clear the tab on the rear tail light. We could have simply shortened the tank by a half inch or so, but then it would not have followed the lines and angles of the tail as well.

Here's the transparent drawing of the tank. I don't know how well this will post, but here goes. BTW.....the drawings belong to the engineer, and should not be duplicated, sold, used, etc, etc.
 

Attachments

  • tank parts2.jpg
    tank parts2.jpg
    15.8 KB · Views: 597
It looks like we're not going to have the tank ready in time for the national rally :( . The guys are too busy with their regular jobs to get it done in time. And I want some run time with it before we show it off. DANG IT!
 
The engineering is basically done. We've got the mounting points figured out and mapped on the drawings. Here's the sketch of what it will look like. Now it's hurry up and wait for the welder! :)
 

Attachments

  • tank.JPG
    tank.JPG
    13.4 KB · Views: 843
Finally getting around to fabbing up an auxiliary tank that fits inboard of the right pannier. We'll see...

ccc33a67.jpg


1.jpg


2.jpg


3.jpg
 
I spoke to my welder tonight, and it seems he finally has time to work on my tank. He's got the parts cut out, and he believes he'll be assembling them over the weekend. After 6 mos it feels like we're finally getting close!
 
Ray R said:
I spoke to my welder tonight, and it seems he finally has time to work on my tank. He's got the parts cut out, and he believes he'll be assembling them over the weekend. After 6 mos it feels like we're finally getting close!

He must be running out of the "free" Obama money :woohoo: , either that or a real good welder and is kept very busy because of the quality of his work.
 
Indeed the welder has made progress, as evidenced by these photos I took today. I hope this doesn't get too confusing with two projects being tracked in the same thread.

He still needs to attach the mounting points, but the basic tank with baffles is complete. Ignore the 1" square tube. We put that there as a spacer for the photo to approximate the actual location.
 

Attachments

  • Tank1.jpg
    Tank1.jpg
    360.8 KB · Views: 691
  • Tank2.jpg
    Tank2.jpg
    294.4 KB · Views: 691
  • Tank3.jpg
    Tank3.jpg
    309.1 KB · Views: 691
Ya know if you put a backwards slant and pad/cushion on it so the wife could stay put rather than sliding forward, that tank just might work for me. The wife is always bitchin that the foot pegs are too close, put her 8" further in the air and it would solve that issue and I would have more gallons to burn.
 
kwn306 said:
Ya know if you put a backwards slant and pad/cushion on it so the wife could stay put rather than sliding forward, that tank just might work for me. The wife is always bitchin that the foot pegs are too close, put her 8" further in the air and it would solve that issue and I would have more gallons to burn.

Thanks for the input, but I wish it would have come months ago. What you're proposing would take a total redesign of the tank. With the current volume it offers, a passenger would be sitting pretty tall if they used it as a seat. And in its current form, it's not engineered to support the weight of a passenger, only to hold fuel and maybe some luggage strapped on the top. That's not to say a 200lb person couldn't sit on the thing and have it support them. I'm just saying we haven't designed or tested for it.

But I appreciate any feedback you have. There hasn't been much throughout this thread, so I don't know if we're filling a potential need or simply creating a one-off for myself. Either suites me just fine, but if this somehow can help the Guzzi community, then even better. So all comments are welcome.
 
Back
Top