• Ciao Guest - You’ve landed at the ultimate Guzzi site. NEW FORUM REGISTRATIONS REQUIRE EMAIL ACTIVATION - CHECK YOUR SPAM FOLDER - Use the CONTACT above if you need help. New to the forum? For all new members, we require ONE post in the Introductions section at the bottom, in order to post in most of the other sections. ALWAYS TRY A SEARCH BEFORE STARTING A NEW TOPIC - Most questions you may have, have likely been already answered. DON'T BE A DRIVE-BY POSTER: As a common courtesy, check back in and reply within 24 hours, or your post will be deleted. Note there's decades of heavily experienced Guzzi professionals on this site, all whom happily give endless amounts of their VALUABLE time for free; BE COURTEOUS AND RESPECTFUL!
  • There is ZERO tolerance on personal attacks and ANY HYPERLINKS to PRODUCT(S) or other competing website(s), including personal pages, social media or other Forums. This ALSO INCLUDES ECU DIAGnostic software, questions and mapping. We work very hard to offer commercially supported products and to keep info relevant here. First offense is a note, second is a warning, third time will get you banned from the site. We don't have the time to chase repeat (and ignorant) offenders. This is NOT a social media platform; It's an ad-free, privately funded website, in small help with user donations. Be sure to see the GTM STORE link above; ALL product purchases help support the site, or you can upgrade your Forum profile or DONATE via the link above.
  • Be sure to see the GTM STORE link also above for our 700+ product inventory, including OEM parts and many of our 100% Made-in-SoCal-USA GTM products and engine kits. In SoCal? Click the SERVICE tab above for the best in service, tires, tuning and installation of our products or custom work, and don't miss our GT MotoCycles® (not) art on the BUILDS tab above. WE'RE HERE ONLINE ONLY - NO PHONE CALLS MADE OR RECEIVED - DO NOT EMAIL AND ASK QUESTIONS OR ASK TO CALL YOU.
  • Like the new V100, GuzziTech is full throttle into the future! We're now running on an all-new server and we've updated our Forum software. The visual differences are obvious, but hopefully you'll notice the super-fast speed. If you notice any glitches or have any issues, please post on the Site Support section at the bottom. If you haven't yet, please upgrade your account which is covered in the Site Support section or via the DONATE tab above, which gives you full site access including the DOWNLOADS section. We really appreciate every $ and your support to keep this site ad-free. Create an account, sign in, upgrade your account, and enjoy. See you on the road in 2024.

BP monitor for my 1200 sport

guzziwranger

Just got it firing!
Joined
Jun 5, 2014
Messages
13
Location
Brisbane Australia
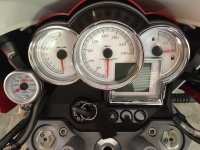
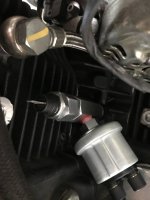
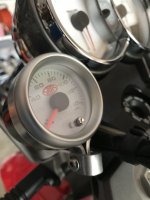
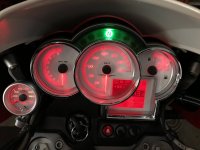
Hi all, after suffering a recent gasket failure in the bottom end which lead to low oil pressure at idle (see attached photo), which put a bit of a dampener on a weekend ride to Sunshine Coast recently. I decided I wanted to keep an eye on the old girls BP from now on.. (oil pressure). Had a bit of a look around and found this little SAAS gauge which looks the part with white background and red needle and it blends into the dash almost as if it was there from new. The real plus to the whole project was that this SAAS gauge has 3 different back light colour options via the push button, one of which was a perfect match to the Guzzi red backlight for the rest of the dash. So with a bit of 3mm x 10mm aluminium flat bar work using a mandrel (spray paint can!) and some grunting and groaning, it came up a treat. Just got to wait for the dual aluminium manifold to turn up from UK now so I can mount the sender (1/8 NPT) and the existing (10mm x 1mm) Guzzi pressure switch into the existing 12mm x 1.5mm block oil hole. It turned up this afternoon, so can't wait to get it connected and wired in to see what pressure it actually runs at (Hot & Cold , idle and redline!)
Keep you posted!
Cheers Paul.
 

Attachments

  • IMG_0857.JPG
    IMG_0857.JPG
    81.3 KB · Views: 49
  • Guzzi Dash 2016.jpg
    Guzzi Dash 2016.jpg
    150.1 KB · Views: 47
Good one Paul. I replaced my gasket last week and it was broken at exactly the same point, and the 4 screws on the spacer were only finger tight. I also had intermittent oil pressure issues, and symptoms of no oil in the engine at all (dry dipstick) - come back in an hour and voila, oil again. My engine has done 94,000 km and has never been apart in this place (the sump spacer) so I can only surmise this was like this from the factory.

All sorted now, so if you think you have a crook sensor, it might actually be the gasket. All up cost is about $12 for the sump and spacer gaskets and takes around an hour to change. Don't re-use your oil.
 
Ugh, sorry about your weekend:-(

But, your solution looks great... like it could have come that way! And, obviously, extremely useful info to have! Nice job!
 
Hi all, OK bit of an update on the oil pressure gauge project. I finished the installation yesterday and all works well. The manifold just fits in with enough clearance under the air box and the pressure sender fits snug next to the block. The manifold just nipped up on the o ring washer as the NPT port came around to exactly the right position to mount the sensor! Bit lucky.
Ok here is the results:
Cold oil start - Idle 70 psi
Cold oil - 3000 rpm 80 psi
Hot oil - Idle 20 psi
Hot oil - 2000 rpm 45 psi
Hot oil - 2500 rpm 55 psi
Hot oil - > 3000 to redline rpm 68 - 70 psi

Interesting around 3000 - 3500 rpm you can see the oil pressure relief valve kick in and the needle is steady as a rock at 68 psi from there up. Also you can see when the oil thermostatic valve kick in, you get a bit of variance in the pressure for about 20 seconds and then it steadies up. Good thing is at 68 psi which is what it runs at hot in top gear at about 120 Kph, the needle is bolt upright at 12 oclock on the dial. Perfect position to have a glance at from the corner of your eye without having to study it to see its at normal pressure.

Only down side so far is when you start the bike, the gauge doesn't remember that you want red backlight! So it always fires up with green back light!! , anyway I think the green is pretty funky too. I might check the online data sheet to see if there is some sort of sequence with the button to make your chosen backlight colour the default option on start up. Keep you posted! here's a few pics of finished job.

Cheers Paul.
 

Attachments

  • IMG_0010.JPG
    IMG_0010.JPG
    55.5 KB · Views: 34
  • IMG_0011.JPG
    IMG_0011.JPG
    55.5 KB · Views: 34
  • IMG_0013.JPG
    IMG_0013.JPG
    92.4 KB · Views: 33
  • IMG_0018.JPG
    IMG_0018.JPG
    107.7 KB · Views: 34
Hi again, further to above; I e-mailed SAAS Australia today and they confirmed that I has miss read the wiring diagram. Had I have connected the orange wire directly to the battery separately and not bridged it to the red wire which is connected to the ignition switch output 12V, then the gauge would retain its backlight LED colour memory which would solve the little issue I mentioned above!! RTFM! I'll make this little change on the weekend and then it should always fire up with red backlight!

(Btw Tony, because we have both done the bypass wiring mod to avoid intermittent start issues, I used the now left over 12V spade from this loom from the ignition switch as my feed to the gauge. I figured bikes don't have light switches like cars do, so I bridged the light switch input to the 12V feed and connected it to this left over 12V feed from the ignition switch. In doing so I overlooked that the gauge needs a permanent feed on orange wire to remember what colour backlight you have chosen!)

Cheers all.

Regards Paul.
 
Back
Top