• Ciao Guest - You’ve landed at the ultimate Guzzi site. NEW FORUM REGISTRATIONS REQUIRE EMAIL ACTIVATION - CHECK YOUR SPAM FOLDER - Use the CONTACT above if you need help. New to the forum? For all new members, we require ONE post in the Introductions section at the bottom, in order to post in most of the other sections. ALWAYS TRY A SEARCH BEFORE STARTING A NEW TOPIC - Most questions you may have, have likely been already answered. DON'T BE A DRIVE-BY POSTER: As a common courtesy, check back in and reply within 24 hours, or your post will be deleted. Note there's decades of heavily experienced Guzzi professionals on this site, all whom happily give endless amounts of their VALUABLE time for free; BE COURTEOUS AND RESPECTFUL!
  • There is ZERO tolerance on personal attacks and ANY HYPERLINKS to PRODUCT(S) or other competing website(s), including personal pages, social media or other Forums. This ALSO INCLUDES ECU DIAGnostic software, questions and mapping. We work very hard to offer commercially supported products and to keep info relevant here. First offense is a note, second is a warning, third time will get you banned from the site. We don't have the time to chase repeat (and ignorant) offenders. This is NOT a social media platform; It's an ad-free, privately funded website, in small help with user donations. Be sure to see the GTM STORE link above; ALL product purchases help support the site, or you can upgrade your Forum profile or DONATE via the link above.
  • Be sure to see the GTM STORE link also above for our 700+ product inventory, including OEM parts and many of our 100% Made-in-SoCal-USA GTM products and engine kits. In SoCal? Click the SERVICE tab above for the best in service, tires, tuning and installation of our products or custom work, and don't miss our GT MotoCycles® (not) art on the BUILDS tab above. WE'RE HERE ONLINE ONLY - NO PHONE CALLS MADE OR RECEIVED - DO NOT EMAIL AND ASK QUESTIONS OR ASK TO CALL YOU.
  • Like the new V100, GuzziTech is full throttle into the future! We're now running on an all-new server and we've updated our Forum software. The visual differences are obvious, but hopefully you'll notice the super-fast speed. If you notice any glitches or have any issues, please post on the Site Support section at the bottom. If you haven't yet, please upgrade your account which is covered in the Site Support section or via the DONATE tab above, which gives you full site access including the DOWNLOADS section. We really appreciate every $ and your support to keep this site ad-free. Create an account, sign in, upgrade your account, and enjoy. See you on the road in 2024.

Brake Fluid Level Switch

DanPez

Cruisin' Guzzisti
Joined
Jun 27, 2010
Messages
488
Location
Hudson, Quebec
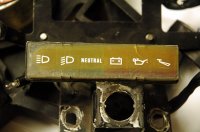
Taking apart the dash of my LM3 I checked the bulbs on the lamp support and found a few contacts that were not mating.
After cleaning and replacing the bulbs I tested the lamps, on the bike, and saw one in particular that stayed on.

The symbol looks like one for a side stand. (Located completely on the right of the lamp support)

Well I was looking for a side stand switch. :lol: (It looks like a side stand for crying out loud!)
Anyway the Carl Allison circuit points me to a "Brake Fluid Level" switch.
I found the brake level switch located in the fluid reservoir. (On the right side panel) Float and contact works fine.

But the way its wired .... seem to me it stays on normally and will go off when the level is low. :huh:
The circuit wiring confirms this.

Has anyone encountered this mystery?
As anyone modified this circuit to make it "Logical" or am I completely in left field? :silly:
 

Attachments

  • Lamp support.jpg
    Lamp support.jpg
    161.7 KB · Views: 152
I had one of those on my 83 California. The switch should have continuity when the level is low, not full. The light on my Cal II didn't come on except when I would test the switch with the cap off the reservoir.
 
john zibell said:
I had one of those on my 83 California. The switch should have continuity when the level is low, not full. The light on my Cal II didn't come on except when I would test the switch with the cap off the reservoir.

I'll do my Gilda Radner imitation from SNL "NEVER MIND" :blush:

John you got me thinking what you just wrote "test the switch with the cap off the reservoir"
When I first removed the cap and float it was in separate pieces. The contact got closed under the prongs. (High level making contact)
The proper assembly is .... the cap and float are assembled together. The contact is made over the 2 prongs. (Low level making contact) Geeze! :idea: Came on

Thanks John.
 
Back
Top