• Ciao Guest - You’ve landed at the ultimate Guzzi site. NEW FORUM REGISTRATIONS REQUIRE EMAIL ACTIVATION - CHECK YOUR SPAM FOLDER - Use the CONTACT above if you need help. New to the forum? For all new members, we require ONE post in the Introductions section at the bottom, in order to post in most of the other sections. ALWAYS TRY A SEARCH BEFORE STARTING A NEW TOPIC - Most questions you may have, have likely been already answered. DON'T BE A DRIVE-BY POSTER: As a common courtesy, check back in and reply within 24 hours, or your post will be deleted. Note there's decades of heavily experienced Guzzi professionals on this site, all whom happily give endless amounts of their VALUABLE time for free; BE COURTEOUS AND RESPECTFUL!
  • There is ZERO tolerance on personal attacks and ANY HYPERLINKS to PRODUCT(S) or other competing website(s), including personal pages, social media or other Forums. This ALSO INCLUDES ECU DIAGnostic software, questions and mapping. We work very hard to offer commercially supported products and to keep info relevant here. First offense is a note, second is a warning, third time will get you banned from the site. We don't have the time to chase repeat (and ignorant) offenders. This is NOT a social media platform; It's an ad-free, privately funded website, in small help with user donations. Be sure to see the GTM STORE link above; ALL product purchases help support the site, or you can upgrade your Forum profile or DONATE via the link above.
  • Be sure to see the GTM STORE link also above for our 700+ product inventory, including OEM parts and many of our 100% Made-in-SoCal-USA GTM products and engine kits. In SoCal? Click the SERVICE tab above for the best in service, tires, tuning and installation of our products or custom work, and don't miss our GT MotoCycles® (not) art on the BUILDS tab above. WE'RE HERE ONLINE ONLY - NO PHONE CALLS MADE OR RECEIVED - DO NOT EMAIL AND ASK QUESTIONS OR ASK TO CALL YOU.
  • Like the new V100, GuzziTech is full throttle into the future! We're now running on an all-new server and we've updated our Forum software. The visual differences are obvious, but hopefully you'll notice the super-fast speed. If you notice any glitches or have any issues, please post on the Site Support section at the bottom. If you haven't yet, please upgrade your account which is covered in the Site Support section or via the DONATE tab above, which gives you full site access including the DOWNLOADS section. We really appreciate every $ and your support to keep this site ad-free. Create an account, sign in, upgrade your account, and enjoy. See you on the road in 2024.

Breva 750 leaking rear main bearing

rossw

Cruisin' Guzzisti
Joined
May 11, 2010
Messages
118
Location
Maitland, NSW
It seems my B750 has developed a case of incontinence. The leak is coming from the clutch housing. Since the clutch housing isn't supposed to have oil in it, I have to assume that the leak is from either the gearbox front seal or the engine rear main bearing seal.

Either way, I see a gearbox removal and clutch replacement (might as well, while I'm in there) in my very near future.

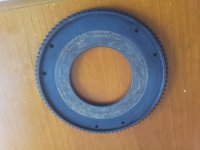
Does anyone have the dimensions necessary to make a clutch centering tool? I have a lathe to make it on. If I need to remove the flywheel I guess I'll also need to make a locking tool for that. Tooth spacing?

Are there any parts that should also be replaced while I'm at it?
 
The clutch can be centred without a tool,eye and measuring will do it. As for the flywheel holder, pm me I could lend you the one I made if you want. I could also lend you my tools for undoing the clutch hub nut.
 
I'm still debating about whether to disassemble and rebuild the gearbox or not. It does have a bit of noise in first and fifth, but I'm hoping not to have to rebuild it this time around.

On the other hand, If I do it now, I won't have to disassemble the whole thing again when it really needs doing.
 
rossw said:
I'm still debating about whether to disassemble and rebuild the gearbox or not. It does have a bit of noise in first and fifth, but I'm hoping not to have to rebuild it this time around.

On the other hand, If I do it now, I won't have to disassemble the whole thing again when it really needs doing.


What do you mean by "a bit of noise" ?

I have at a very few occasions driven my Breva without wearing ear-plugs, and THATS a scaring experience. Considering the general flawlessness, I won't do it again. The not-wearing-ear-plugs, that is. :dry:
 
5th and first are obviously whining. Other gears whine a bit but not as much. First has been whining (more than other gears) for ages. 5th has begun to be noticeably louder than 4th only recently.

Now that I have established (probably) that the leak is coming from the gearbox, I'm thinking the noise should reduce again when I top it up.

When I remove the gearbox to fix the leak, how I proceed from there is going to depend a lot on what I find in the fluid that drains out. Last time there was very little in the way of wear metal, so I'm hoping I can get away without the rebuild if it's still reasonably clear this time.
 
Charlie J said:
The clutch can be centred without a tool,eye and measuring will do it.

+1

I just left one mounting bolt to use as a shelf then put a large flat head screw driver in the ring gear to hold it steady while loosening the nuts.

Does your leak smell like gear oil or engine oil?
 
NOLAGuzzi said:
Charlie J said:
The clutch can be centred without a tool,eye and measuring will do it.

+1

I just left one mounting bolt to use as a shelf then put a large flat head screw driver in the ring gear to hold it steady while loosening the nuts.

Does your leak smell like gear oil or engine oil?

I've had a sniff ;) It's more like gear oil, which would explain why 5th is noisier. I guess I should top it up then :whistle: ...

I've stopped riding the bike regularly for now until I can get hold of a seal and a clutch plate (on order with Stein Dinze, but they appear to be out of stock). When I drain the gearbox I'll get a picture of the drain plug contents.
 
Well after a lot of stuffing around, I finally got dismantling to fix my gearbox leak.
Now I have arrived at the dreaded "Screw of doom" :angry: . It's true. There is no way to get a socket on this without removing the throttle bodies.

So off they come. Pity the torx bit required to separate them is the only size I don't have. :( Off to Jaycar then...

I haven't done a writeup of the process because there is already good information out there. Some observations though:

The lower frame rails have to come off. There is nothing holding up the engine without these. I found it is necessary to support the engine underneath AND the frame at the back.

Getting the fuel injectors out was easier than I expected. Getting the airbox rubbers off perhaps not so much.

When I put it all back together I'll be making sure the clamp screw for the rear drive boot is positioned where I can get at it with a screwdriver, not like before.

All the effort needed makes me glad I bought a new clutch plate. Hopefully it will be a LONG time before I need to do this again.

Special thanks to Charlie J. and Mario from Thunderbikes in WA.
 

Attachments

  • DSCN1281.JPG
    DSCN1281.JPG
    113.4 KB · Views: 599
Don't separate the throttle bodies. Bring them off as a unit. It is easy to do. It is more trouble to separate them, putting it back together in the bike would be difficult.
 
A little late, as I can see, but for future exercises; I think it would be easier to demount the motor and entire drive line including the back wheel, as one unit.
 
john zibell said:
Don't separate the throttle bodies. Bring them off as a unit. It is easy to do. It is more trouble to separate them, butting it back together in the bike would be difficult.

That's what I have found too; take the throttle bodies off as a unit.

I agree RossW, that the airbox rubbers are hard to take off. I had to be more forceful with them than I liked.
Joe
 
Holt said:
A little late, as I can see, but for future exercises; I think it would be easier to demount the motor and entire drive line including the back wheel, as one unit.

I hear what you're saying. Undo the electrics, hoses and the top gearbox mounts and just lift off the whole top half of the bike.

A variation on the "crabbing" technique? I looked at that until I realised that a) once the bottom frame rails are gone there's nothing to crab against. and b) either way those throttle bodies have to come off, and thus far, it's proving to be the most difficult part.

I'll take your advice John and Sign216 and leave them assembled. I'm just having trouble getting the airbox rubbers off. There must be something I'm missing.

Perhaps Sign216, it's just a matter of more brute force then. I'll have another go tonight.

For those interested, the gearbox oil when I drained it was black with a metallic sheen, but no chunks sticking to the magnet.

Edit: The metallic sludge is most probably the moly additive I put in it to try and shut it up. It's the same stuff that goes in the rear drive. I just put the excess in the gearbox at the time of teh last oil change hoping it would help.
 
Ross,

Taking the TBs off as a single unit is definitely the right way. I started to separate them, and it was wrong.

The rubber boots were a bear. I heated them with a hair dryer, and sprayed lube, but in the end it was brute force with screwdrivers and other tools. I forced the boots open and around. I did "feed" a little of the boots into the airbox to give me room to work with, but it was really just manhandling the boots that got them off and on.

It was really rough on the boots but they could take it in the end. After I did it the first time, it became much easier, as I got a feel for "what to do" and "where to do it."

You think you are tearing things apart, but they can take it, and it's how to get the rubbers off/on.

Joe
 
Success! :cool:

Managed to push the rubbers into the airbox after a bit of a struggle. Once that was done the throttle bodies came out and I was able to access the "screw of death".

Now my gearbox is sitting on the floor. I'm away on business for the rest of the week, but Saturday is looking more promising than it was. :D
 
those throttle bodies are bolted together for a VERY good reason... You don't need to find out why ?
 
gstallons said:
those throttle bodies are bolted together for a VERY good reason... You don't need to find out why ?

It was no problem leaving them bolted together in the end. I guess that's why they use torx screws there.
 
OK, Now that the gearbox is off, I've removed the flywheel to clean off the contamination and replace the clutch plate. The clutch plate has plenty of meat on it, but I'm wasn't going to take the risk that it might be contaminated and bought a new one. I probably didn't need to, but I don't want to do this again for a while.

The friction surface of the flywheel and backing plate have wear that I've never seen before. It looks as though it's been getting hot from excessive slipping/riding. The pressure plate is similar.


There has been no sign (as far as I could tell) of roughness, sticking, slipping or any other clutch misbehaviour. The surface is smooth to the touch but the machining marks are worn down unevenly. It doesn't look right and I'd rather give it the bucket test than have to do all of this again.

What does everyone think?
 

Attachments

  • 20111218_100351.jpg
    20111218_100351.jpg
    43.4 KB · Views: 288
That is caused by the oil contamination. Just go over the surfaces with coarse sandpaper to score the surface and get to clean metal. It will be OK to use.
 
john zibell said:
That is caused by the oil contamination. Just go over the surfaces with coarse sandpaper to score the surface and get to clean metal. It will be OK to use.

Thanks John, I'll do just that. Coarse sandpaper I can do.
 
Back
Top