• Ciao Guest - You’ve landed at the ultimate Guzzi site. NEW FORUM REGISTRATIONS REQUIRE EMAIL ACTIVATION - CHECK YOUR SPAM FOLDER - Use the CONTACT above if you need help. New to the forum? For all new members, we require ONE post in the Introductions section at the bottom, in order to post in most of the other sections. ALWAYS TRY A SEARCH BEFORE STARTING A NEW TOPIC - Most questions you may have, have likely been already answered. DON'T BE A DRIVE-BY POSTER: As a common courtesy, check back in and reply within 24 hours, or your post will be deleted. Note there's decades of heavily experienced Guzzi professionals on this site, all whom happily give endless amounts of their VALUABLE time for free; BE COURTEOUS AND RESPECTFUL!
  • There is ZERO tolerance on personal attacks and ANY HYPERLINKS to PRODUCT(S) or other competing website(s), including personal pages, social media or other Forums. This ALSO INCLUDES ECU DIAGnostic software, questions and mapping. We work very hard to offer commercially supported products and to keep info relevant here. First offense is a note, second is a warning, third time will get you banned from the site. We don't have the time to chase repeat (and ignorant) offenders. This is NOT a social media platform; It's an ad-free, privately funded website, in small help with user donations. Be sure to see the GTM STORE link above; ALL product purchases help support the site, or you can upgrade your Forum profile or DONATE via the link above.
  • Be sure to see the GTM STORE link also above for our 700+ product inventory, including OEM parts and many of our 100% Made-in-SoCal-USA GTM products and engine kits. In SoCal? Click the SERVICE tab above for the best in service, tires, tuning and installation of our products or custom work, and don't miss our GT MotoCycles® (not) art on the BUILDS tab above. WE'RE HERE ONLINE ONLY - NO PHONE CALLS MADE OR RECEIVED - DO NOT EMAIL AND ASK QUESTIONS OR ASK TO CALL YOU.
  • Like the new V100, GuzziTech is full throttle into the future! We're now running on an all-new server and we've updated our Forum software. The visual differences are obvious, but hopefully you'll notice the super-fast speed. If you notice any glitches or have any issues, please post on the Site Support section at the bottom. If you haven't yet, please upgrade your account which is covered in the Site Support section or via the DONATE tab above, which gives you full site access including the DOWNLOADS section. We really appreciate every $ and your support to keep this site ad-free. Create an account, sign in, upgrade your account, and enjoy. See you on the road in 2024.

Breva V1100 fork oil change

3ackok said:
Thanks for your answers. I didn't remove the fork from the bike, I started to work according to Graham's instructions. Loosened bolts holding handle bar riser and tried to remove the top cap from the fork. I even tried to do it with the adjuster bolt in full out position, but it didn't help. Hard to imagine both forks legs to be defective, but I don't know what else to think.

3ackok:

The instructions specify to loosen the top cap at the beginning. You will not remove the top cap until you have removed the forks from the bike. If you have gone 180 degrees, I would say that is definitely enough. Do not loosen anymore. Continue with the rest of the instructions. Hopefully the threads are okay.
 
It's important to loosen all the fasteners which surround the top of the fork leg before trying to loosen the fork leg top cap. Steel etc can be distorted and even shrunk when squeezed. Think what happens to the bits which grip the fork legs and axle when the pinch fasteners are tightened.
 
3ackok
Firmly smacking down on top of the removal socket with a club hammer is something else I'd try.

If the caps still can't be removed, it could be that someone has tightened them while cross threaded. If that is the case it may help to warm the tops of the removed legs with a heat gun while the legs are gripped lower down in a soft jawed vice.
 
3ackok said:
I didn't remove the fork from the bike, I started to work according to Graham's instructions. Loosened bolts holding handle bar riser and tried to remove the top cap from the fork. I even tried to do it with the adjuster bolt in full out position, but it didn't help. Hard to imagine both forks legs to be defective, but I don't know what else to think.

I think 3ackok was trying to remove the top cap with the forks still on the bike. The top cap can only be loosened while the forks are on the bike. Removal of the top cap can only happen once the forks are removed from the bike.
 
OK, Let me start with those :oops: :oops: :oops: :blush: :blush: :blush: here goes my reputation...
It happened exactly the way NeroGuzzi wrote. Probably there is some sort of a mental connection between me and this forum. I haven't visited this thread for at least two weeks, but this morning decided to check the plugs again, but this time I removed the handle bar riser completely. Needless to say I immediately saw the reason for my misfortunes. I came here to confess and saw this post from NeroGuzzi made just a day before.
OK, mystery solved! I may not have time to continue this job today, but I feel much better about the whole thing. Thanks!
 
The good news is you did not go more than 180 degrees when you first loosened the top cap. Good luck with the rest of the process and please post your findings.
 
For the recommended 5 or 20 fork oil I do think it's an accidental recommendation or a translation error. I've been reading several Guzzi oil rec's and found in one Italian saying 5W/20, which is completely different.
Tho' I don't know if fork oils comes in multigrade...

I've found a SAE 7,5 to be a better alternative for the 750 Breva.
 
I finished the work yesterday. Ir was so uneventful that I somewhat disappointed. :D 
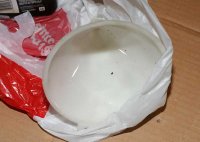
I imagined that fork is difficult to disassemble and relies on some precision measured amount of oil. Turned out that oil is just sloshing around, you can put a little less or more without trouble. I drained about 470ml from each leg and replaced it with the same quantity. Can't explain official recommendations of 400+-2.5ml. The oil I drained was pretty dirty, grayish in color with lots of small particles floating in it. I replaced it with 7w Belray, which turned out to have bright green color. I've seen a green ketchup, but not a green oil :D

Graham, thanks for your instructions!
 
3ackok

Lovely yellow paint job there!

The reason why I and many others opted for 15W oil is to increase the damping response. The Guzzi spec of 5W to 20W is a huge range. The reason for adding more oil is to increase the air-springing effect as the forks near full compression, not to affect the damping. Adding an excessive amount of oil could ask a lot of the oilseals, but reports of up to 500cc being used make that volume sound OK. Just the same I'll stay with 450cc.

Reading this thread reminds me that since my Breva is just over four years old it's time to change the fork oil again. One wet day in the near future looks like the go for that so I'll buy some oil. This time I'll try to measure the oil level after adding 450cc of oil to one leg and match that for the second leg because that method is preferable to measuring just the volume when refilling after an oil change.
 
Graham, measuring the reference oil level is a great idea. I wish I thought about it! Are you sure that air compression makes a difference? Air is easily compressible, and the spring is pretty stiff.
Couple of pictures from my adventure:
 

Attachments

  • IMG_5560.jpg
    IMG_5560.jpg
    33.6 KB · Views: 2,214
  • IMG_5561.jpg
    IMG_5561.jpg
    33.1 KB · Views: 2,214
  • IMG_5564.jpg
    IMG_5564.jpg
    34.1 KB · Views: 2,215
The air-chamber is a PART of the suspension system, and the the level will decide the stiffness of the fork. It will certainly have influence on roadholding.
 
3ackok

For a start I thought the bottle contained whisky for drinking while doing the job!

It's because air is compressible that it can act as a springing medium, but is effective only when the springs have compressed enough for the air to also be compressed enough to offer resistence. There have been bikes with forks and rear supension units which used air as the only springing medium, with tyre-type valves for pumping to the appropriate pressure.
 
GrahamNZ said:
There have been bikes with forks and rear supension units which used air as the only springing medium, with tyre-type valves for pumping to the appropriate pressure.

My 1980 Kwaka Z 750 had this system, I still have the big hypodermic converted to an air pump that was supplied with the bike to pump the forks up (as I recall it was something like 7PSI static with the wheel off the ground). Not sure if it was a good idea or not, but gave me something else to play with on the bike.

So without a doubt if the access covers and adjusters at the top end of the fork have an air tight seal the compressing of the internal air may have an affect on springing, but to be honest my gut feeling is that without some "pre-load" of the internal air pressure the forks would have to be almost turned inside out for the air pressure to rise enough to have any practical effect.
 
I also had a Kawasaki with air shocks, and they required pumping air into them. I am not sure if air springing effect is significant when starting at atmospheric pressure.
 
I think that after 3 years and 30,000Km this operation is long due in my 1200S :p
 
When I last changed my oil (2 years ago so about to do it) I noticed that the plugs in the top of the stanchions were directly on the springs. Presumably there should be a spacer and I have had very soggy front sepension since I got the Breve in Oct 2007?

I did wonder why the adjusters seemed to be working on nothing but the spring!
Nigel
 
NPS said:
When I last changed my oil (2 years ago so about to do it) I noticed that the plugs in the top of the stanchions were directly on the springs. Presumably there should be a spacer and I have had very soggy front sepension since I got the Breve in Oct 2007?

I did wonder why the adjusters seemed to be working on nothing but the spring!
Nigel


Someone here should be able to tell you the length of the spacer. But that would depend of the origin of the springs, of course. If a previous owner changed the OEM springs, the new ones may be of a different length.
You didn't happen to look for the spacers at the bottom of the fork, BTW? :whistle:
If you go for new White Power, Wirth or Wilbers they'll come complete inclusive the right spacer for the specific spring.
 
Holt said:
Someone here should be able to tell you the length of the spacer. But that would depend of the origin of the springs, of course. If a previous owner changed the OEM springs, the new ones may be of a different length.
You didn't happen to look for the spacers at the bottom of the fork, BTW?
Correct, correct and correct. Stock spacers in the Breva 11 are ~209.55mm
HyperPro springs re-use the stock spacers, unaltered.
 
NPS

When you changed the oil why didn't the preload spacer tubes come out when you upended the forks? Please don't tell me you sucked the oil out! If you did that then I recommend doing the job again properly.

Being at the bottom of the world and a long way from many things - good and bad - I've decided to have both ends of my Breva reworked by the local Ohlins secialist. The front will get new damping components and springs and the rear probably just damping components. Static sag figures suggest that the front springs are a bit light but the rear spring is OK for the load. The harsh ride over our often poor surfaces is most likely caused by very poor quality damping control, especially compression damping. Cost to do this upgrade is likely to no more than $1,600NZ, so a lot less that buying from the USA.
 
Back
Top