• Ciao Guest - You’ve landed at the ultimate Guzzi site. NEW FORUM REGISTRATIONS REQUIRE EMAIL ACTIVATION - CHECK YOUR SPAM FOLDER - Use the CONTACT above if you need help. New to the forum? For all new members, we require ONE post in the Introductions section at the bottom, in order to post in most of the other sections. ALWAYS TRY A SEARCH BEFORE STARTING A NEW TOPIC - Most questions you may have, have likely been already answered. DON'T BE A DRIVE-BY POSTER: As a common courtesy, check back in and reply within 24 hours, or your post will be deleted. Note there's decades of heavily experienced Guzzi professionals on this site, all whom happily give endless amounts of their VALUABLE time for free; BE COURTEOUS AND RESPECTFUL!
  • There is ZERO tolerance on personal attacks and ANY HYPERLINKS to PRODUCT(S) or other competing website(s), including personal pages, social media or other Forums. This ALSO INCLUDES ECU DIAGnostic software, questions and mapping. We work very hard to offer commercially supported products and to keep info relevant here. First offense is a note, second is a warning, third time will get you banned from the site. We don't have the time to chase repeat (and ignorant) offenders. This is NOT a social media platform; It's an ad-free, privately funded website, in small help with user donations. Be sure to see the GTM STORE link above; ALL product purchases help support the site, or you can upgrade your Forum profile or DONATE via the link above.
  • Be sure to see the GTM STORE link also above for our 700+ product inventory, including OEM parts and many of our 100% Made-in-SoCal-USA GTM products and engine kits. In SoCal? Click the SERVICE tab above for the best in service, tires, tuning and installation of our products or custom work, and don't miss our GT MotoCycles® (not) art on the BUILDS tab above. WE'RE HERE ONLINE ONLY - NO PHONE CALLS MADE OR RECEIVED - DO NOT EMAIL AND ASK QUESTIONS OR ASK TO CALL YOU.
  • Like the new V100, GuzziTech is full throttle into the future! We're now running on an all-new server and we've updated our Forum software. The visual differences are obvious, but hopefully you'll notice the super-fast speed. If you notice any glitches or have any issues, please post on the Site Support section at the bottom. If you haven't yet, please upgrade your account which is covered in the Site Support section or via the DONATE tab above, which gives you full site access including the DOWNLOADS section. We really appreciate every $ and your support to keep this site ad-free. Create an account, sign in, upgrade your account, and enjoy. See you on the road in 2024.

C14 - Stop the moaning whale - Tip/Evap

LOL sometimes I scare myself too. :) Your advice is very sound and reasonable but I was too eager to finish the work unfortunately. If I waited for a day all would be just fine. Anyway, I'll leave the "fix" the way it is - at least until I absolutely need to open it, since I've already driven a bike for a couple of days and I think I'd do more damage than good by trying to unscrew it now. I can't imagine a scenario where I'd have to open that hole again, what do you think?

Every single modification I made did alter the air/exhaust flow but the bike was running quite badly before that already. My greatest suspicion is the tip valve which didn't look dirty but the flow was very low. After the mods it's running with much more power all throughout the rpm range, and is running COOLER! :) I've no idea what happened but I like it when I ride. Also, no more moaning, no more loping at the stops, no more hanging throttle.

Todd's package should come in a week or two so there shouldn't be too much harm to the engine before I get the fueling perfected. And then it shall be glorious!

Wroom, you're scaring me man, the link you provided for the "Stik'n Seal" makes the frightening statements: 1) ADHESIVE, 2) Not for metal-to-metal applications. I'm hoping you haven't ridden that bike very far and I would try to remove it if that were my bike. It might be nothing but honestly, you used the wrong product. If we are talking about using this product on the bolt in the throttle body, keep in mind that the inside of the throttle body is under negative pressure most of the time. I would not like to think of any of that stuff getting sucked into the engine, it will hit very hot valves/valve seats on the way in and MUCH hotter valves/valve seats on the way out. I would suggest not using anything, just the proper torque on the bolt.

As for the various modifications you've made to your bike, every one of them has altered the induction metrics. Most leading to increased flow. The default fuel maps will be way wrong under the new conditions, in fact you may have been experiencing the effects of putting your bike into "limp home mode". You need dynamic oxygen sensor input and dynamic fuel mixture control in the worst way. Todd's GT-Rx fueling package is a good way to get a closed loop dynamic fuel management modification, you are going in the right direction. Good luck with it; and please post your results on the forum. Todd did make a comment on one of his posts about the GT-Rx fueling package which does apply to the mods you've already made to your bike:

"I need to mention here, that even a bone stock bike really needs the fueling corrected (dealers cannot do this) in order to have a long, healthy life. Any modifications exacerbates the uber-lean fueling." (Todd)

Later my friend.
Den.
 
Thanks for the update. Glad to hear that your ride is running better now that you effectively implemented Todd's "Harpooning The Whale" solution. Yep, leave that throttle body bolt alone now, nothing would be gained.

Modifications made anywhere in the fuel induction and or exhaust system will affect the conditions inside the combustion chamber. So it matters not that your modifications were after the Oxygen Sensors because the change in exhaust back pressure affect the conditions upstream. Once you get Todd's kit installed you'll have an intelligent and continuously adaptive air/fuel mixture metering system.

I'm curious how you were able to determine the engine is now running cooler. Did you use an infrared thermometer, or does it just feel like it is running cooler? I use an infrared thermemeter ($25 @ Harbor Freight) to measure mine and I get a pretty consistent 250 degrees F (240-260 actually) on the cylinder barrel, outside facing, cooling fins, and around 110 to 160 on the aluminium valve covers, depending upon where you take the measurement. I took these measurements after riding leisurely for half an hour on an 85 degree day.

If you did measure the engine at a cooler temp I'd love to know the approximate differential, it would be educational.

Den.
 
Hey Dennis,

I did not use any scientific or even technical method of measuring the temperature, I simply felt it being noticeably cooler on my inner thighs during my regular and consistent every-day ride to work. One thing that is surely missing on the dashboard is the engine temperature, I've no idea why they wouldn't let us at least have a menu item to check the readings.

Thanks,
Sasha
 
If you did measure the engine at a cooler temp I'd love to know the approximate differential, it would be educational.
Den, using a digital infrared gauge, I noted a 40ºF drop at the heads on the few I remembered to note. YMMV, but as Sasha above states, you can feel the difference.
 
Sorry to drag up an old topic. But I cannot seem to find reference to the evap system in my service manual or a diagram of it and was just wanting to confirm that I am understanding the system correctly.

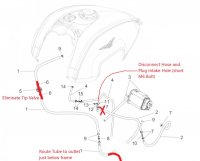
Is this statement correct? The Vent Line from the fuel tank (by cap) comes down to the Tip Valve and then runs to the evap canister - the evap canister has an outlet that can be drained under the bike and another outlet which goes to the port on the intake manifold. Am I missing anything?

So on my '15 California I have remove the Tip valve and the hose runs directly down to the underneath of the motorcycle. Then I have removed and plugged the port on the intake manifold.

I just want to be sure that this essentially completely removes the evap system and that there aren't any other hoses or tubes that need plugged.

Regards, Joe
 
Awesome...Thank you very much.

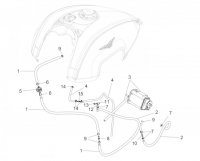
IN the picture, I take it that the longer tube on the left of the canister is the drain tube? It looks like there is a T-Connection at the top. Is that a tube that goes to the airbox? I would guess that there is no need to mess with it.

Attached is my crappy drawing...I hope that it keeps folks like me from asking other questions :)

Cheers, Joe

Evap Mod
 
Not sure why it took me so long to carry out this mod, but I got around to plugging the throttle body air inlet but left the tip valve in place. In summary it has transformed the low rpm/partial throttle response of the bike. The improvement is noticeable immediately. I can use partial throttle alone to take 1st or 2nd gear tight corners. No feathering the clutch and balancing the throttle to avoid lurches.

The hiccups in the 2000-3000 rpm have also all but disappeared. Holding a steady but light throttle is now very smooth and even the exhaust pops on deceleration (which I kinda liked) have gone. I can apply the cruise control in 4th gear at 2000 rpm and it's a pleasure to cruise around on now, even in the city. If you haven't done this mod already, go out and do it now. I didn't even need a new M6 screw, I initially bought one 12 mm long which was the shortest I could get over the counter in Home Depot, but the one you take out is half that long and only 3/4 of that that goes into the throttle body due to the brass air inlet fixing that sits over it and connects to the rubber pipe. In the end I replaced the brass inlet fixture with a thick washer and screwed the original bolt in to seal it (it even as rubber band at the top to help with the seal). Be careful though, I didn't get the sense that the threads on the throttle body would stand up to too much tightening.

Thanks Todd for the original post, this is a great update and all for the cost of a washer and 30 mins of my time.
 
Hi Joe, it looks to me like you have everything straight. You have routed your fuel tank vent tube to the atmosphere, good. And you've plugged the plenum, that effectively completes the mod. Keep your handlebars facing up and you will be golden.

I plugged the plenum, and removed the tip over guts, but I left the fuel tank vent plumbing intact to prevent raw fuel spewing out in the unlikely event of a tip over.

I also bought a great pair of Vendramini riding boots to secure good foot purchase while muscling this 750 pound machine through tight quarters and parking spaces.
 
I have a 2014 California Touring. I had gutted the tip-over valve some time ago and just yesterday I removed and plugged the port on the plenum and I cut the overflow hose per the instructions.

When disconnected the hose at the plenum port, I found another hose near it. The hose I found was not connected to anything at the end under the tank (the upper end). I could not follow it very far until it disappeared into the area of the air box/battery/etc. Based of the fact that it has 2 clamps and a fitting in it, it looks like it might be the hose marked with the number 4 in the parts drawing below. I pulled the end of it out and found that there is little resistance when I blow through it. I have no idea what it is for or what it is supposed to be connected to at its "upper" end. For now, I just tucked it back where it was and left it.

Any ideas.

evap-mod-jpg.13047
 
Forgive my ignorance, but couldn't you just remove and plug the intake, and leave the rest of the plumbing as-is? That way the fuel vapors are still filtered by the charcoal, and you still eliminate your controlled vacuum leak.
 
Forgive my ignorance, but couldn't you just remove and plug the intake, and leave the rest of the plumbing as-is? That way the fuel vapors are still filtered by the charcoal, and you still eliminate your controlled vacuum leak.
Yes you can, but be sure to open/replace the tip-valve.
 
The tip valve looks like the tank vent valve on my RSV4 RF.

Out of curiosity, why do you need to open/replace the valve, besides eliminating the noise (which my Audace does not have)?
 
I still need to do this but a question to take Josh Harvey's 1 step further.

Should we just (1) remove the tip-valve completely and join the 2 tubes with a connector, or (2) take the guts out of the tip-valve only and put the cap back on and leave it in place?

Which option is best?
 
Remove the plastic tip valve all together is best, but you'll have to source a straight barbed connector.
 
Thanks Todd. I've got a 3/16ths and a 1/4" brass barb connector in my parts box ... will see if either of those fit and report back when I do it.
 
I'm not sure why Todd recommends full tip valve removal, he didn't give a reason. I just removed the guts and snapped it back together (a hair dryer was helpful) with great results. Either solution should give the same end result.
 
Back
Top