• Ciao Guest - You’ve landed at the ultimate Guzzi site. NEW FORUM REGISTRATIONS REQUIRE EMAIL ACTIVATION - CHECK YOUR SPAM FOLDER - Use the CONTACT above if you need help. New to the forum? For all new members, we require ONE post in the Introductions section at the bottom, in order to post in most of the other sections. ALWAYS TRY A SEARCH BEFORE STARTING A NEW TOPIC - Most questions you may have, have likely been already answered. DON'T BE A DRIVE-BY POSTER: As a common courtesy, check back in and reply within 24 hours, or your post will be deleted. Note there's decades of heavily experienced Guzzi professionals on this site, all whom happily give endless amounts of their VALUABLE time for free; BE COURTEOUS AND RESPECTFUL!
  • There is ZERO tolerance on personal attacks and ANY HYPERLINKS to PRODUCT(S) or other competing website(s), including personal pages, social media or other Forums. This ALSO INCLUDES ECU DIAGnostic software, questions and mapping. We work very hard to offer commercially supported products and to keep info relevant here. First offense is a note, second is a warning, third time will get you banned from the site. We don't have the time to chase repeat (and ignorant) offenders. This is NOT a social media platform; It's an ad-free, privately funded website, in small help with user donations. Be sure to see the GTM STORE link above; ALL product purchases help support the site, or you can upgrade your Forum profile or DONATE via the link above.
  • Be sure to see the GTM STORE link also above for our 700+ product inventory, including OEM parts and many of our 100% Made-in-SoCal-USA GTM products and engine kits. In SoCal? Click the SERVICE tab above for the best in service, tires, tuning and installation of our products or custom work, and don't miss our GT MotoCycles® (not) art on the BUILDS tab above. WE'RE HERE ONLINE ONLY - NO PHONE CALLS MADE OR RECEIVED - DO NOT EMAIL AND ASK QUESTIONS OR ASK TO CALL YOU.
  • Like the new V100, GuzziTech is full throttle into the future! We're now running on an all-new server and we've updated our Forum software. The visual differences are obvious, but hopefully you'll notice the super-fast speed. If you notice any glitches or have any issues, please post on the Site Support section at the bottom. If you haven't yet, please upgrade your account which is covered in the Site Support section or via the DONATE tab above, which gives you full site access including the DOWNLOADS section. We really appreciate every $ and your support to keep this site ad-free. Create an account, sign in, upgrade your account, and enjoy. See you on the road in 2024.

California Fuel Injector Removal Shortcut

Walter5

Just got it firing!
Joined
Dec 21, 2023
Messages
12
Location
Dripping Springs, TX
My 2001 California EV is not firing on the left cylinder. Spark and compression are there, so I want to pull the injector to test and clean it. The injector seems removable without removing the throttle body. Has anyone been able to do this or will I have to remove the tank, air box, and throttle body to pull the injector? Thanks!
 
The EV has the injectors central to the bike. Every time I've pulled them for cleaning, fuel tank, and airbox need to be removed. The throttle body can remain in place if you are careful. I can recommend RC engineering in California for injector cleaning and since you are in there, have both cleaned.
 
Having just completed this task yet again a couple months ago, I can tell you that it is almost impossible to pull the injectors without removing the throttle bodies. The bolts holding the injectors to the throttle bodies, have a thread sealer on them and they can be TOUGH to get out. There is very limited clearance with the throttle bodies in place.
 
Ok good to know. Thank you for your reply! Did you have to pull the air box to remove the throttle bodies, and did you have to pull the tank to remove the air box? The reason I'm asking is the PO used a braided steel shielded fuel line that is being a pain to remove.
 
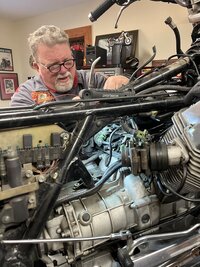
Here you can see the throttle bodies in place. You have to remove everything including the fuel filter in order to gain access.


IMG 3974


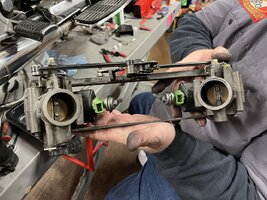
Here you can see the throttle bodies removed from the motorcycle.

Zoom in and you can see the upper and lower Allen head screw holding the injector retainers in place. At this age, the thread locker can really be hard to break loose. I really had to go slow and deliberate to remove these without damaging the assembly.

Please be careful! This assembly is insanely expensive!

IMG 3975
 
Last edited:
I have done it w/o pulling TB's but it's a pain. As you can see in Scotts photo the block & screws face the center. I used a long 1/4" extension from opposite side AND still had tank & air box lid off. Glad to be retired now, don't need another.
Good Luck.
 
I have done it w/o pulling TB's but it's a pain. As you can see in Scotts photo the block & screws face the center. I used a long 1/4" extension from opposite side AND still had tank & air box lid off. Glad to be retired now, don't need another.
Good Luck.
That is how I do them. I hate fighting the TBs back in when the manifold rubbers are in good shape, but older and very stiff. I do remove the battery and airbox so I can better visualize the injector area.
 
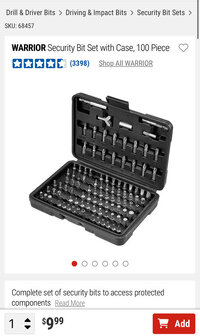
Like John, I prefer to leave the throttle bodies in place but like I said, depending upon how much Loctite Luigi used that day, you may find it very difficult to extract the bolt. If you decide to do it this way, I recommend a brand new bit of the appropriate size. Be DEAD SURE to have the bit fully inserted before applying force so you do not round out the hex head on the bolt. They are delicate due to their very small size. ~ 4 mm I think.

Harbor Freight tools has a nice bit kit for about $10.
IMG 3988
 
Back
Top