• Ciao Guest - You’ve landed at the ultimate Guzzi site. NEW FORUM REGISTRATIONS REQUIRE EMAIL ACTIVATION - CHECK YOUR SPAM FOLDER - Use the CONTACT above if you need help. New to the forum? For all new members, we require ONE post in the Introductions section at the bottom, in order to post in most of the other sections. ALWAYS TRY A SEARCH BEFORE STARTING A NEW TOPIC - Most questions you may have, have likely been already answered. DON'T BE A DRIVE-BY POSTER: As a common courtesy, check back in and reply within 24 hours, or your post will be deleted. Note there's decades of heavily experienced Guzzi professionals on this site, all whom happily give endless amounts of their VALUABLE time for free; BE COURTEOUS AND RESPECTFUL!
  • There is ZERO tolerance on personal attacks and ANY HYPERLINKS to PRODUCT(S) or other competing website(s), including personal pages, social media or other Forums. This ALSO INCLUDES ECU DIAGnostic software, questions and mapping. We work very hard to offer commercially supported products and to keep info relevant here. First offense is a note, second is a warning, third time will get you banned from the site. We don't have the time to chase repeat (and ignorant) offenders. This is NOT a social media platform; It's an ad-free, privately funded website, in small help with user donations. Be sure to see the GTM STORE link above; ALL product purchases help support the site, or you can upgrade your Forum profile or DONATE via the link above.
  • Be sure to see the GTM STORE link also above for our 700+ product inventory, including OEM parts and many of our 100% Made-in-SoCal-USA GTM products and engine kits. In SoCal? Click the SERVICE tab above for the best in service, tires, tuning and installation of our products or custom work, and don't miss our GT MotoCycles® (not) art on the BUILDS tab above. WE'RE HERE ONLINE ONLY - NO PHONE CALLS MADE OR RECEIVED - DO NOT EMAIL AND ASK QUESTIONS OR ASK TO CALL YOU.
  • Like the new V100, GuzziTech is full throttle into the future! We're now running on an all-new server and we've updated our Forum software. The visual differences are obvious, but hopefully you'll notice the super-fast speed. If you notice any glitches or have any issues, please post on the Site Support section at the bottom. If you haven't yet, please upgrade your account which is covered in the Site Support section or via the DONATE tab above, which gives you full site access including the DOWNLOADS section. We really appreciate every $ and your support to keep this site ad-free. Create an account, sign in, upgrade your account, and enjoy. See you on the road in 2024.

California Vintage 1100 - Relay problem?

Adrian Beckham

Tuned and Synch'ed
Joined
Aug 16, 2016
Messages
37
Location
Northallerton, North Yorkshire, UK
Hi All,

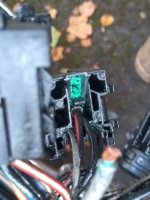
Out on my suspension test run at the weekend I parked the bike for about 15 minutes. When I came back she wouldn't start, nothing at the button. You could hear the injectors charge and all the electrics seemed to work. I checked the fuses, all seemed good and then wiggled the relays and that did the trick enough to get me home.

Tonight I've come to check her out and while she starts OK, the headlight, brake light and driving lights won't work. I have:
  1. Cleaned and checked all the fuses - All OK with zero ohms resistance
  2. Cleaned all the relays (most were showing some minor signs of "green" on the contacts)
Nothing - Apart from a brief flicker when I wiggled the 3rd relay from the back of the bike (sorry I haven't been able to find a wiring diagram that indicates which relay this is. I have found one that tells me Fuse 3 (20A) covers the 3 things I don't have working, so I've tried replacing this. If I remove the fuse I have 2V with the ignition off and around 12 with it on when I poke the contacts in the fuse block so there's power and the fuse is good.

I'd normally go looking for a bad earth on intermittent problems, but don;t know where to start in this case. So 2 questions for now:
  1. Can I test the relays and if so how?
  2. Where are the earths that I should be checking
Thanks in advance,

Ade.
 
Thanks Brian,

Wasn't up to much last night after the day from hell at work and then finding my wheels had let me down too :(

I've now googled how to test relays so feel better armed. That and your link to the schematic should see me getting some 2 wheeled therapy at the weekend.

Regards,

Ade.
 
So this happened...

Any idea how to get what's left of the connector out?

What's the best advice on fixing this? New fuse box block unit thingy, new fuse box or new bit of loom?

Guess I'm not riding this weekend
 

Attachments

  • IMG_20171028_120202490.jpg
    IMG_20171028_120202490.jpg
    67.4 KB · Views: 33
Connectors can be removed from the block and affixed directly to the relay. Use a small blade screwdriver to compress the tab on the metal connector. Looks like some serious corrosion developed to get that hot. Tinning connectors with solder will improve connectivity. Still try to find out what generated so much heat before doing the repair. In the end a new block would be a permanent fix. These block are individual units that come apart from each other and can be replaced separately. https://www.harpermoto.com/12-relais-support.html
 
In the UK you can get them from Vehicle Wiring Products.
Those spade connectors have been known to lose their spring contact which causes a poor connection, thus heat, which destroys the spring even more. Sometimes the crimp on the wires just wasn't good enough either.
I would suggest you replace the spade connector with a new one, yo will never get the old one making any sort of good connection in my experience. Add to that a new relay.
 
Thanks Guys, Dunno why I never thought about a short term fix of matching the relay to some "new" connectors (what do you call the female side to a spade connector?).

I'll be doing a full refurb on the fuse box asap as there are several other dodgy looking connectors. This one in particular has totally gone, there was no copper left at all. just some slightly soggy verdigris. I'll checkout Vehicle Wiring Products for the proper connectors and have a look to see if I can protect the top of the fuse box from water ingress as it looks a bit too exposed for my liking.

Ade.
 
They also do the complete fuse boxes, might be easier than repairing yours. They are just known as female spades by the way.

Remember every connection which is not so good drops the voltage and causes heat to build up. Worth checking as many as you can.
I also spray into every connector I find some electrical contact cleaner and lubricant. Good preventative maintenance.
 
They also do the complete fuse boxes, might be easier than repairing yours. They are just known as female spades by the way.

Couldn't find that as an option on the parts breakout. If you have a part number for the complete assembly that would help him.
 
Thanks again guys, Pretty sure I can clean up the fuse/relay blocks once I get things apart as there doesn't appear to be any damage to anything apart from the connectors. Always worth having the part No just in case though, I've a bad habit of forgetting how much my time is worth when renovating something that costs next to nothing.
 
So I ended up handing this over to someone who know's what they're doing as I kept hitting different issues every time I thought I'd fixed something. Turned out to be a major issue with the wiring loom suddenly hitting a bunch of corrosion related issues all at the same time. Biggest culprit was the inline diode that had somehow got submerged in about a tea spoon full of water that was held in place by the heatshrink tubing supposed to protect it.

Pocket's significantly lighter, but at least I'm going into the New Year with a bike that actually runs :)

Happy New Year folks
 
Get a can of electrical contact cleaner such as Servisol and spray that into all the connections you can find, plus every switch. Help keep those gremlins away in the future.
 
Back
Top