Penis Rotor
GT Godfather!
No, I'm not the least bit interested in sneering or criticism.
***************************************************
OK, so I started to get paranoid. I thought the top end of my Griso was beginning to 'Tick' more than it should. Given Greg's observations at MI I thought it was time for a looksee.
Before I start let me apologise for the overall poor quality of the pics. This was done on Easter Saturday morning, the workshop is always gloomy, it was cloudy and overcast outside and I'm crap with a camera so please, if you want to give me grief? Feel free, but find some other Pete Roper who actually cares! ;D
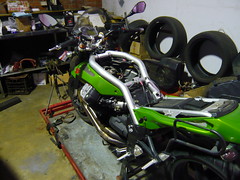
OK, so that's got the seat, battery and tank out of the way.
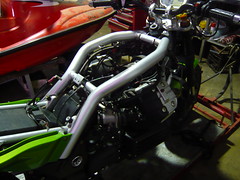
Then get the 'wings' off.
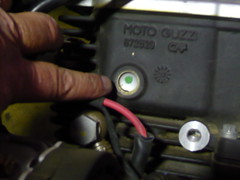
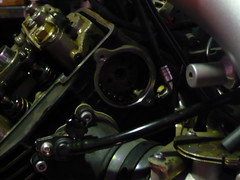
This is a pic of the 'Core Plug', what Aussies and many Yanks would call a 'Welch Plug', that blew out on the bike in the UK that had a pic of it put up on Guzzitech. Just so you know. It's the only case I've heard of but no doubt this will lead to a hundred more 'Sky is Falling' posts ??? :")
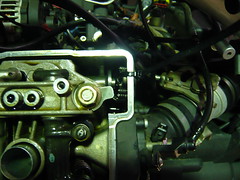
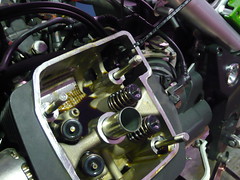
OK, rocker cover off and there's the cam sprocket. Set the piston at TDC compression and...
Remove the breather plate from the end of the head behind the cam sprocket.
After undoing the bolt that retains the sprocket and flinger plate from the end of the cam the sprocket can be pulled off AFTER the tensioner has been compressed with a screwdriver, the 5mm allen bolt removed from the back of the cylinder and the tensioner locked slack by insering an allen key, (Or some such through the hole. This is shown very well in the factory tear down, It was a bit dark for me to get a decent pic in the workshop, sorry.
The sprocket can then be hung up with a cable tie to the back of the head above the cam-tunnel/breather 'ole.
Ithen loosened the two inner bolts on the 'Scaffold' as i wan't sure if they went into the head proper. It turns out they don't sso the next step SHOUL be to undo the two 6mm bolts at the back of thr cam-chain tunnel, (Sorry, no pic, but I'm pretty sure they AREN'T the ones shown being undone in the factroy description! They go betwixt head and barrel! Not at the base of the barrel to the block.
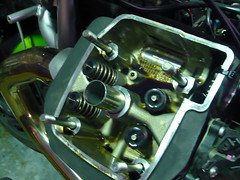
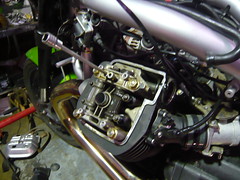
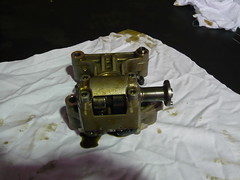
The four main stud nuts can now be loosened and removed, (In steps, in a crosshatch patern.) and the whole cam holding 'Scaffold' lifted free of the head. The above pic and the one below shows what the 'Bare' head looks like without the valve-lifting equipment in-situ. As Greg noted, th head itself is pretty thin, oil is gushing all over this area helping to keep things cool, that surface will be VERY hot in service. No Yak Fat for this baby!!!! ;D
Here you can see the 'Scaffold' inverted on the bench. The cams clearly visible. Next step was to undo the 4 *underneath* bolts that retain the top of the 'Scaffold' to the bottom, as I said, I'd already removed the top two but this can easily be left until this point as they DON'T go into the head.

That's a better one of the 4 bolts.
NOW FOR PEOPLE WHO MIGHT BE DOING THIS. THIS IS IMPORTANT

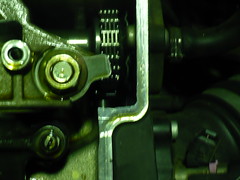
Look carefully at this pic. Next to the upper left hand bolt hole you can see there is a locating pin. Look adjacent to the one on the lower right and you will see that the pin is BROKEN. These are locating pins to ensure that there is sufficient alignment in the cam bearings. The hydraulic tension of the oil between the upper and lower parts of the 'Scaffold' makes them reluctant to part company. I held on to the 'Lower" part and gave the cam a tap with a 4 Oz. hammer. It separated, but not evenly and the locator pin broke. Entirely my fault but although I had examined the parts diagram I hadn't realized exactly how tiny these pins are, less than 2mm would be my guess. Be VERY, VERY carefull separating the scaffold. The good news for me was that it didn't snap completely flush and I was able to re-install everything without danger of further damage, more on that later, but BE VERY AWARE. I'm glad I found this out on my own machine rather than a customers. Whilke I can live with it I wouldn't send out a customer's bike like that and that would of cost me BIG BICKIES!
That is a REALLY lousy pic of one of the tappets, sorry, but that's the best I've got.In reality it looks OK but you can see the 'Ghosting' that Greg mentioned. It isn't failing yet, but the potential is there. I'll try and get some better pics when i actually do the replacement/recall work.

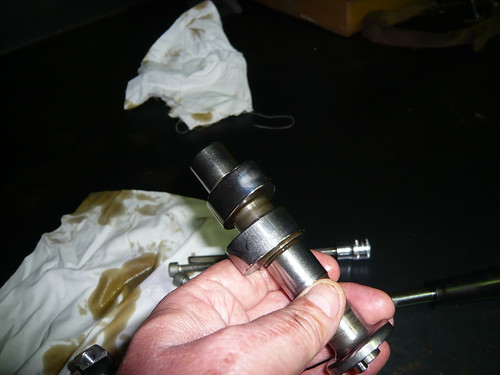
One of the diddy little pushrods.
The camshaft, yes, there are marks on the nose circle, detectable by eye but not by feel.

Another one of the same.

Reassembley, note liberal use of assembley lube!
Reassembley was a reverse of the disassembley. Because of the broken pin I was VERY careful reassembling the 'Scaffold and ensured that after torquing the camshaft turned freely with no tight spots. I didn't remove the rockers themselves as there semed to be no need, they moved smooth and free.
Once all back together I turned the motor by hand to ensure that the cam timing was OK, (It is important to keep tension on the cam chain at all times to ensure it doesn't jump a tooth at either end and throw the cam timing out as this will result in bent valves!),. Fired her up and all is good, but I look forward to getting the *new* bits.
So, like any Guzzi before this, there is no *magic* involved, none of it is very difficult, just be careful and pay attention to basics and take care taking the 'Scaffold' to bits.
Runs like a champ again and my mind is at least partially at rest. : ;D
Pete
PS, sorry, the early pics are small, I tried to make 'em bigger but I'm not very clever with 'pooters!
***************************************************
OK, so I started to get paranoid. I thought the top end of my Griso was beginning to 'Tick' more than it should. Given Greg's observations at MI I thought it was time for a looksee.
Before I start let me apologise for the overall poor quality of the pics. This was done on Easter Saturday morning, the workshop is always gloomy, it was cloudy and overcast outside and I'm crap with a camera so please, if you want to give me grief? Feel free, but find some other Pete Roper who actually cares! ;D
OK, so that's got the seat, battery and tank out of the way.
Then get the 'wings' off.
This is a pic of the 'Core Plug', what Aussies and many Yanks would call a 'Welch Plug', that blew out on the bike in the UK that had a pic of it put up on Guzzitech. Just so you know. It's the only case I've heard of but no doubt this will lead to a hundred more 'Sky is Falling' posts ??? :
OK, rocker cover off and there's the cam sprocket. Set the piston at TDC compression and...
Remove the breather plate from the end of the head behind the cam sprocket.
After undoing the bolt that retains the sprocket and flinger plate from the end of the cam the sprocket can be pulled off AFTER the tensioner has been compressed with a screwdriver, the 5mm allen bolt removed from the back of the cylinder and the tensioner locked slack by insering an allen key, (Or some such through the hole. This is shown very well in the factory tear down, It was a bit dark for me to get a decent pic in the workshop, sorry.
The sprocket can then be hung up with a cable tie to the back of the head above the cam-tunnel/breather 'ole.
Ithen loosened the two inner bolts on the 'Scaffold' as i wan't sure if they went into the head proper. It turns out they don't sso the next step SHOUL be to undo the two 6mm bolts at the back of thr cam-chain tunnel, (Sorry, no pic, but I'm pretty sure they AREN'T the ones shown being undone in the factroy description! They go betwixt head and barrel! Not at the base of the barrel to the block.
The four main stud nuts can now be loosened and removed, (In steps, in a crosshatch patern.) and the whole cam holding 'Scaffold' lifted free of the head. The above pic and the one below shows what the 'Bare' head looks like without the valve-lifting equipment in-situ. As Greg noted, th head itself is pretty thin, oil is gushing all over this area helping to keep things cool, that surface will be VERY hot in service. No Yak Fat for this baby!!!! ;D
Here you can see the 'Scaffold' inverted on the bench. The cams clearly visible. Next step was to undo the 4 *underneath* bolts that retain the top of the 'Scaffold' to the bottom, as I said, I'd already removed the top two but this can easily be left until this point as they DON'T go into the head.
That's a better one of the 4 bolts.
NOW FOR PEOPLE WHO MIGHT BE DOING THIS. THIS IS IMPORTANT
Look carefully at this pic. Next to the upper left hand bolt hole you can see there is a locating pin. Look adjacent to the one on the lower right and you will see that the pin is BROKEN. These are locating pins to ensure that there is sufficient alignment in the cam bearings. The hydraulic tension of the oil between the upper and lower parts of the 'Scaffold' makes them reluctant to part company. I held on to the 'Lower" part and gave the cam a tap with a 4 Oz. hammer. It separated, but not evenly and the locator pin broke. Entirely my fault but although I had examined the parts diagram I hadn't realized exactly how tiny these pins are, less than 2mm would be my guess. Be VERY, VERY carefull separating the scaffold. The good news for me was that it didn't snap completely flush and I was able to re-install everything without danger of further damage, more on that later, but BE VERY AWARE. I'm glad I found this out on my own machine rather than a customers. Whilke I can live with it I wouldn't send out a customer's bike like that and that would of cost me BIG BICKIES!
That is a REALLY lousy pic of one of the tappets, sorry, but that's the best I've got.In reality it looks OK but you can see the 'Ghosting' that Greg mentioned. It isn't failing yet, but the potential is there. I'll try and get some better pics when i actually do the replacement/recall work.
One of the diddy little pushrods.
The camshaft, yes, there are marks on the nose circle, detectable by eye but not by feel.
Another one of the same.
Reassembley, note liberal use of assembley lube!
Reassembley was a reverse of the disassembley. Because of the broken pin I was VERY careful reassembling the 'Scaffold and ensured that after torquing the camshaft turned freely with no tight spots. I didn't remove the rockers themselves as there semed to be no need, they moved smooth and free.
Once all back together I turned the motor by hand to ensure that the cam timing was OK, (It is important to keep tension on the cam chain at all times to ensure it doesn't jump a tooth at either end and throw the cam timing out as this will result in bent valves!),. Fired her up and all is good, but I look forward to getting the *new* bits.
So, like any Guzzi before this, there is no *magic* involved, none of it is very difficult, just be careful and pay attention to basics and take care taking the 'Scaffold' to bits.
Runs like a champ again and my mind is at least partially at rest. :
;DPete
PS, sorry, the early pics are small, I tried to make 'em bigger but I'm not very clever with 'pooters!
")