• Ciao Guest - You’ve landed at the ultimate Guzzi site. NEW FORUM REGISTRATIONS REQUIRE EMAIL ACTIVATION - CHECK YOUR SPAM FOLDER - Use the CONTACT above if you need help. New to the forum? For all new members, we require ONE post in the Introductions section at the bottom, in order to post in most of the other sections. ALWAYS TRY A SEARCH BEFORE STARTING A NEW TOPIC - Most questions you may have, have likely been already answered. DON'T BE A DRIVE-BY POSTER: As a common courtesy, check back in and reply within 24 hours, or your post will be deleted. Note there's decades of heavily experienced Guzzi professionals on this site, all whom happily give endless amounts of their VALUABLE time for free; BE COURTEOUS AND RESPECTFUL!
  • There is ZERO tolerance on personal attacks and ANY HYPERLINKS to PRODUCT(S) or other competing website(s), including personal pages, social media or other Forums. This ALSO INCLUDES ECU DIAGnostic software, questions and mapping. We work very hard to offer commercially supported products and to keep info relevant here. First offense is a note, second is a warning, third time will get you banned from the site. We don't have the time to chase repeat (and ignorant) offenders. This is NOT a social media platform; It's an ad-free, privately funded website, in small help with user donations. Be sure to see the GTM STORE link above; ALL product purchases help support the site, or you can upgrade your Forum profile or DONATE via the link above.
  • Be sure to see the GTM STORE link also above for our 700+ product inventory, including OEM parts and many of our 100% Made-in-SoCal-USA GTM products and engine kits. In SoCal? Click the SERVICE tab above for the best in service, tires, tuning and installation of our products or custom work, and don't miss our GT MotoCycles® (not) art on the BUILDS tab above. WE'RE HERE ONLINE ONLY - NO PHONE CALLS MADE OR RECEIVED - DO NOT EMAIL AND ASK QUESTIONS OR ASK TO CALL YOU.
  • Like the new V100, GuzziTech is full throttle into the future! We're now running on an all-new server and we've updated our Forum software. The visual differences are obvious, but hopefully you'll notice the super-fast speed. If you notice any glitches or have any issues, please post on the Site Support section at the bottom. If you haven't yet, please upgrade your account which is covered in the Site Support section or via the DONATE tab above, which gives you full site access including the DOWNLOADS section. We really appreciate every $ and your support to keep this site ad-free. Create an account, sign in, upgrade your account, and enjoy. See you on the road in 2024.

Clutch replacement and input shaft seal replacement

Julian Sudano

Tuned and Synch'ed
GT Contributor
Joined
Jul 25, 2021
Messages
61
Location
Los Angeles, CA
Hi All,
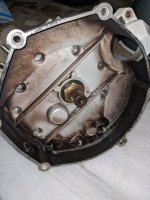
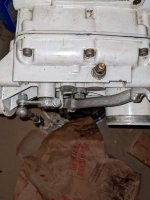
Pulled the gear box and clutch assembly last night in order to replace the rear main seal and was hoping to do the same with the input shaft seal as well.

I didn't count on the rather large nut on the input shaft! What's the procedure for removing that bad-boy? I'm assuming you need to immobilize the input shaft, via the splines to get the nut moving?

Also, it looked like there was grease in the groove where the big circlip holds the cupped disc in place. When reassembling, should I smear a small amount if grease in that groove so the cup isn't dragging?
Assuming that the clutch friction disc splines, as well as the input shaft splines should get a tad of grease too? I was thinking of using Liqui Moly LM47...

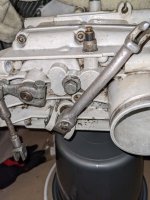
One last question: I have an output shaft seal, and am hoping there is some easy way of replacing that without tearing down the gearbox?!

Thanks for your input!
 

Attachments

  • Gearbox input shaft.jpg
    Gearbox input shaft.jpg
    124.4 KB · Views: 21
If you want to take nut off and are changing clutch plate, trash it by using the center for a tool w/handle. You ought to get a service manual it's all in there except the grease part. I never use any type in a clutch area, not on a Guzzi, it's NOT a bmw.
You can also take out those allen head bolts to gain access to the primary gears.
What you thought was grease was most likely oil mixed w/clutch dust. It all flings around.
You never said what year or model but that looks like a 5 speed in the pic.
 
Workshop manual is critical......If you want to do the small clutch pushrod seal on the back of the clutch shaft, then you'll need to remove the clutch cover. If it's just the input shaft seal then you can leave it on gearbox & save yourself a gasket (and it's easier to hold the gearbox while you undo the nut !)

If you take the clutch cover off, it needs lots of tapping and fiddling (and swearing) as it usually drags the bearing out a bit until it fouls the input shaft gear on top of gearbox .

First use a flat tool to open up the lock nut on the top of clutch shaft.

Next you'll need a suitable spanner (probably cut down to fit inside the starter cover - see pics) for the big nut AND also need to weld a big nut on a cut up clutch plate (your current one OR old one with the right spline size !!).

Then you need to 'hold' the gearbox OR the clutch cover in a very strong workbench, make sure the spanner is locked in place, and turn the nut welded on the clutch plate using a long bar to break the 100nm plus (anti-clockwise cos it's the nut you are actually undoing).
You can change the clutch cover oil seal from there (and I'd change the 'o ring' under the spacer also while you're there).

If you want to do the clutch push rod seal, then pull the clutch cover off & replace that with suitable drift (& check bearings etc while you are there)

IMG 3028r
IMG 3029r
IMG 3030r
InkedIMG 3134r LI
 
For the output seal you can do it from outside if you are careful in extracting the seal from around the output spline shaft (the seal sits on the output shaft bearing)....it's just a fiddley job which I use long self-tapping screws to hold the seal and then pull it.

Last time I went the 'long way around' and changed the seal from inside as I had to replace a failed washer on the layshaft; this also let's you replace the 'o' ring on the gear change shaft (which I don't think is possible from outside the box)

but here's a pic of the 'inside view' if it helps..

IMG 3488r
 
Hi Paul - thanks for input! I'm still debating whether or not I'll try to pull the input shaft seal, due to a lack of tools, and it doesn't seem to be leaking at this point. I did however just bolt the flywheel and clutch assembly back on this afternoon, and then put the gearbox back in place only to find that it takes a herculean effort now to actuate the clutch arm. I could operate it easily prior to disassembly, but now I'm worried I'll snap my clutch cable, it's that stiff!

I did replace the seal on the plunger at the back of the gearbox, and at one stage pushed the pin on the input shaft back quite far, so am wondering if I've somehow got that whole assembly out of sync. With the gear box off the engine, I can move the pin back and forth freely with little effort. I don't want to put the bike back together just to find out the hard way that I've cocked something up!

I did replace the clutch friction disc, but apart from that haven't made any fundamental changes. Any idea why it is now so stiff?

Cheers.
 
The arm that acts upon the clutch push rod should be at about 90 degrees to the rod (the block that contacts the rod) when the clutch handle is squeezed in, If less or more could be the reason it is stiff.
 
The arm that acts upon the clutch push rod should be at about 90 degrees to the rod (the block that contacts the rod) when the clutch handle is squeezed in, If less or more could be the reason it is stiff.

Hi John - thanks for the input. I've attached a few pics as I don't quite follow your explanation.

Could a possible reason for the extreme pressure need to actuate the lever be that the clutch disc is not properly centered and therefore the pin that actuates the cupped disc, is not centered properly? I was pretty careful about getting that aligned before tightening down the clutch housing against the flywheel though, and the gearbox slide into place very easily when attached.
 

Attachments

  • Clutch arm 1.jpg
    Clutch arm 1.jpg
    74.3 KB · Views: 13
  • Clutch lever 2.jpg
    Clutch lever 2.jpg
    90.9 KB · Views: 13
Agree with John, adjustment of the clutch arm is critical (and quite a tight range needed to avoid running out of rear lever travel); and often 'stiff clutch' is just stretching the cable if the lever is fully in ;)

Only other things that come to mind are the assembly sequence of the pushrod bits, if you put the clutch plate in the right way around & if you put the round plate the clutch pushrod pushes the right way around....I've spent lots of 'check-recheck' time getting these right in the past
 
Sounds correct, looking at that arm & adjuster, it needs to come back for more play, then adjust correctly.
Make sure handlebar adjuster is all the way in.
 
Hi John - thanks for the input. I've attached a few pics as I don't quite follow your explanation.

Could a possible reason for the extreme pressure need to actuate the lever be that the clutch disc is not properly centered and therefore the pin that actuates the cupped disc, is not centered properly? I was pretty careful about getting that aligned before tightening down the clutch housing against the flywheel though, and the gearbox slide into place very easily when attached.


Without the cable attached and clutch lever in I can't tell you.
 
Sounds correct, looking at that arm & adjuster, it needs to come back for more play, then adjust correctly.
Make sure handlebar adjuster is all the way in.


So I pulled it all apart again this afternoon to check that everything was out back as I found it, and it was. Still feels really stiff though.

I'm wondering if the there is something up with the parts that make up the pushrod assembly. Can this be removed and reassemble so I can check the parts, without creating further headaches?
 
Yes, easier if the gearbox isn't on the engine but on engine can be doable with some fishing and depending how 'free' the pushrod is in the seal - part 21 inside rear of clutch cover. Good to check by moving in and out the clutch bearing end & rod separately to 'feel' where stiffness may be.

Check for straightness, all the clutch bearing parts for problems (roller cages can wear/break up), 'O'ring size and position (should be 17.2mm x 2.62 mm ish, check parts sequence against relevant diagram (this is V50-3 but probably all the same)

Breakdown
 
Thanks Paul! Looks exactly the same as the parts diagram I have for my V65. I was just concerned that I might lose some small part into the gearbox if I pulled it all out.

In the meantime, I went ahead and refitted the engine/gearbox back into the frame and reconnected the clutch cable to see if there was a noticeable difference in the force required to move the clutch lever arm, via the handle bars, and while it is definitely firmer, it doesn't seem too bad.

I'm waiting for a few parts to arrive before I can take it for a ride, but I did readjust the grub screw on the clutch arm that pushes on the plunger in order to give the arm a few more degrees of movement, so we'll see how that plays out.
 
Back
Top