• Ciao Guest - You’ve landed at the ultimate Guzzi site. NEW FORUM REGISTRATIONS REQUIRE EMAIL ACTIVATION - CHECK YOUR SPAM FOLDER - Use the CONTACT above if you need help. New to the forum? For all new members, we require ONE post in the Introductions section at the bottom, in order to post in most of the other sections. ALWAYS TRY A SEARCH BEFORE STARTING A NEW TOPIC - Most questions you may have, have likely been already answered. DON'T BE A DRIVE-BY POSTER: As a common courtesy, check back in and reply within 24 hours, or your post will be deleted. Note there's decades of heavily experienced Guzzi professionals on this site, all whom happily give endless amounts of their VALUABLE time for free; BE COURTEOUS AND RESPECTFUL!
  • There is ZERO tolerance on personal attacks and ANY HYPERLINKS to PRODUCT(S) or other competing website(s), including personal pages, social media or other Forums. This ALSO INCLUDES ECU DIAGnostic software, questions and mapping. We work very hard to offer commercially supported products and to keep info relevant here. First offense is a note, second is a warning, third time will get you banned from the site. We don't have the time to chase repeat (and ignorant) offenders. This is NOT a social media platform; It's an ad-free, privately funded website, in small help with user donations. Be sure to see the GTM STORE link above; ALL product purchases help support the site, or you can upgrade your Forum profile or DONATE via the link above.
  • Be sure to see the GTM STORE link also above for our 700+ product inventory, including OEM parts and many of our 100% Made-in-SoCal-USA GTM products and engine kits. In SoCal? Click the SERVICE tab above for the best in service, tires, tuning and installation of our products or custom work, and don't miss our GT MotoCycles® (not) art on the BUILDS tab above. WE'RE HERE ONLINE ONLY - NO PHONE CALLS MADE OR RECEIVED - DO NOT EMAIL AND ASK QUESTIONS OR ASK TO CALL YOU.
  • Like the new V100, GuzziTech is full throttle into the future! We're now running on an all-new server and we've updated our Forum software. The visual differences are obvious, but hopefully you'll notice the super-fast speed. If you notice any glitches or have any issues, please post on the Site Support section at the bottom. If you haven't yet, please upgrade your account which is covered in the Site Support section or via the DONATE tab above, which gives you full site access including the DOWNLOADS section. We really appreciate every $ and your support to keep this site ad-free. Create an account, sign in, upgrade your account, and enjoy. See you on the road in 2024.

Driving lights on the Stelvio (finally!)

John in PA

Cruisin' Guzzisti
GT Contributor
Joined
Jul 31, 2009
Messages
255
Location
Hollidaysburg, PA
Well, I finally finished my installation of the PIAA 1100x dichroic driving lights on the Stelvio. I used the on-board foglight switch and circuitry to control and feed the lamps. I ended up cutting off the stock plugs on the *short* wires up inside the right and left front fairing and using red Posii-locks to make 6 inch extensions for the wires. I had purchased the posi-locks and some very nice waterproof two-pole connectors from Eastern Beaver. I removed the stock PIAA plugs from the lights (unnecessary as I found out later as Eastern Beaver also sells the PIAA compatible connectors, so that step would NOT be necessary. They might even have a small plug that fits up to the stock foglight wire plugs, so stock connector could remain in place, though you would still have to make a short extension pigtail)

I had wrestled with the decision of where/how to mount the lights. Originally I was going to use a nice mounting bracket machined and black anodized from aluminum that PIAA offers for 1" bars. Bought a set, tried several possible mount configurations, but was dissatisfied with the various options. It seemed that lights would either be exposed to damage in the event of a tipover (not that THAT could happen), or else wires or lamps would be a bit closer than comfortable to exhaust header heat. I also would have needed to custom make some machined aluminum blocks to mount as I had purchased the auto set instead of the powersports set (half the price, same lights and harness, ABS mounting brackets instead of stamped steel) I elected to mount on the underside front of the fairing.

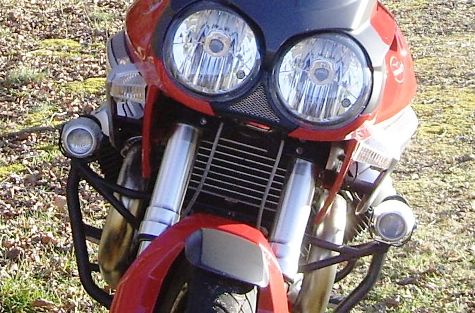
Result: lights are up high for visibility, don't stick out to the sides in case of mischief/operator error, short wire run to power source, no heat issues, and no bracket fabrication. They obviously look "added-on", but then so do lights dangling off the crash bars, and utility-over-beauty seems to be the custom with adventure tourers anyhow. They mount with one 3/8" buttonhead stainless bolt 1" long, neoprene 1.5" washer inside and out for increased friction to resist turning. Stainless 1.5" fenderwasher and a nylock nut on the inside of the fairing, and a standard stainless washer on the outside between bolt head and light bracket.

Here are a couple pics of the finished product. I haven't tried them at night, but had the same lights on the Quota, and now on a Can-Am Spyder, and they really turn night into day!! Big even flood of light over 2-3 lanes wide, and about 300 yards up the road.

StelvioGPS014.jpg


StelvioGPS015.jpg


StelvioGPS016.jpg


StelvioGPS019.jpg


Amazon has a good price on the lights, around $150 if I recall.
 
nice job.
end result is good lighting that will survive riding and a tip-over - can't complain about that ;)
 
Very nice indeed... would love to see the improvement... How much did all of this cost you?
 
OK, Here's a shopping list:

1 set PIAA 1100X Driving lamp set (#1192) $146.03 (Amazon--free shipping) http://www.amazon.com/PIAA-1192-Pla..._1?ie=UTF8&s=automotive&qid=1237892091&sr=8-1

4 Posi-locks--red (or 2 original style plugs to match guzzi OEM from Eastern Beaver)
2 2-pole waterproof plugs (or PIAA plugs from Eastern Beaver)
4 1.5" neoprene washers
2 3/8"x1" Stainless buttonhead bolts (allen-type)
2 3/8 Stainless washers
2 1.5" stainless fender washers 3/8" hole
2 3/8" stainless nylock nuts
12-18" two-lead automotive wire, 16 or 18ga
1 20A relay for the empty slot in the Guzzi relay box inside the right front fairing Pyro Dan's work great)
4 nylon zip ties


Wiring option: The PIAA set comes with a complete wiring harness, relay, LED lighted switch. You only have to do the wiring if you want to use the circuitry already on the bike for accessory lights, which gives a neat little ICON on the dash when the lights are lit, and avoids adding clutter to the right handlebar control by adding yet another switch.

PIAA connectors: http://easternbeaver.com/Main/Elec__Products/Connectors/312_Connectors/312_connectors.html
Use the 2P connectors

Guzzi OEM connectors: http://easternbeaver.com/Main/Elec__Products/Connectors/110_Connectors/110_connectors.html
Use the 2 position .110 connectors

I only did the posilocks and new waterproof connectors 'cause I didn't see the .110 and PIAA connectors on the site till the job was about done!!

A 6" pigtail extension plus plugs will about do it on each side


Mounting on the bike:
Enlarge the hole in the light mounting bracket to 3/8" and reverse the brackets on the lights. Otherwise you can't access the socket head to tighten. Or use a hex head bolt instead, there's just barely room to get a wrench in if you do.

Locate and drill pilot holes in underside of fairing, then carefully enlarge to 3/8"

Fastener order from the outside: Bolt head, flat washer, light bracket,neoprene washer, fairing, neoprene washer, fender washer, nylock nut.
There's barely room to get a finger inside the fairing to get a start on the nut. I poked an allen wrench up through the hole in the fairing and stacked/aligned the inside fasteners on it, then got a finger inside and started the bolt/washer stack in the threads before adding the light bracket.(the light bracket is in two pieces, and can be split apart and applied after the bolt is started. I discovered this method after many tries and extensive exploration of my vocabulary of expletives. Once tried this way, it was easy.)
 
Thank you for posting the link for the Guzzi OEM wire connectors. I've tried to find those locally, but it seems everyone I call is clueless. No one carries Sumitomo or they don't know any connector by a .110 name. So I'll have to wait for them to ship from eagerbeaver. If nothing else, owning Guzzi's has taught me patience.

I'm mounting the lumalink fork mounts with trail tech (eclipse) HID lights.
 
I e-mailed pyrodan to get shipping info .. He says his relays do not fit in the Stelvio relay socket. :dry:
Did you need to get a socket for it from somewhere else?
 
Shrike said:
I e-mailed pyrodan to get shipping info .. He says his relays do not fit in the Stelvio relay socket. :dry:
Did you need to get a socket for it from somewhere else?

He is mistaken. I plugged one of his relays that I ought for my EV into my Stelvio driving light socket. His relay may not be correct for the other relays in the bike, but it is correct for the driving lights,
 
Nice install John.

Looking at the first pic, I can see why the Aus red tape people don't like the position of the indicators - they sure would be lost in the headlight. The position of the spotties probably won't help, but I recon that it doesn't matter as the cage in front I can see avoid and anyway he/she probably won't be looking at my indicators anyway.
 
Very nice set up, definitely in a safer place than the MG fitting on my NTX. :roll:
 
Back
Top