• Ciao Guest - Youā€™ve landed at the ultimate Guzzi site. NEW FORUM REGISTRATIONS REQUIRE EMAIL ACTIVATION - CHECK YOUR SPAM FOLDER - Use the CONTACT above if you need help. New to the forum? For all new members, we require ONE post in the Introductions section at the bottom, in order to post in most of the other sections. ALWAYS TRY A SEARCH BEFORE STARTING A NEW TOPIC - Most questions you may have, have likely been already answered. DON'T BE A DRIVE-BY POSTER: As a common courtesy, check back in and reply within 24 hours, or your post will be deleted. Note there's decades of heavily experienced Guzzi professionals on this site, all whom happily give endless amounts of their VALUABLE time for free; BE COURTEOUS AND RESPECTFUL!
  • There is ZERO tolerance on personal attacks and ANY HYPERLINKS to PRODUCT(S) or other competing website(s), including personal pages, social media or other Forums. This ALSO INCLUDES ECU DIAGnostic software, questions and mapping. We work very hard to offer commercially supported products and to keep info relevant here. First offense is a note, second is a warning, third time will get you banned from the site. We don't have the time to chase repeat (and ignorant) offenders. This is NOT a social media platform; It's an ad-free, privately funded website, in small help with user donations. Be sure to see the GTM STORE link above; ALL product purchases help support the site, or you can upgrade your Forum profile or DONATE via the link above.
  • Be sure to see the GTM STORE link also above for our 700+ product inventory, including OEM parts and many of our 100% Made-in-SoCal-USA GTM products and engine kits. In SoCal? Click the SERVICE tab above for the best in service, tires, tuning and installation of our products or custom work, and don't miss our GT MotoCyclesĀ® (not) art on the BUILDS tab above. WE'RE HERE ONLINE ONLY - NO PHONE CALLS MADE OR RECEIVED - DO NOT EMAIL AND ASK QUESTIONS OR ASK TO CALL YOU.
  • Like the new V100, GuzziTech is full throttle into the future! We're now running on an all-new server and we've updated our Forum software. The visual differences are obvious, but hopefully you'll notice the super-fast speed. If you notice any glitches or have any issues, please post on the Site Support section at the bottom. If you haven't yet, please upgrade your account which is covered in the Site Support section or via the DONATE tab above, which gives you full site access including the DOWNLOADS section. We really appreciate every $ and your support to keep this site ad-free. Create an account, sign in, upgrade your account, and enjoy. See you on the road in 2024.

GTM Secondary Air Supply (SAS) V7-9 Block-off Kit

Ted, just leave the pump connected - as in plugged into the electrical plug and hang in original position on the rubber hangeršŸ˜ŽšŸ‘Œ you won't of hurt your bike just a electrical short code
 
Actually I removed the entire Pump and Tubing.... (Seemed pretty pointless to leave it there...)

So you are saying I leave the Pump / Tubing dangling there?? Why not use a Dongle like the E4 Kit? (IĀ“m confused...and starting to get upset!!)

Thanks for your comments / Assistance!

TJ

There are some differences between E4 and E5. I'm curious what the ECU is checking on that valve and if it cannot be replaced by a resistor.
 
Like other people have commented, leave the pump, remove the tubing. I'm not sure why a resistor can't replace it either since I don't know enough about this stuff but the description on the product page says to leave the pump in place. I left mine where it was on my V7 but others have tucked it out of the way. I'm not sure if that's possible on the V85, but that's what some people have done.
 
I clearly state to leave the pump connected. I also HIGHLY recommend leaving the tubing connected, and only plug the inlet line from the intake manifold. Capping it and tape wrapping it may overheat the pump and cause bigger problems. The pump circuit is quite different from E4 to E5. I canā€™t and wonā€™t get into technicalities here.
 
2022 V7 850 Special

Im about to install the SAS kit and UpMap to my bike.
As I read it, for my model the following is applicable:
"LEAVE THE STOCK SAS PUMP IN PLACE AND DISCONNECT OR REMOVE THE TUBING, USE ONLY THE BLOCK-OFF PLATES AND AIR BOX CAP"
this means
- I fit the block off caps that come in the kit
- I leave the actual SAS pump and its wiring in place, I leave the tubing that ran from the original plates to the SAS pump dangling free (so the ends need to be left open), or optionally I can remove the hoses completely at the SAS pump end?
- I remove the SAS pump to airbox tube at the air box end, and cap the air box hole with the little rubber cap that comes in the kit. This tube, SAS pump to airbox, can either be left dangling or be removed at the SAS pump end also?
- If I remove all the hoses at the SAS pump end, leaving wiring and its plug intact, I can then cable tie the SAS pump up under the tank to tidy things up?

Im not Irish but would still like to be sure to be sure...
 
2022 V7 850 Special
Im about to install the SAS kit and UpMap to my bike.
As I read it, for my model the following is applicable:
"LEAVE THE STOCK SAS PUMP IN PLACE AND DISCONNECT OR REMOVE THE TUBING, USE ONLY THE BLOCK-OFF PLATES AND AIR BOX CAP"
this means:
- I fit the block off caps that come in the kit
CORRECT.
- I leave the actual SAS pump and its wiring in place, I leave the tubing that ran from the original plates to the SAS pump dangling free (so the ends need to be left open), or optionally I can remove the hoses completely at the SAS pump end?
CORRECT. LEAVE AS IS, OR REMOVE COMPLETELY. UP TO YOU.
- I remove the SAS pump to airbox tube at the air box end, and cap the air box hole with the little rubber cap that comes in the kit. This tube, SAS pump to airbox, can either be left dangling or be removed at the SAS pump end also?
CORRECT.
- If I remove all the hoses at the SAS pump end, leaving wiring and its plug intact, I can then cable tie the SAS pump up under the tank to tidy things up?
YOU CAN. WE RECOMMEND LEAVE THE PUMP IN ITS RUBBER MOUNTED POSITION.
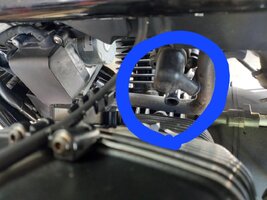
Thanks Todd answers much appreciated.
 
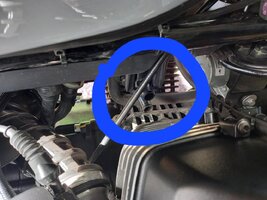
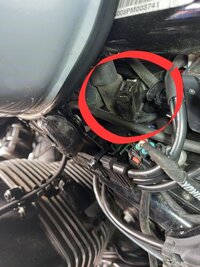
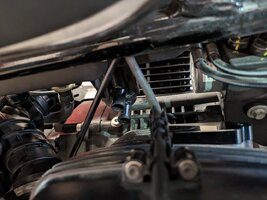
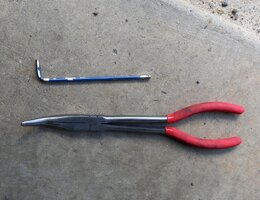
Completed the SAS modification on my 2022 V7 850 Special.. Have to say the job from start to finish only took an hour, I did unbolt and lift the tank back, mine seems to have plenty of spare fuel hose to do so. Access is good with the tank moved back , I bought for NZ$20 a pair of long nose bent tip pliers (see photo) which made the job of removing the hose clips simple. Only other tool required was a 4mm Allen key. Per Todd's recommendation I have left the SAS pump in its standard mounted position and removed from the bike the 2 hoses that go to the cylinder head blocks and the one that runs from SAS pump to the airbox. Quite a straight forward job thanks to the write ups here.
On another note, I found a spare plug at the front of the fuel tank, see the last photo and circled in Red. Does anyone know what this is for?

20230823 143048 20230823 201210 20230823 201302 20230823 201348
 
Last edited:
Yes leave plugged in otherwise it will throw a code. I blanked the the ports with heat shrink tubing and left it in its mount.
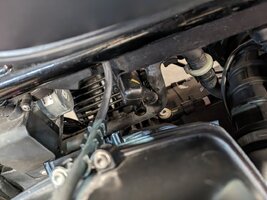
Just for assurance ... I just did the SAS elim on my '21 V7 850 E5 Centanario. So I now have the 'pump' with no hoses and plugged in electronically in the bracket. The plates are on and the air box is capped. There's some oil residue hanging from the ports (figure that won't last very long). This sounds/appears correct?

PXL 20240319 000015596 PXL 20240319 000030164
 
Just for assurance ... I just did the SAS elim on my '21 V7 850 E5 Centanario. So I now have the 'pump' with no hoses and plugged in electronically in the bracket. The plates are on and the air box is capped.
Since you had the tank lifted, you could have tucked the pump up under the tank. Do NOT cap the ends, correct.
 
Since you had the tank lifted, you could have tucked the pump up under the tank. Do NOT cap the ends, correct.
I may pull the tank and zip tie the pump up underneath. Thanks for the confirmation, BTW. It always looks weird to me seeing open ports
 
Since it rained today and I received the GTM SAS Kit, I went ahead and installed it. Super easy, I removed all 3 hoses and left the Secondary Air Valve in the stock location. It fired up smoothly and ran much better, no popping at all and it helped with the stumble around 3k rpm. I pulled the Db killers but the stumble and slight popping came back. So.. back in they go until I get an UpMap. Thanks Todd, nice piece of kit. šŸ˜Ž
 

Attachments

  • IMG_4228.jpeg
    IMG_4228.jpeg
    82.7 KB · Views: 10
  • IMG_4229.jpeg
    IMG_4229.jpeg
    83.1 KB · Views: 10
  • IMG_4225.jpeg
    IMG_4225.jpeg
    113.8 KB · Views: 10
Last edited:
Since it rained today and I received the GTM SAS Kit, I went ahead and installed it. Super easy, I removed all 3 hoses and left the Secondary Air Valve in the stock location. It fired up smoothly and ran much better, no popping at all and it helped with the stumble around 3k rpm. I pulled the Db killers but the stumble and slight popping came back. So.. back in go the Db's until I get and UpMap. Thanks Todd, nice piece of kit. šŸ˜Ž
Slick set-up, isn't it?
 
Back
Top