For those currently experiencing noisy gear change action and poor clutch performance on cold starts; A refresher on the clutch design and the required periodic method of bathing the parts.
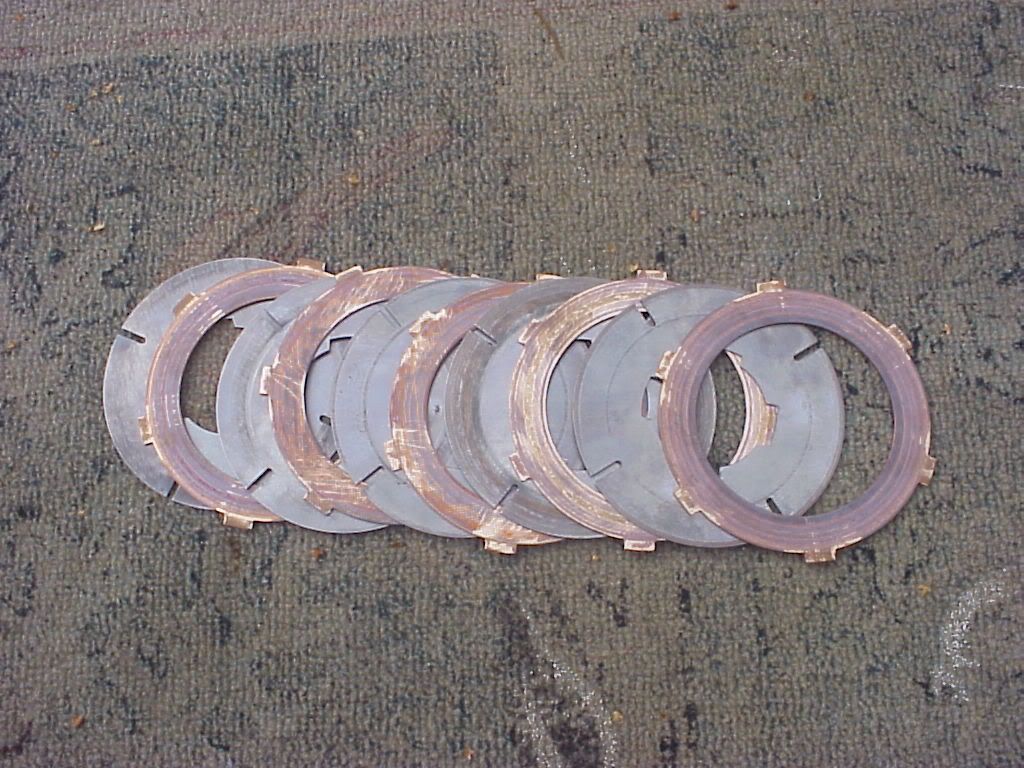
The Guzzi-Single clutch is composed of a stacked sandwich of 5 steel and 5 bronze plates. The steel plates are connected in their center to the clutch fixed body hub on the primary shaft of the transmission. The bronze plates are connected at their perimeter to the gear-like outer body basket. There may be one or two friction material rings installed at the base of this stack as well. The outer body basket may run on a continuous core bushing or it may have a packet of loose rollers. All of these options depend on which model and year you have, but the multi-plate design and basic operation are all the same.
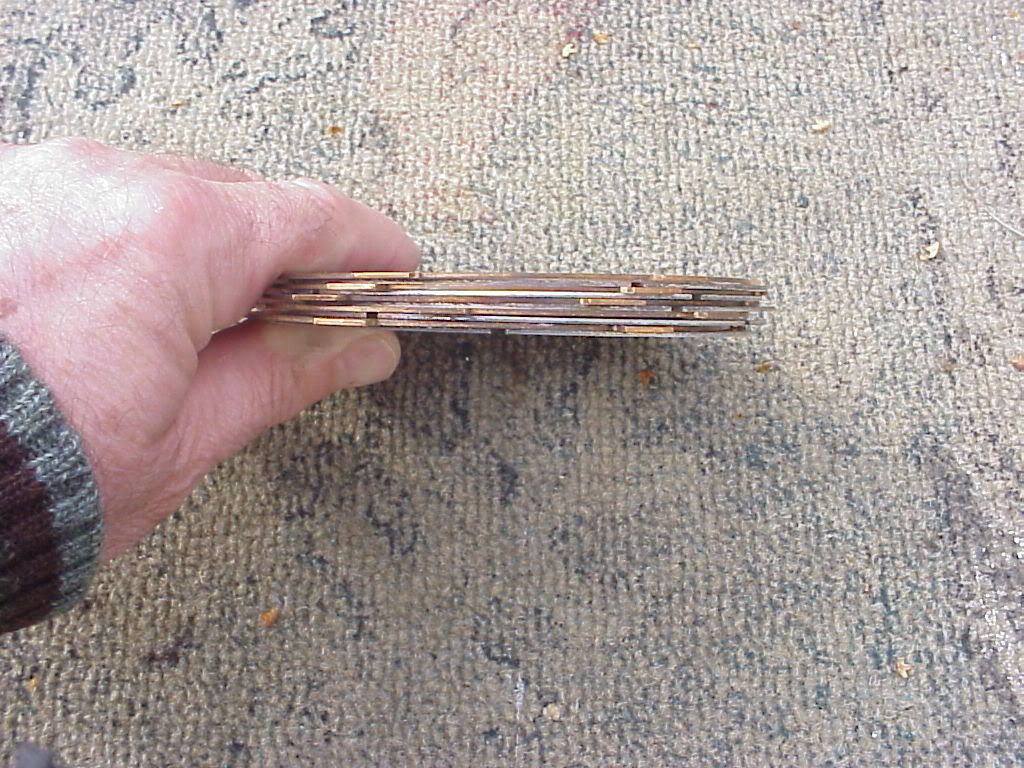
Here are pictures of a used plate stack and a fresh stack already installed into my SuperAlce.
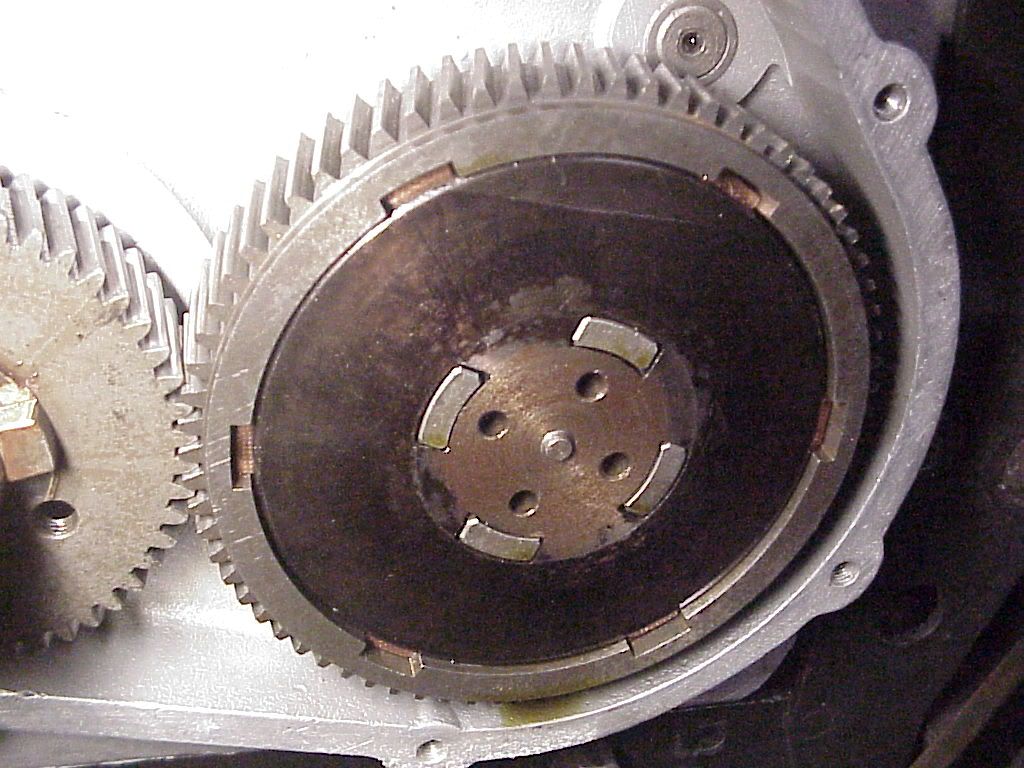
When the clutch is bound by its spring, the stack of plates and all of the clutch components rotate as an intact, unit mass. When you pull on the clutch handle, the spring pressure is countered or relieved and the various pieces are released and allowed to move independently. In theory, the stacked sandwich parts should all slip smoothly over each otther so that the outer body remains spinning with the motor, while the inner body remains stationary. This allows you to remain in gear with the engine running.
In addition to these parts, there is a small passage at the top of the crankcase which allows for a fine mist of air and engine oil to pass from the crankcase chamber to the exterior clutch chamber.
(the zip tie is in place just to demonstrate the oil passage route)
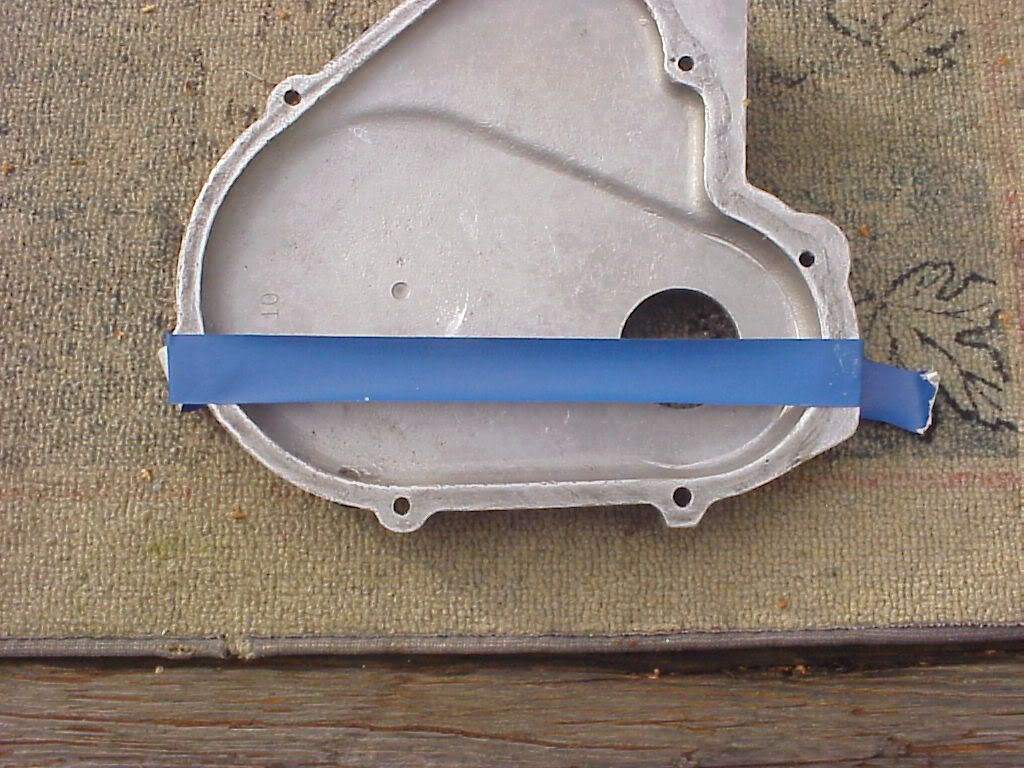
This mist of oil lubricates all the parts in the clutch chamber, including the plates, and eventually condenses into a puddle in the clutch chamber. It is a total loss system. There is no way for this oil to get back into the engine case. Eventually, this condensed puddle grows to the level that the bottom of the clutch parts are sitting in a pool of oil and any further excess starts to leak out behind the flywheel where the crankshaft passes through the clutch chamber. There is no seal for this passage. This blue tape represents the maximum depth of oil puddle within the clutch chamber before it will simply pour out the crankshaft hole.
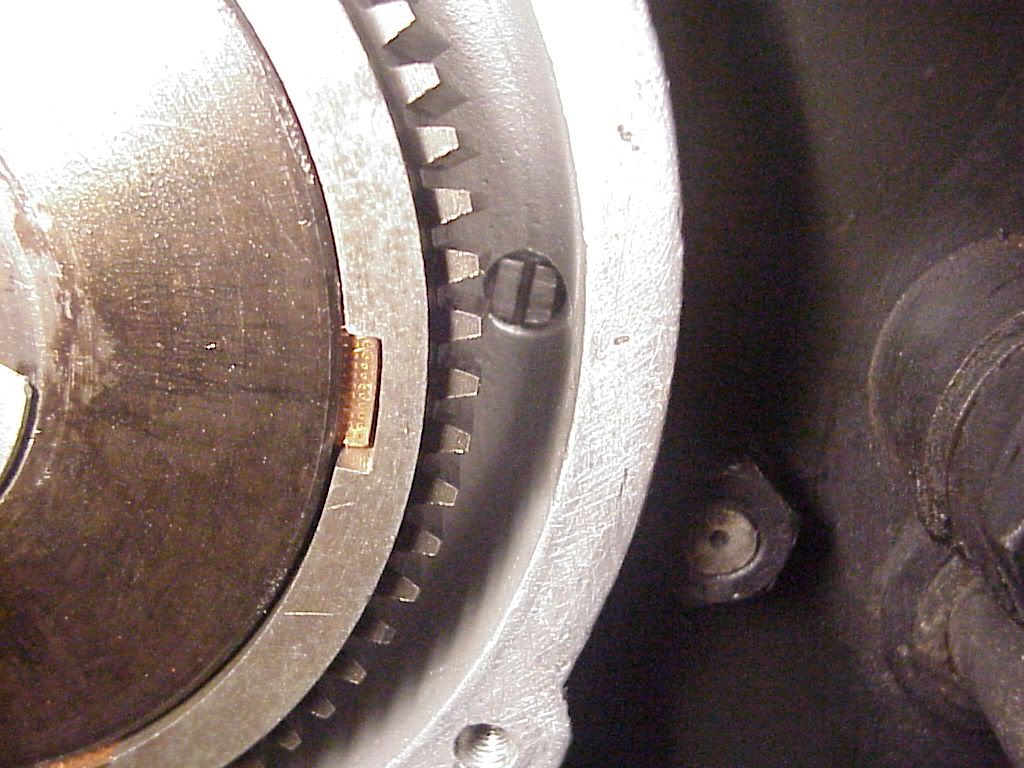
Guzzi didn't want to waste this oil mist, so there is also a crossing passage which goes from the clutch chamber back to the right side in the vicinity of the chain drive sprocket. Some of the oil mist works its way out over here and drips onto the chain as an automatic oiler. Clever, but messy. Many of us plug that cross passage to reduce the mess and we then relay on modern chain sprays. You can see my plug here.
Warm, thin, clean oil is a very nice substance to put onto the clutch plates. It lubricates everything for smooth action and minimizes wear. However, cold, dirty oil acts more like a glue than a lubricant and prevents free action of the plates. The various clutch pieces all bind together and fail to slip as intended. It can become very noisy to shift gears, especially down into first gear. The noise also produces damage to the tips of the gear teeth. The COMPLETE CURE is to fully disassemble the entire clutch package and clean all the parts to new condition.
The INTERMEDIATE MAINTENANCE solution is the BATHE the clutch parts to remove any oil or dirt or wear material and restore original action. Here is the procedure. It will be a VERY messy job so protect your
floor and be prepared for hazardous disposals.
First, at the lower rear curve of the clutch cover plate, there will be a small, slotted screw-plug. Remove that to drain away all of the condensed puddle of oil. Here is the drain plug at the lower rear of the clutch cover.
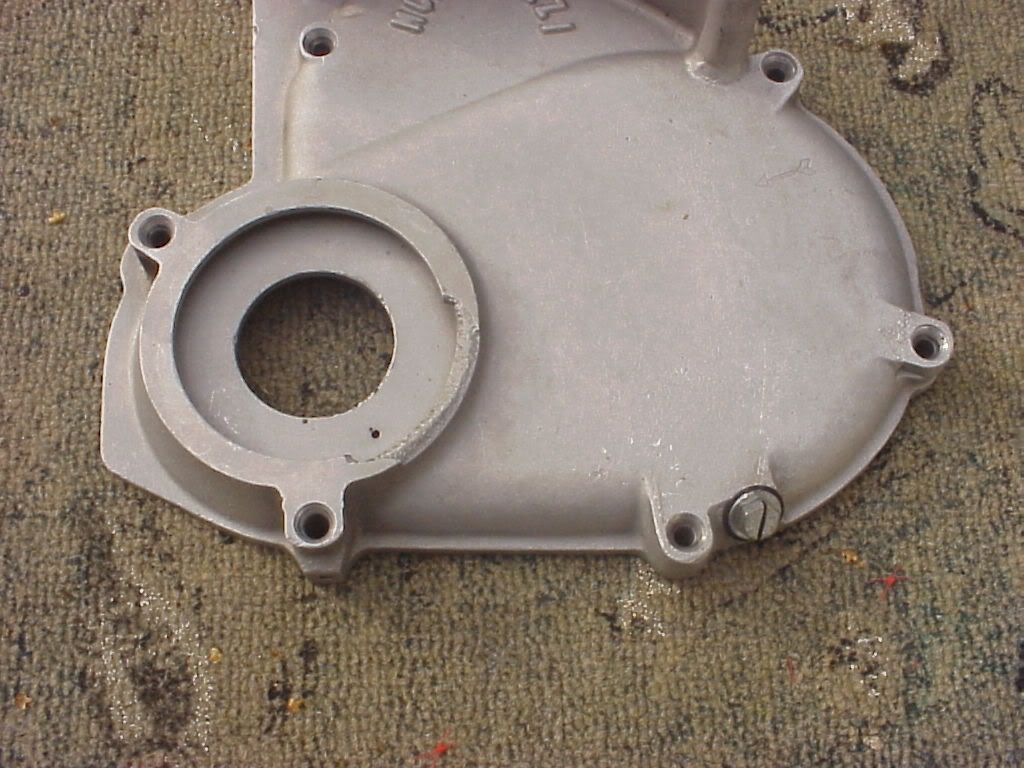
Flipping the cover over, you may be able to see the interior tip of this drain plug at the lower left.
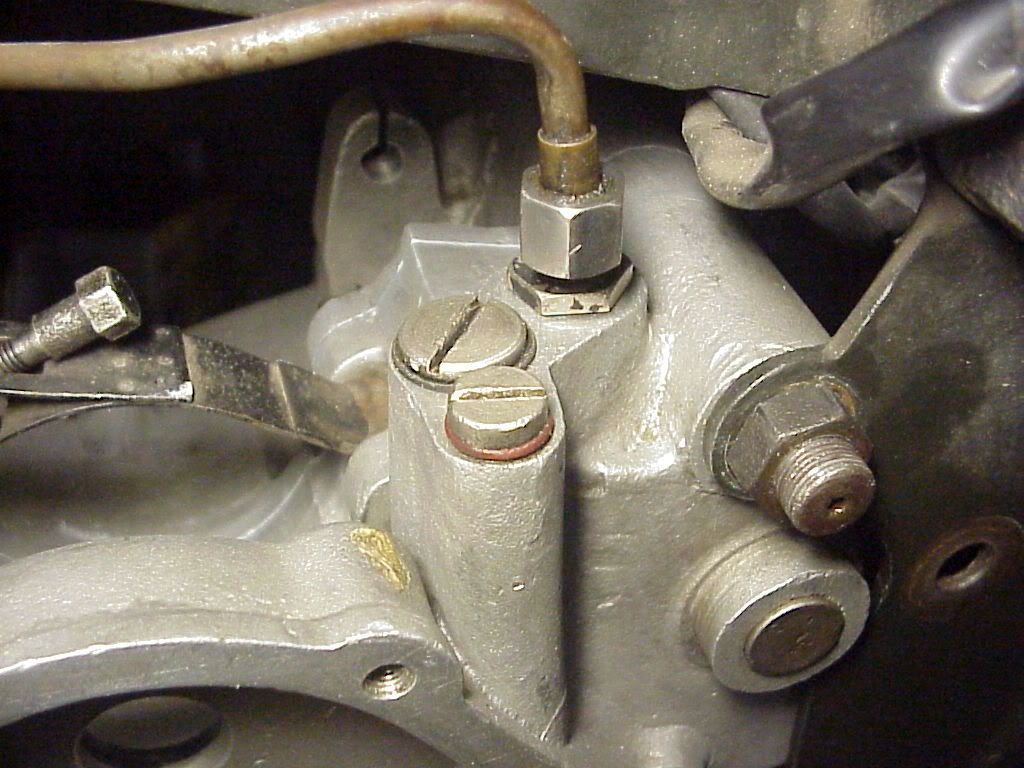
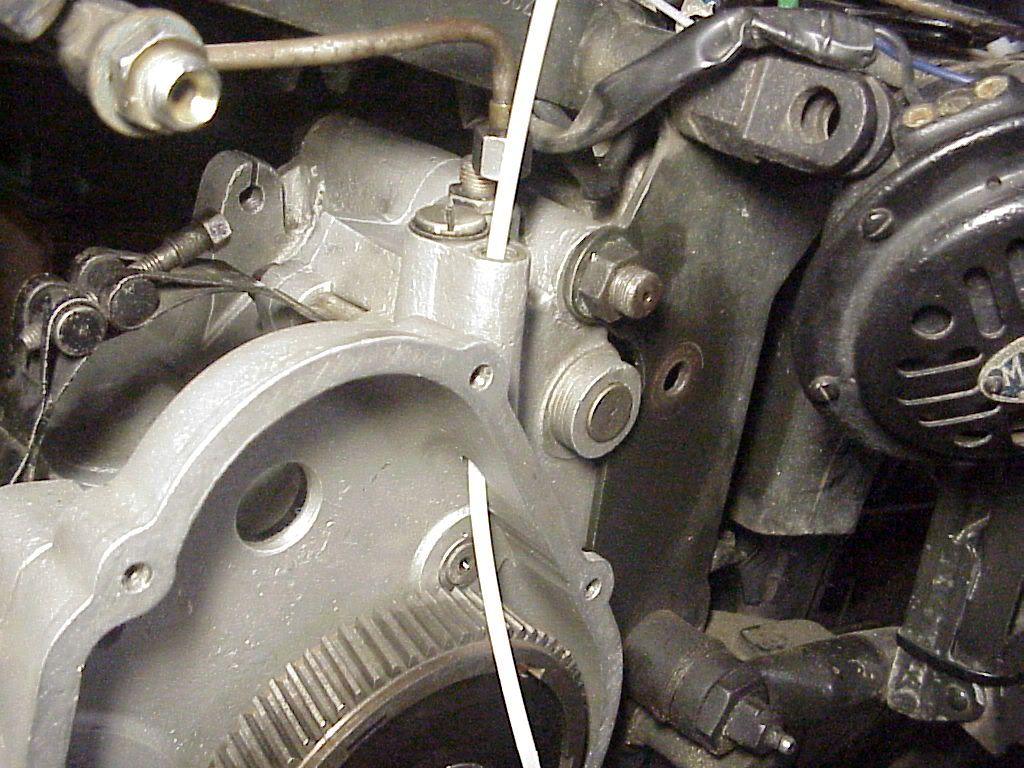
Second, at the top of the left side crankcase you will find an engine breather tube which returns crankcase pressure and oil mist back to the oil reservoir tank. Adjacent to that breather tube is a slotted plug which leads directly to the clutch chamber below.
(the zip tie is in place just to demonstrate the oil passage route)
Third, introduce a pint of 'paint thinner' into the clutch chamber via the upper plug. If you put too much, it will simply run out the opening behind the flywheel.
CAUTION: In America, paint thinner is also known as mineral spirits. It is a good solvent, but not particularly volatile or harsh to painted surfaces. In Europe however, the term 'paint thinner' refers to something Americans call lacquer thinner. This latter material is highly flammable and an instant paint remover and should NOT be used for this cleaning purpose. In a pinch, you can use gasoline.
Fourth, push the kickstarter repeatedly. While doing so, pull on the clutch handle slightly so that the engine does not turn over but the kickstarter does go through full throw. In this way, the kickstarter will be rotating the inner body and steel plates, while engine compression will be holding back the external body and bronze plates.
The paint thinner will remove oil, grime, and wear contaminants from the clutch parts and drop them into the bottom of the clutch chamber cover. Do this kicking and feathering for several minutes.
Fifth, remove the plug at the rear lower corner of the clutch cover and drain away the contaminated paint thinner. Although dirty, it might be useful for other rough part washing tasks around your shop. Let it settle for a week so you can decant the liquid off of the settled sludge.
Sixth, repeat steps three through five, perhaps a total of three rinse cycles.
Seventh, clean up your mess and go for a ride. It will likely be several months or a year before you need to repeat this procedure depending on your miles driven.
As a TEMPORARY AID before you have an opportunity to perform the more involved bathing or disassembly tasks you can assist the releasing of the cold clutch plates. You will generally find that shifting from neutral into second gear is a lot easier than shifting down into first. So, on a cold started motor, shift into second. Gently rev the motor slightly, and, while holding the hand or foot brake, feather release the clutch handle a few times so that you force a slippage of the plates several times. Do this almost to the point of stalling the motor. This will quickly heat the oil film which is binding the plates and the underlying components. You may now be able to return to idle and more quietly shift into first gear.
Patrick Hayes
Fremont CA
SuperAlce and Falcone-NT
The Guzzi-Single clutch is composed of a stacked sandwich of 5 steel and 5 bronze plates. The steel plates are connected in their center to the clutch fixed body hub on the primary shaft of the transmission. The bronze plates are connected at their perimeter to the gear-like outer body basket. There may be one or two friction material rings installed at the base of this stack as well. The outer body basket may run on a continuous core bushing or it may have a packet of loose rollers. All of these options depend on which model and year you have, but the multi-plate design and basic operation are all the same.
Here are pictures of a used plate stack and a fresh stack already installed into my SuperAlce.
When the clutch is bound by its spring, the stack of plates and all of the clutch components rotate as an intact, unit mass. When you pull on the clutch handle, the spring pressure is countered or relieved and the various pieces are released and allowed to move independently. In theory, the stacked sandwich parts should all slip smoothly over each otther so that the outer body remains spinning with the motor, while the inner body remains stationary. This allows you to remain in gear with the engine running.
In addition to these parts, there is a small passage at the top of the crankcase which allows for a fine mist of air and engine oil to pass from the crankcase chamber to the exterior clutch chamber.
(the zip tie is in place just to demonstrate the oil passage route)
This mist of oil lubricates all the parts in the clutch chamber, including the plates, and eventually condenses into a puddle in the clutch chamber. It is a total loss system. There is no way for this oil to get back into the engine case. Eventually, this condensed puddle grows to the level that the bottom of the clutch parts are sitting in a pool of oil and any further excess starts to leak out behind the flywheel where the crankshaft passes through the clutch chamber. There is no seal for this passage. This blue tape represents the maximum depth of oil puddle within the clutch chamber before it will simply pour out the crankshaft hole.
Guzzi didn't want to waste this oil mist, so there is also a crossing passage which goes from the clutch chamber back to the right side in the vicinity of the chain drive sprocket. Some of the oil mist works its way out over here and drips onto the chain as an automatic oiler. Clever, but messy. Many of us plug that cross passage to reduce the mess and we then relay on modern chain sprays. You can see my plug here.
Warm, thin, clean oil is a very nice substance to put onto the clutch plates. It lubricates everything for smooth action and minimizes wear. However, cold, dirty oil acts more like a glue than a lubricant and prevents free action of the plates. The various clutch pieces all bind together and fail to slip as intended. It can become very noisy to shift gears, especially down into first gear. The noise also produces damage to the tips of the gear teeth. The COMPLETE CURE is to fully disassemble the entire clutch package and clean all the parts to new condition.
The INTERMEDIATE MAINTENANCE solution is the BATHE the clutch parts to remove any oil or dirt or wear material and restore original action. Here is the procedure. It will be a VERY messy job so protect your
floor and be prepared for hazardous disposals.
First, at the lower rear curve of the clutch cover plate, there will be a small, slotted screw-plug. Remove that to drain away all of the condensed puddle of oil. Here is the drain plug at the lower rear of the clutch cover.
Flipping the cover over, you may be able to see the interior tip of this drain plug at the lower left.
Second, at the top of the left side crankcase you will find an engine breather tube which returns crankcase pressure and oil mist back to the oil reservoir tank. Adjacent to that breather tube is a slotted plug which leads directly to the clutch chamber below.
(the zip tie is in place just to demonstrate the oil passage route)
Third, introduce a pint of 'paint thinner' into the clutch chamber via the upper plug. If you put too much, it will simply run out the opening behind the flywheel.
CAUTION: In America, paint thinner is also known as mineral spirits. It is a good solvent, but not particularly volatile or harsh to painted surfaces. In Europe however, the term 'paint thinner' refers to something Americans call lacquer thinner. This latter material is highly flammable and an instant paint remover and should NOT be used for this cleaning purpose. In a pinch, you can use gasoline.
Fourth, push the kickstarter repeatedly. While doing so, pull on the clutch handle slightly so that the engine does not turn over but the kickstarter does go through full throw. In this way, the kickstarter will be rotating the inner body and steel plates, while engine compression will be holding back the external body and bronze plates.
The paint thinner will remove oil, grime, and wear contaminants from the clutch parts and drop them into the bottom of the clutch chamber cover. Do this kicking and feathering for several minutes.
Fifth, remove the plug at the rear lower corner of the clutch cover and drain away the contaminated paint thinner. Although dirty, it might be useful for other rough part washing tasks around your shop. Let it settle for a week so you can decant the liquid off of the settled sludge.
Sixth, repeat steps three through five, perhaps a total of three rinse cycles.
Seventh, clean up your mess and go for a ride. It will likely be several months or a year before you need to repeat this procedure depending on your miles driven.
As a TEMPORARY AID before you have an opportunity to perform the more involved bathing or disassembly tasks you can assist the releasing of the cold clutch plates. You will generally find that shifting from neutral into second gear is a lot easier than shifting down into first. So, on a cold started motor, shift into second. Gently rev the motor slightly, and, while holding the hand or foot brake, feather release the clutch handle a few times so that you force a slippage of the plates several times. Do this almost to the point of stalling the motor. This will quickly heat the oil film which is binding the plates and the underlying components. You may now be able to return to idle and more quietly shift into first gear.
Patrick Hayes
Fremont CA
SuperAlce and Falcone-NT