• Ciao Guest - You’ve landed at the ultimate Guzzi site. NEW FORUM REGISTRATIONS REQUIRE EMAIL ACTIVATION - CHECK YOUR SPAM FOLDER - Use the CONTACT above if you need help. New to the forum? For all new members, we require ONE post in the Introductions section at the bottom, in order to post in most of the other sections. ALWAYS TRY A SEARCH BEFORE STARTING A NEW TOPIC - Most questions you may have, have likely been already answered. DON'T BE A DRIVE-BY POSTER: As a common courtesy, check back in and reply within 24 hours, or your post will be deleted. Note there's decades of heavily experienced Guzzi professionals on this site, all whom happily give endless amounts of their VALUABLE time for free; BE COURTEOUS AND RESPECTFUL!
  • There is ZERO tolerance on personal attacks and ANY HYPERLINKS to PRODUCT(S) or other competing website(s), including personal pages, social media or other Forums. This ALSO INCLUDES ECU DIAGnostic software, questions and mapping. We work very hard to offer commercially supported products and to keep info relevant here. First offense is a note, second is a warning, third time will get you banned from the site. We don't have the time to chase repeat (and ignorant) offenders. This is NOT a social media platform; It's an ad-free, privately funded website, in small help with user donations. Be sure to see the GTM STORE link above; ALL product purchases help support the site, or you can upgrade your Forum profile or DONATE via the link above.
  • Be sure to see the GTM STORE link also above for our 700+ product inventory, including OEM parts and many of our 100% Made-in-SoCal-USA GTM products and engine kits. In SoCal? Click the SERVICE tab above for the best in service, tires, tuning and installation of our products or custom work, and don't miss our GT MotoCycles® (not) art on the BUILDS tab above. WE'RE HERE ONLINE ONLY - NO PHONE CALLS MADE OR RECEIVED - DO NOT EMAIL AND ASK QUESTIONS OR ASK TO CALL YOU.
  • Like the new V100, GuzziTech is full throttle into the future! We're now running on an all-new server and we've updated our Forum software. The visual differences are obvious, but hopefully you'll notice the super-fast speed. If you notice any glitches or have any issues, please post on the Site Support section at the bottom. If you haven't yet, please upgrade your account which is covered in the Site Support section or via the DONATE tab above, which gives you full site access including the DOWNLOADS section. We really appreciate every $ and your support to keep this site ad-free. Create an account, sign in, upgrade your account, and enjoy. See you on the road in 2024.

Looking for info about "Lowering" the Exhaust Can for 2013 Stelvio

Road Damage

Tuned and Synch'ed
GT Contributor
Joined
Feb 1, 2022
Messages
29
Location
Northwest Colorado
Hello all,

I'm looking to remove/replace my OEM exhaust can with something lighter, and then mount it in a lower position.
I checked/read lots of aftermarket exhaust can information on the site, but didn't find anything pertaining to what I'd like to do.

So I thought I'd ask the collective: Have any of you lowered your Stelvio exhaust can position?
As it sits, the exhaust exits above the pannier rack mount, and I'd like for it to exit BELOW the pannier rack mount.
If you've done this modification, please tell me about what you did, what you learned, what exhaust can you used, etc.

Here's WHY I'd like to do this:
I've currently got the SW Motech mounts with Micatech boxes fitted.
I've fabbed up a few aluminum plates to fit on the "inside" of the pannier mounts as carriers for tool tubes. (they're plenty strong and WAY lighter than the stainless steel ones) Ideally I'd like to mount an aluminum tool box on BOTH of the pannier mounts. That's why I'd like to lower the exhaust, as it's now in the way of the left tool box. If I can do this, then I can carry my full tool kit, tire pump, tire plugging kit, battery rescue pack, a few spare parts, zip ties, tape, etc. ALL in the tool boxes .......... and NOT have to off-road ride the bike with the panniers mounted.

Thanks for any help or advice.
RD
 
Last edited:
I'm new to attaching pictures on this site, but I'll give it a go.
Old dog, new trick .......... right! :nod:
Here you go DeadEye.

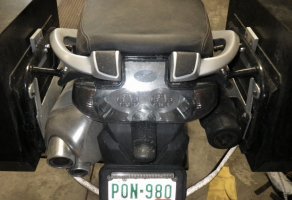
Below is what the rear of the bike currently looks like.
Those are MicaTech panniers on SW Motech racks ............ it's the spool system that allows the 4 different pannier mounting positions.
I fabbed up the aluminum plates on the inside of each SW-M rack from a stainless steel pattern.
They're secured to the racks with the same bolts that hold the pannier mounts, so easy-peasy.
As you can see the right side has a plastic tool tube mounted to my aluminum plate.
The left side has the aluminum plate mounted, but the exhaust gets in the way of what would otherwise be usable space.
So that's what I'm wanting to change.
See the mounting bar that goes behind the license plate? I'd like for the lowered exhaust to be just below that bar.

Fullsizeoutput f67

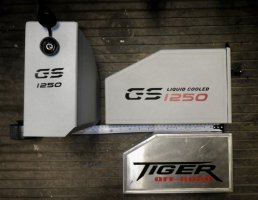
I found a pair of these lightweight aluminum locking tool boxes for about $49 each. (below)
They're 12" long, 7 1/4" tall, and 3" wide and they weigh about 2 lbs each.
They're surprisingly nice/well made to be so affordable. I've seen cheesy plastic tool boxes selling for almost 3 times the price.
I put a smaller/heavier/older stainless steel toolbox in the picture for reference/scale.


Fullsizeoutput f64

So I'd like to lower the exhaust can below that pannier rack support bar that goes behind the license plate.
That would allow me to mount one of these tool boxes on the backside of each pannier rack. It'll provide LOTS of secure/lockable storage space so that my pannier space isn't taken up by tools/supplies.
I could carry everything I'd need for a nice long day ride in my tool boxes and my tank bag.
Then I could leave the panniers at home.

Fullsizeoutput f65

It'll be nice to do something different as I'm starting to sorta despise these plastic tool tubes. LOL
They're difficult to truly make secure, and they're cheaply made so it takes some futzing around to make them waterproof.
These locking tool boxes are going to work so much better for my uses, and they're going to be very simple to mount.

Fullsizeoutput f6c

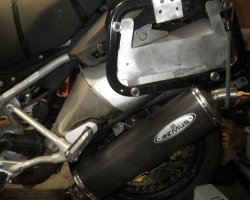
I've just got this CF Remus can "propped up" underneath the OEM Stelvio can in the above pic.
But it gives an idea about what I was thinking of doing ............. mounting a new can that routes under the back of the pannier rack. I'm thinking a trip to the local muffler shop for a custom bent connector and then fabbing up a new hanger strap out of some aluminum bar stock and that should all work with a little tweaking here and there.
BTW, that Remus CF can weighs in at 6.5 lbs, and the OEM can is supposed to be 17+ lbs.

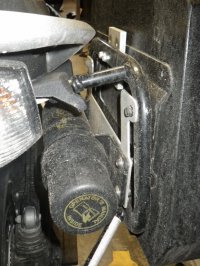
In the picture just above you can also see where I fabbed up an adjustable locking system for the panniers too. It's the square piece of aluminum that you can see mounted at the top if the SW Motech rack. I threaded each hole so I can easily secure each pannier in any of it's 4 possible routing positions with the thumb screw ......... fore/aft/up/down.
I like it much better and it's stone hammer simple. It's 3/8" thick 6061 aluminum.
I'll eventually cut those down in size and round over the corners for a smoother look.

So have any of you guys ever done a lowering modification like this to your Stelvio exhaust canister?
Any new ideas out there or do you folks see something that I'm possibly overlooking?
Thanks for any and all advice!
Holler with any questions.
RD
 
Ok, a picture is worth even more with the accompanying words :)
”I guess” you could get /make an adapter to change the angle at which the can connects to the existing “header pipe” then fabricate a bracket/hanger to attach/support the exhaust in the new spot ?

Does the existing header have the up sweep as part of the pipe or is it two separate pieces ?
Either way you could cut the pipe at the angle you need to get the “appropriate“ angle for the muffler placement…
 
Last edited:
Yep, that's pretty much what I was planning on doing.
I was sorta hoping that someone on here had done something similar and had some sage advice for me.

I did a similar thing on a couple of different GSAs that I used those Jesse Safari bags on. If you lowered the exhaust can, then you could use 2 full size boxes and not have to deal with the pannier that had the annoying "muffler cutout". And as luck would have it, Jesse provided the exhaust connector that had the exact perfect bend in it!

I was hoping for some similar luck with the Stelvio exhaust!
 
page50image67560

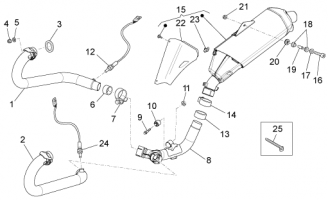
To answer your previous question DeadEye: It looks like from the drawing that there's a lot of upsweep on that OEM mid pipe.
It's actually hard to see on the bike as it's all covered/protected/obscured by the heat shield (part #22).
And it's actually 3 different pieces to make what I'd consider to be the complete header.

Ideally I'd like to keep part #8 (mid pipe collector?) intact and unmolested for an easy return to OEM condition.
So I'll need a muffler shop to fab me up a short curved piece to "connect the dots" from the mid pipe to the Remus Can.
That Remus CF can is so danged light that it probably won't need a real heavy hanger to support it well.
It's looking like I'll probably use something like a piece of 1/4" x 2" aluminum for that.
 
Please realize that if you change the exhaust can on the Stelvio NTX, you will need a fueling solution, like the PC-V and AT 300 setup in the store, in order to make the motorcycle run properly.

Otherwise the motorcycle is going to run poorly and snap crackle pop on all deceleration and sometimes on acceleration too.
 
Hey All,

"Snap, crackle, & pop!"
Then it'll sound just like my knees, back, hips, shoulders, etc. :mm:

So I've got an exhaust question for you guys.
Is backpressure essentially the only change that happens when swapping exhaust canisters/mufflers?

If so ............ why don't aftermarket exhaust manufacturers and the bike manufacturers test for & publish their relative back pressures for their bikes/products. Seems that it would be a real simple "X-flow @ X-pressure value? Then maybe offer a few options of db killers/inserts that give different back pressures. Seems that it could be so much simpler ordering the right back pressure insert, than remapping, refueling, and changing computer engine parameters.
Seems that there might be some marketing/engine tuning opportunities being missed.
Or am I terribly oversimplifying a backpressure issue that I know little about?

And I've gotten no further on my Stelvio exhaust/tool box changes.
I've been riding it, instead of working on it ................. and all my recent wrenching has been on the GSA prepping it to sell.

Thanks!
RD
 
No, everything changes.

Exhaust gas flow IS NOT like water out of a garden hose. It is not a constant pressure.

It is a oscillating wave, like a sine wave. It has a “pulse” to it.

Back pressure is just one aspect. Flow, pressure, density, heat, mixture, literally everything.

That is why people like Todd spend hours and days and weeks on dynos measuring and testing and tweaking. It’s 60% science and 40% art form.

Tuning fueling to an exhaust, is not “wham bam thank you ma’am” and your done.

I’m sorry but your layman’s assumptions are completely wrong.

It’s not a simple thing at all.
 
Back
Top