• Ciao Guest - You’ve landed at the ultimate Guzzi site. NEW FORUM REGISTRATIONS REQUIRE EMAIL ACTIVATION - CHECK YOUR SPAM FOLDER - Use the CONTACT above if you need help. New to the forum? For all new members, we require ONE post in the Introductions section at the bottom, in order to post in most of the other sections. ALWAYS TRY A SEARCH BEFORE STARTING A NEW TOPIC - Most questions you may have, have likely been already answered. DON'T BE A DRIVE-BY POSTER: As a common courtesy, check back in and reply within 24 hours, or your post will be deleted. Note there's decades of heavily experienced Guzzi professionals on this site, all whom happily give endless amounts of their VALUABLE time for free; BE COURTEOUS AND RESPECTFUL!
  • There is ZERO tolerance on personal attacks and ANY HYPERLINKS to PRODUCT(S) or other competing website(s), including personal pages, social media or other Forums. This ALSO INCLUDES ECU DIAGnostic software, questions and mapping. We work very hard to offer commercially supported products and to keep info relevant here. First offense is a note, second is a warning, third time will get you banned from the site. We don't have the time to chase repeat (and ignorant) offenders. This is NOT a social media platform; It's an ad-free, privately funded website, in small help with user donations. Be sure to see the GTM STORE link above; ALL product purchases help support the site, or you can upgrade your Forum profile or DONATE via the link above.
  • Be sure to see the GTM STORE link also above for our 700+ product inventory, including OEM parts and many of our 100% Made-in-SoCal-USA GTM products and engine kits. In SoCal? Click the SERVICE tab above for the best in service, tires, tuning and installation of our products or custom work, and don't miss our GT MotoCycles® (not) art on the BUILDS tab above. WE'RE HERE ONLINE ONLY - NO PHONE CALLS MADE OR RECEIVED - DO NOT EMAIL AND ASK QUESTIONS OR ASK TO CALL YOU.
  • Like the new V100, GuzziTech is full throttle into the future! We're now running on an all-new server and we've updated our Forum software. The visual differences are obvious, but hopefully you'll notice the super-fast speed. If you notice any glitches or have any issues, please post on the Site Support section at the bottom. If you haven't yet, please upgrade your account which is covered in the Site Support section or via the DONATE tab above, which gives you full site access including the DOWNLOADS section. We really appreciate every $ and your support to keep this site ad-free. Create an account, sign in, upgrade your account, and enjoy. See you on the road in 2024.

Missing Stelvio fairing fastener?

Razooki

Just got it firing!
Joined
May 4, 2020
Messages
3
Location
Toronto, Canada
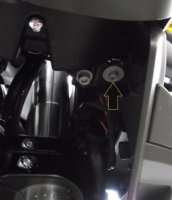
Hello Stelvio collective. In the process of re installing the fairing on my bike after converting to LED bulbs I realized that both my side farirings are missing some kind of fasterners to attach them to the front frame bracket (or at least I think so). I have contacted my local Guzzi dealer twice but to no avail and scouring the internet parts diagrams has proven unsuccessful. I'm wondering if indeed I am missing a couple of fasteners or not. The image I posted was taken looking up from the front. Stelvio side fairing attachment

thanks as always,

Raz
 
Set your fairing in place. If there is a corresponding hole in the body work then you need screws. They are probably M5X15. Nor sure of the pitch but that is what I see in a Stelvio parts break out. GU98710215
 
I agree, unfortunately when the fairing is set it sits under that metal almost circle and there's no way to attach the fairing to an emty hole. To me it almost looks as if there is some sort of gromet missing for that hole....
 
Nothing goes in the broken circle hole. It’s a pass-thru for the retaining bolt. It’s cut out like that so that you can loosen but not remove the front bolt from the side panel tab, and slide it towards the front of the motorcycle for easy removal.

The side panel is held on by three different mounting points - the rear which you must remove the nut and washers from the stem coming out under the tank, the middle which must be removed and is dead center in the bottom of the side-panel going horizontal into the frame mount, and this front half-circle which you loosen the bolt and the side-panel slides forward and comes out.

You have the panel incorrectly installed! Simple misalignment. You’re so close you just don’t see it.

Look at your photo here. You need to get the side-panel tab with its clup-nut, ON TOP of that half-hole.

6540A6D3 5628 4CE0 9E81 DC70B8EC24E5

The side panel uses a bolt and large washer that goes from the bottom of the panel, thru that half-hole and up into that silver nut clip on the side panel tab, which you need to reposition so that it it on the TOP SIDE of that hole. Remove the side panel and realign it so that tab is on top of the half-hole, not beside and under it like you have it.

STOP! DO NOT TRY AND BEND AND FORCE IT INTO POSITION! YOU WILL SNAP THE SIDE-PANEL MOUNTING TAB. YOU MUST REMOVE ALL 3 RETAINING SCREWS AND REPOSITION IT CORRECTLY AS YOU INSTALL IT.

Then when you install the bolt and washer, it passes thru the hole, going into the nut clip, pulls the whole side panel mounting tab tight against the whole metal frame mounting bracket.


089B22C8 CF7F 4304 887C 7FFCA9228354


There are complete instructions and photos of the bodywork removal on a brand new 2012 Stelvio in the PDF I made way back when...

https://www.guzzitech.com/forums/threads/charcoal-canister-removal-detailed-with-pictures.9202/

Good Luck.
 
Last edited:
Back
Top