• Ciao Guest - You’ve landed at the ultimate Guzzi site. NEW FORUM REGISTRATIONS REQUIRE EMAIL ACTIVATION - CHECK YOUR SPAM FOLDER - Use the CONTACT above if you need help. New to the forum? For all new members, we require ONE post in the Introductions section at the bottom, in order to post in most of the other sections. ALWAYS TRY A SEARCH BEFORE STARTING A NEW TOPIC - Most questions you may have, have likely been already answered. DON'T BE A DRIVE-BY POSTER: As a common courtesy, check back in and reply within 24 hours, or your post will be deleted. Note there's decades of heavily experienced Guzzi professionals on this site, all whom happily give endless amounts of their VALUABLE time for free; BE COURTEOUS AND RESPECTFUL!
  • There is ZERO tolerance on personal attacks and ANY HYPERLINKS to PRODUCT(S) or other competing website(s), including personal pages, social media or other Forums. This ALSO INCLUDES ECU DIAGnostic software, questions and mapping. We work very hard to offer commercially supported products and to keep info relevant here. First offense is a note, second is a warning, third time will get you banned from the site. We don't have the time to chase repeat (and ignorant) offenders. This is NOT a social media platform; It's an ad-free, privately funded website, in small help with user donations. Be sure to see the GTM STORE link above; ALL product purchases help support the site, or you can upgrade your Forum profile or DONATE via the link above.
  • Be sure to see the GTM STORE link also above for our 700+ product inventory, including OEM parts and many of our 100% Made-in-SoCal-USA GTM products and engine kits. In SoCal? Click the SERVICE tab above for the best in service, tires, tuning and installation of our products or custom work, and don't miss our GT MotoCycles® (not) art on the BUILDS tab above. WE'RE HERE ONLINE ONLY - NO PHONE CALLS MADE OR RECEIVED - DO NOT EMAIL AND ASK QUESTIONS OR ASK TO CALL YOU.
  • Like the new V100, GuzziTech is full throttle into the future! We're now running on an all-new server and we've updated our Forum software. The visual differences are obvious, but hopefully you'll notice the super-fast speed. If you notice any glitches or have any issues, please post on the Site Support section at the bottom. If you haven't yet, please upgrade your account which is covered in the Site Support section or via the DONATE tab above, which gives you full site access including the DOWNLOADS section. We really appreciate every $ and your support to keep this site ad-free. Create an account, sign in, upgrade your account, and enjoy. See you on the road in 2024.

Monoshock removal

GTM®

Administrator
Staff member
GT di Razza Pura
Joined
Jul 1, 2009
Messages
15,135
Location
Malibu
How-to for rear shock removal on a Breva 1100, Norge or Sport 1200. Secure/support bike for removal;

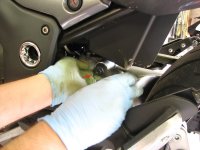
1. Turn the adjuster fully in (clockwise), and remove the adjuster knob. Careful of the spring and ball as arrowed below:
BNS Mono Remove1

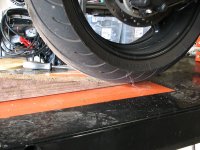
2. After securing the bike (center stand or lift), use a wedge shaped board or eq. to take some of the pressure off the shock linkage.
BNS Mono Remove2

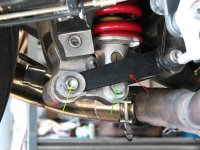
3. Bottom shock linkage removal. Yellow arrow first, swing linkage (fork - red arrow)) out of the way, and remove the bottom shock bolt (green arrow).
BNS Mono Remove3

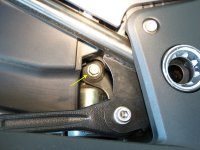
4. Next remove the top shock bolt below:
BNS Mono Remove4

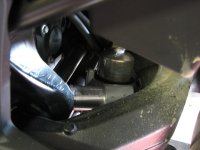
5. Align the shock preload adjuster to match the 'V' of the swing arm, and gently lift the wheel/swing arm and it will drop out the bottom (have a hand on it to catch it).
BNS Mono Remove5

6. Re-installation is of course opposite of above. Move the wheel/swing-arm to allow ease of bolt installation. You should not have to beat anything back in, when aligned by moving the swing-arm/wheel, everything will slide in by fingers only. Also, now would be a good time to grease the bearings including the swing arm bearings. They are notoriously lacking in grease from the factory.
 
GrahamNZ said:
Thanks Todd. That's great to have posted. Have you ever had to drill off the preload knob's retaining screw? Hopefully mine was a rare example.
My pleasure, and yes, but only one of ~6, so far. I have two more to do this weekend.
 
I took my shock off last week to change the spring for Todd's uprated Hyperpro one, if you get the angle of the swingarm right it just falls out, dead easy. :)

Todd do you have any suggestions for settings on spring pre load, I'm keeping the damping at 11 clicks and have already fitted Hyperpro fork springs.
I'm 15 stone and ride mostly solo.

I'm amazed at how clean your bike is in the pics, mine is covered in crap after an english winter, with plenty of surface rust on the top of the shock.
Those Californian winters must be hell.... :lol:
 
Todd

Removal went like a bought one. About a 10 minute procedure. Only thing I'd add is that to withdraw the top mounting bolt from the suspension unit's eye it helps to use a magnetic picker or a wire hook once the bolt is free of the thread in the frame lug.

While the suspender was out I took the opportunity to remove the bottom linkages and grease the needle rollers and seals again. Last done two years ago and really not needed this time as everything was perfect.

More later once the unit has been upgraded. Apparently some units have been assembled with internal parts the wrong way around, leading to shocking compression damping response.
 
My bike has cost over£1000 in oil leaks gearbox seal carc input seal. Whilst it was in the dealer said it needed new needle bearings in the triangular linkage marked yellow/green in above pics were pitted and corroded . He said he didn't know how it passed its mot. I reminded him he did the mot 6 weeks previous when he did the gearbox seal. Anyway he said they change the whole triangular block cos its to labour intensive to change the bearings.
 
Well nel that sounds like a real tale of woes. Sorry to hear it. Forum member BeBe had issues with his bike's rear suspension linkage so it may be worth sending him a PM about it. As I recall there was no troublesome play nor any lube issue, it was just that the inspector wasn't checking things correctly.

To feel for up/down play - the play that matters - the testing method is with the bike on the centrestand is to reach across the seat and lift the rear wheel up and let it down a few times so that any linkage play will be felt as freeplay. The forked linkage arm which attaches at the front to the frame lug is made to be able to move laterally a bit for alignment purposes and sidesways movement there shouldn't be mistaken for troublesome play.

Pitting of the needle rollers is a bad thing of course and is a sign on such young bikes of poor lubrication on assembly, missing seals at each end of the bearings, or a lot of water (and salt in some countries) being flung over the linkage. I've fitted a protective flexible flap to reduce the amount of muck reaching the linkage and shock, and here salting of roads isn't widespread.

If pitting ot the needle rollers and inner spacers was present I'd just remove the seals and press out the bearings and then replace the parts rather than buy a whole linkage. The bearings and seals don't look special to me. Just the same, removing the linkage and re-greasing the bearings and seals every year or two is no big deal - probably an hour's work. My 97 Triumph Trophy was fitted with grease nipples which were charged at each 10,000km service. Now there was a good idea!
 
londonrob said:
Todd do you have any suggestions for settings on spring pre load, I'm keeping the damping at 11 clicks and have already fitted Hyperpro fork springs. I'm 15 stone and ride mostly solo.
I'm amazed at how clean your bike is in the pics, mine is covered in crap after an english winter, with plenty of surface rust on the top of the shock. Those Californian winters must be hell.... :lol:
For the rear shock? If yes, it's spec'ed in the instructions. Yes, our Winter's can be a real burden with horrid "rain" (light showers most often)... then we get a lovely 4-7 months of warm sunshine. :pinch:

GrahamNZ said:
Only thing I'd add is that to withdraw the top mounting bolt from the suspension unit's eye it helps to use a magnetic picker or a wire hook once the bolt is free of the thread in the frame lug.
Thanks and done!
 
One further refinement. The detent ball for the preload adjuster is at about 11.30 O'clock, so putting your hand there and following the knob as it's removed should have the ball caught rather than bounce along the floor. Similarly, holding the ball in place with a finger when refitting the knob gets everything in place nicely.
 
Graham, thanks again. Bob, assuming he means the OEM shock, which is believable based on some of the horrible action of most of them. I've had *zero* issues with the HP units. Graham, please expand.
 
Yes it's the OEM Sachs unit I'm referring to. The NZ suspension Guru has come across several Sachs units on Aprilias (and our Guzzis are effectively Aprilias) where the damping piston had been fitted the wrong way around. As You know, a unit with bad compression response can easily give the effect of spring bottoming. BTW at the "Standard" preload setting my Breva has 10mm unladen sag, (7% of axle range) which does not indicate that the spring is too light for the bike's weight. Maybe with a large rider, pillion and luggage it may be of course.

(Post split to new thread, Re: Rear suspension upgrade for my Breva 11 -- Ed. - Todd)
 
Probably obvious, but refitting is best done in reverse. Ie. Fit the top eye bolt once the bottom has been refixed and the linkage reconnected.

Refitting the preload knob detent spring and ball - grease the spring and ball and fit in place. Hold the ball in place with a finger as the knob is pushed over the ball.
 
Using the method illustrated in this photo I can remove and refit the unit by myself - 10 minutes out and 12 minutes in. All work apart from actual removal and re-insertion of the suspension unit into the bike can be done from the right hand side. The wood chock is "just in case" and isn't really necessary as the bike is very stable on the centrestand, especially with the weight of the rear wheel/arm/CARC carried by the jack. The arm needs to be raised to about 90 degrees relative to the suspension unit when being removed and re-inserted as per Todd's photo.
RemovingBrevasrearsuspensionunit.jpg
 
GrahamNZ said:
Using the method illustrated in this photo I can remove and refit the unit by myself - 10 minutes out and 12 minutes in. All work apart from actual removal and re-insertion of the suspension unit into the bike can be done from the right hand side. The wood chock is "just in case" and isn't really necessary as the bike is very stable on the centrestand, especially with the weight of the rear wheel/arm/CARC carried by the jack. The arm needs to be raised to about 90 degrees relative to the suspension unit when being removed and re-inserted as per Todd's photo.
RemovingBrevasrearsuspensionunit.jpg

Graham

I was suspicious as soon as I noticed a lack of a 4lb hammer in the required tools. :lol: .. but started anyway. Knob off (ball went sideways out of the right side of the bike avoiding all attempt to catch it in hand or container...), nut off the linkage bolt, cant get this bolt to free up even when i place wife on bike and jack the rear ... all i'm doing is jacking the bike off the centrestand ... could the linkage be siezed up ?

Art
 
Graham

OK so I decided to investigate further what was happening when I was jacking the CARC?

Took the bike off the centrestand. Onto the sidestand and its obvious the linkage is moving just by loading the seat a little . Mmm. Tried looking for the expected sweet spot where the bolt is free to move and lo and behold i can find it without jacking the CARC, just by loading the suspension up by using one arm across the seat while checking the bolt head to see if it frees up ... and bingo out she come's no worries ... no idea why jacking was lifting the bike as a unit rather than moving the suspension but this method is much easier anyway.

anyway back to continue the shock removal...

Art :eek:
 
Art

Good to hear that you got on top of it all. The jack I found makes everything easy, but you do have to fiddle a bit to get holes to align. At no stage did the jack try to lift my whole bike, so I can't shed light on your finding.

Why are you removing the shock?
 
GrahamNZ said:
Art

Good to hear that you got on top of it all. The jack I found makes everything easy, but you do have to fiddle a bit to get holes to align. At no stage did the jack try to lift my whole bike, so I can't shed light on your finding.

Why are you removing the shock?

Graham

At some point i will get round to replacing it with better quality item and I don't like removing bolts from the first time in anger, especially when they might have been torqued by Luigi the Gorilla with a grease aversion. At the moment I'm just going through a dummy run, cleaning and lubricating. Thought it might be time to lubricate the linkages as well, though i now know they are moving fine

Art
 
Art

We're on the same wavelength there. I did a dummy run and greased all the linkages at the same time, which I had greased a while back without removing the shock.

Recommendations - replace the preload securing screw with a SS cap screw (M5 x 10mm) - go for the best of the Penske shocks offered by Todd if you intend keeping the bike for a fair while.
 
rturo said:
Graham

OK so I decided to investigate further what was happening when I was jacking the CARC?

Took the bike off the centrestand. Onto the sidestand and its obvious the linkage is moving just by loading the seat a little . Mmm. Tried looking for the expected sweet spot where the bolt is free to move and lo and behold i can find it without jacking the CARC, just by loading the suspension up by using one arm across the seat while checking the bolt head to see if it frees up ... and bingo out she come's no worries ... no idea why jacking was lifting the bike as a unit rather than moving the suspension but this method is much easier anyway.

anyway back to continue the shock removal...

Art :eek:


Not sure it would work on CARC bike (not sure why it wouldn't) when I pulled the rear shock out of my VFR last winter I used a ratching tie down thru the real wheel up over the passenger grab bars allowing me to find the sweet spot for the shock to drop out...

Dan
 
Sorry to raise this again, I am going to have to do this on mine having today ordered the Hyperpro shock. Has anyone else come up with good practice. I could pay £150 and take it to bike shop but having just spent £350 on the unit I best try it myself.

Thanks

Lee

Further - when I did take the bike in for just the spring to be changed they said all the mud guard needed to come off, however on the pictures (which are great) it doesn't apear they do.
 
Back
Top