• Ciao Guest - You’ve landed at the ultimate Guzzi site. NEW FORUM REGISTRATIONS REQUIRE EMAIL ACTIVATION - CHECK YOUR SPAM FOLDER - Use the CONTACT above if you need help. New to the forum? For all new members, we require ONE post in the Introductions section at the bottom, in order to post in most of the other sections. ALWAYS TRY A SEARCH BEFORE STARTING A NEW TOPIC - Most questions you may have, have likely been already answered. DON'T BE A DRIVE-BY POSTER: As a common courtesy, check back in and reply within 24 hours, or your post will be deleted. Note there's decades of heavily experienced Guzzi professionals on this site, all whom happily give endless amounts of their VALUABLE time for free; BE COURTEOUS AND RESPECTFUL!
  • There is ZERO tolerance on personal attacks and ANY HYPERLINKS to PRODUCT(S) or other competing website(s), including personal pages, social media or other Forums. This ALSO INCLUDES ECU DIAGnostic software, questions and mapping. We work very hard to offer commercially supported products and to keep info relevant here. First offense is a note, second is a warning, third time will get you banned from the site. We don't have the time to chase repeat (and ignorant) offenders. This is NOT a social media platform; It's an ad-free, privately funded website, in small help with user donations. Be sure to see the GTM STORE link above; ALL product purchases help support the site, or you can upgrade your Forum profile or DONATE via the link above.
  • Be sure to see the GTM STORE link also above for our 700+ product inventory, including OEM parts and many of our 100% Made-in-SoCal-USA GTM products and engine kits. In SoCal? Click the SERVICE tab above for the best in service, tires, tuning and installation of our products or custom work, and don't miss our GT MotoCycles® (not) art on the BUILDS tab above. WE'RE HERE ONLINE ONLY - NO PHONE CALLS MADE OR RECEIVED - DO NOT EMAIL AND ASK QUESTIONS OR ASK TO CALL YOU.
  • Like the new V100, GuzziTech is full throttle into the future! We're now running on an all-new server and we've updated our Forum software. The visual differences are obvious, but hopefully you'll notice the super-fast speed. If you notice any glitches or have any issues, please post on the Site Support section at the bottom. If you haven't yet, please upgrade your account which is covered in the Site Support section or via the DONATE tab above, which gives you full site access including the DOWNLOADS section. We really appreciate every $ and your support to keep this site ad-free. Create an account, sign in, upgrade your account, and enjoy. See you on the road in 2024.

Mystery bits inside my Griso's headlamp housing

MrMorrisSD

Tuned and Synch'ed
Joined
Oct 25, 2011
Messages
85
Location
San Diego, CA
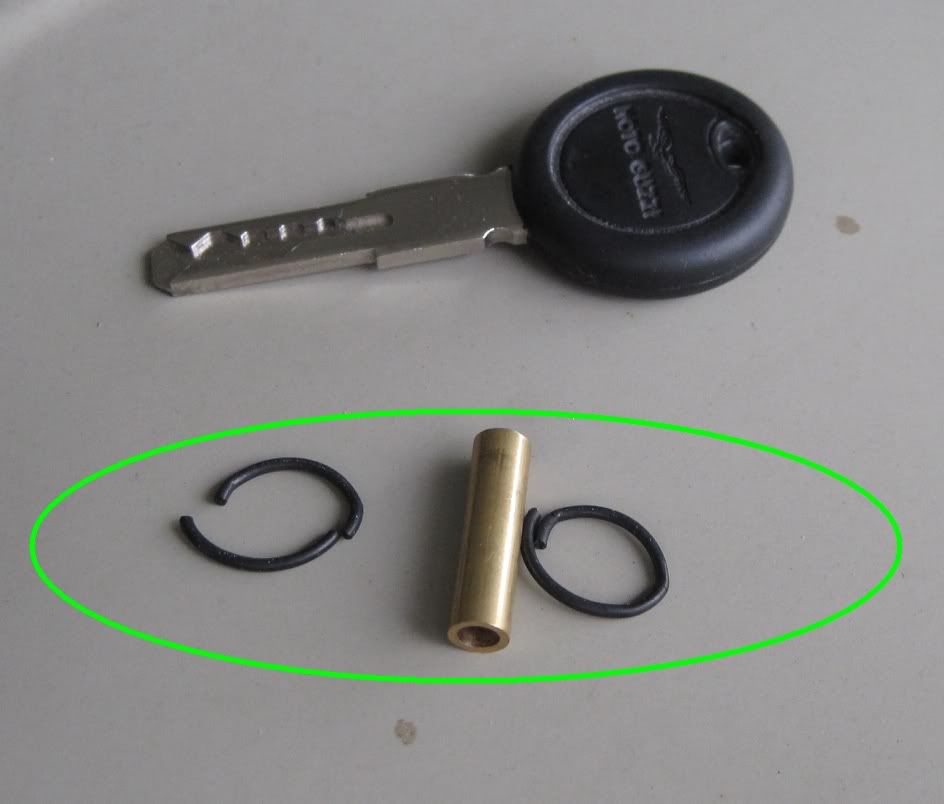
Hi folks. I was opening up my '07 Griso 1100's headlamp housing to replace the bulb. I removed the bottom screw to separate the bezel/bulb from the rear housing and the following little pieces fell out. (The key is obviously just there for scale.):

A small brass tube and a couple of deteriorated o-rings.

Any idea what these are supposed to do, if anything?

Headlight_random_parts.jpg
 
The tube is a spacer and fits with the O rings on the screw that holds the headlight rim to the shell. I think the theory is that they hold the screw on the rim when you undo it so you don't drop the screw on the floor/in the mud and lose it.. But it doesn't work....the screw has come off the rim and dropped into the bottom of the headlight shell every time I've undone the headlight on either of my Grisos. I was bloody glad to find the little tube inside the second time I opened up the headlight ....I hadn't noticed it had fallen off the first time and I'd been trying to trace the annoying rattle for about a year!
 
O ring's did the same on my Griso and V7C, I went down to my local Plumbing supply house ( In the US any ACE hardware store) and sourced some the same size and way better quality (Damn Bean counters).
 
Thanks. So I don't imagine there's any need to try and reuse the brass tube. I had no problem at all reinstalling the headlight and it fits tight now.

As for the o-rings, I think they may have fallen from the top of the housing. Does that sound right? When I pulled the bezel away, I saw a piece of an o-ring on one of the 'hooks' (for lack of a better term) near the 12-oclock position of the housing where the bezel hooks on. Did the o-rings go around those hooks to provide some cushioning between the bezel and the housing? That's the only explanation I can think of.
 
MrMorrisSD said:
Thanks. So I don't imagine there's any need to try and reuse the brass tube. I had no problem at all reinstalling the headlight and it fits tight now.

As for the o-rings, I think they may have fallen from the top of the housing. Does that sound right? When I pulled the bezel away, I saw a piece of an o-ring on one of the 'hooks' (for lack of a better term) near the 12-oclock position of the housing where the bezel hooks on. Did the o-rings go around those hooks to provide some cushioning between the bezel and the housing? That's the only explanation I can think of.

Yes from the 2 "hooks" the headlite cover hangs on. I would reconsider not installing the brass tube, with it you can snug down the screw with out fear of distorting the the screw hole in the cover by tightening it down to much and the possibility if it is not snug down enough of the screw vibrating loose. The tube is there for a reason and that is it.
 
Ah. Thanks Dan. That does make sense.

So just to make the procedure clear, I should do the following when reinstalling the lamp assy into the housing?

1. Put the two (new) o-rings over the hooks.
2. Insert installation screw through bezel.
3. Slip brass tube over installation screw.
4. Place lamp assy into position on housing.
5. Line up installation screw with its connector dealie in the housing and tighten until snug.
 
MrMorrisSD said:
Ah. Thanks Dan. That does make sense.

So just to make the procedure clear, I should do the following when reinstalling the lamp assy into the housing?

1. Put the two (new) o-rings over the hooks.
2. Insert installation screw through bezel.
3. Slip brass tube over installation screw.
4. Place lamp assy into position on housing.
5. Line up installation screw with its connector dealie in the housing and tighten until snug.


You got it !
 
Cool. BTW, what I was doing was swapping out my stock H4 bulb for an Osram Silverstar. A friend suggested it to me after making the same upgrade on his Harley. Very much improvement in light output with the new bulb, without having to up the wattage. (This Osram is 55/60w I believe.)
 
Back
Top